Within the on-premises world, dial plans have been around for quite some time, and not just within OCS/Lync/Skype for Business. For most organisations, the way users were dialled on traditional PABX systems was by their extension. It was possible to look up a user in a contacts list and then dial them, but ultimately the unique identifier that was being dialled was the user’s extension. In the Microsoft UC world, this is less of a requirement: we search for people we want to communicate with by name, and when we dial, it’s the SIP URI, not a number that we call. That said, there are a few reasons why it’s still desirable to configure a dial plan:
- Users will not immediately adapt to not dialling extensions.
- Organisations may be used to using customer short dials, for example dial “9” for reception.
- In a migration scenario, where some users are still on a traditional PABX system and some are on Skype for Business, the dial plan can be used to normalise numbers being presented in the contact card that’s displayed when looking up users. For example, the organisation may still display 4 digit extensions on a contact card, which we want the dial plan to normalise this before the call is routed:

Let’s introduce the migration of users to Skype for Business Online with Cloud PBX. In Australia today, there are currently two methods to enable users for Cloud PBX:
- Hybrid with Skype for Business Server 2015
- o Calls to/from users homed to Skype for Business Online route via an on-premises Skype for Business Server deployment to the PSTN network and/or traditional PABX system.
- Hybrid with Cloud Connector Edition (CCE)
- o Calls to/from users homed to Skype for Business Online route via on-premises CCE deployment to the PSTN network and/or traditional PABX.
If the environment supporting Cloud PBX users is Hybrid with an on-premises Skype for Business Server topology, on-premises dial plans can be assigned to Cloud PBX users. This ensures that, when users are moved from on-premises to online, their dialling behaviour remains unchanged.
If the Hybrid environment supporting Cloud PBX users is with an on-premises Cloud Connector Edition, on-premises dial plans cannot be assigned. Instead, users are assigned a Service Country level dial plan from the Skype for Business Online tenant, which cannot be configured or customised. This presented some challenges, including:
- Users that were moved from on-premises Skype for Business (Enterprise Voice), to Skype for Business Online (Cloud PBX) would experience a change in dialling behaviour, as their dial plan would not move with them.
- In the AU region at least, the dial plan is very basic. Only 4 normalisation rules were contained within the dial plan (see Online Dial Plans – Before Customisation below) Some issues with this included incorrect normalisation behaviour when dialling emergency numbers, as well as no method to support user dialling local 8 digit numbers, as the Server Country dial plan was exactly that: country wide. It wasn’t granular enough to support users in different states dialling local numbers. Both could be manipulated on the SBC before routing to the PSTN, however it was confusing for end users.
- If deploying CCE into a Hybrid environment where internal dialling between Cloud PBX users and traditional PABX users still needed to occur, not having a configurable dial plan could lead to problems and/or confusion for end users when dialling between systems.
The above points meant that, when deploying Cloud Connector Edition, there was pain being experienced by end users, especially when being migrated from an on-premises solution that supported custom dial plans…
Until now.
Microsoft Introduces Tenant Dial Plans
As of last week, we now have access to custom Tenant Dial Plans that can be configured on a per tenant or per user basis.
Why?
- A single country specific set of dialling rules was not enough.
- Dial patterns had to change when users migrated to SfB online – this greatly impacted the end user experience.
What?
- Simply put, custom dial behaviour for Skype for Business Online Cloud PBX users.
- Tenant Dial Plans can apply to Cloud PBX Online, Hybrid, CCE as well as dial out for Cloud PSTN Conferencing.
- No change in routing, dial plans normalise numbers prior to the call being routed.
- Limit 25 normalisation rules per dial plan.
Tenant Dial Plans – Before Customisation
Below is the full list of normalisation that were assigned to each Cloud PBX user within Australia automatically:

The two main issues with these rules:
- Dialling Emergency did not normalise correctly
- Dialling Local 8 digit numbers did not normalise correctly
Custom Tenant Dial Plans
How Are They Applied?
With the introduction of custom Tenant dial plans, there are now three types of dial plans that can be applied to users:
- Service Dial Plans – always existed, applied to all users, cannot be changed
- Tenant-Global – customise, applies to all users in tenant
- Tenant-User – applied only to specific users

Note that Tenant dial plans are applied to users a little differently than on-premises dial plans. For on-premises users, they would get a single dial plan, with the dial plan “closest” to them taking precedence. For example, in an environment with a site level and global level dial plan, the site level dial plan would be applied to users within that site, and the global dial plan would not be applied.
With Tenant Dial Plans in Skype for Business Online, the Service level dial plan is merged with either the Tenant – Global or the Tenant – User dial plan. Only additional normalisation rules on top of what’s automatically assigned to your users from the Service Country dial plan need be configured:

Planning for Tenant Dial Plans
Before you deploy your own custom Tenant Dial Plans, ask yourself the following questions:
- Are additional rules required?
Usually, the answer will always be yes. Even if all your users are in a single location, and they do not require extension level dialling, you at the very least want to ensure Emergency and Local 8 Digit dialling normalises correctly.
- Determine Dial Plan Type
Do I need to deploy Tenant Global or Tenant User dial plans? If all users are located in a single state, with the same extension level dialling requirements, Tenant Global would suffice. However, if your users are based in different states, use Tenant User dial plans to ensure specific groups of users get the correct result when dialling local 8 digit numbers.
- Build valid number patters for each plan
Some examples to follow below.
- Maintain consistency with naming conventions
Think about future requirements. It’s worth taking the effort to name dial plans with an expectation that other states or countries may be added in the future. For example, AU-VIC-MEL-QST or similar future proofs your dial plan configuration.
How To Tell What Rules I Need?
Depending on what environment your migrating from, there are a couple of ways to achieve this:
- Existing Lync/Skype for Business On-Premises deployment
You can manually review your existing dial plans and copy as required, or, there’s a script for this! Refer section Additional Useful Cmdlets – Import from CSV below
- Migration from traditional PABX system
Gather details from the existing PABX system to ascertain dial plan requirements. If you’re using the Skype Operations Framework, this is covered when carrying out the Envisioning Architecture Workshop (part of the Envisioning phase).
Future Capabilities
Some additional information on future capabilities that are on the roadmap:
- Today, can only be configured via PowerShell. A User Interface (UI) is planned for future release.
- No support for the External Access Prefix. If you try to configure today:

- Currently no support for certified IP phones – Microsoft is working on this with partners, expect to be supported in future device firmware release.
Tenant Dial Plan Walk-through
Without configuring custom Tenant Dial Plans, this is the result when dialling emergency numbers, local 8 digit numbers, and internal extensions from a Cloud PBX user located in region AU:


If we look at the client side trace (more in that below in the Troubleshooting section below), you can see what normalisation entries have been provisioned in-band when signing in as a Cloud PBX user, without custom Tenant Dial Plans being applied:

To resolve this, we will now create a Tenant User Dial Plan, and assign it to user Vincent Vega:
- From Skype for Business Online Remote PowerShell, create Tenant User Dial Plan:
$nr1 = New-CsVoiceNormalizationRule -Parent Global -Name AU-Emergency -Description "Emergency number normalisation for Australia" -Pattern '^(000|112|911)
- Assign this to user Vincent Vega:
Grant-CsTenantDialPlan -PolicyName AU-VIC-MEL-QST -Identity vincent.vega@insynctechnology.com.au
After signing out and back in from the Skype for Business client, the additional normalisation rules are now applied:


From the client side trace, you will now see additional dial plan entries as well as the existing Service Country Dial Plan entries. Also, note the difference in the name. It’s now a combination of a unique identifier, Tenant User and Service Country Dial Plans:

Additional Useful Cmdlets
Import from CSV
If you have an existing on-premises Lync/Skype for Business environment, you can import rules from existing dial plans into Tenant Dial Plans. To do this:
- Run the following from on-premises Lync/Skype for Business Management Shell:
$DPName = "OnPremDialPlan"

$DPFileName = "dialplan.xml"

Get-CsDialplan $DPName | Export-Clixml $DPFileName
- Run the following from Skype for Business Online Remote PowerShell:
$DPFileName = "dialplan.xml"
$DP = Import-Clixml $DPFileName
$NormRules = @()

ForEach($nr in $dp.NormalizationRules)

{
$id1 = "Global/" +$nr.Name
$nr2 = New-CsVoiceNormalizationRule -Identity $id1 -Description $nr.Description -Pattern $nr.Pattern -Translation $nr.Translation  -IsInternalExtension $nr.IsInternalExtension -InMemory
$NormRules += $nr2
}

New-CsTenantDialPlan -Identity $dp.SimpleName -ExternalAccessPrefix $dp.ExternalAccessPrefix -Description $dp.Description -OptimizeDeviceDialing $dp.OptimizeDeviceDialing -SimpleName $dp.SimpleName -NormalizationRules $NormRules
Get Service Level Dial Plan
The following cmdlet will list default dial plan entries that apply to a region. In this example, the region is AU:
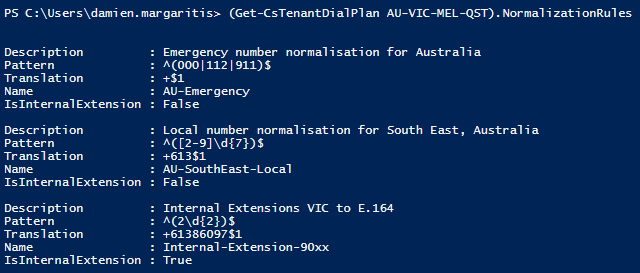
(Get-CsDialPlan AU).NormalizationRules | FT Name,Description,Pattern,Translation,IsInternalExtension

Update Global Tenant Dial Plan with Normalisation Rules
If you have no need for Tenant User level dial plans, you can configure your additional normalisation rules at the Tenant Global level:
$nr1 = New-CsVoiceNormalizationRule -Parent Global -Name AU-SouthEast-Emergency -Description "Emergency number normalisation for Australia" -Pattern '^(000|112|911)

Remove Tenant User Dial Plan from a User
The following will remove a user level dial plan that’s been assigned to an individual user:
Grant-CsTenantDialPlan -PolicyName $null -Identity Vincent.vega@insynctechnology.com.au
Remove a Tenant User Dial Plan (force will allow delete even if assigned to any users)
Whilst it’s recommended to gracefully remove a dial plan from all users it’s assigned to prior to deleting the dial plan, include -force if you want to remove anyway:
Remove-CsTenantDialPlan -Identity AU-VIC-MEL-QST -force
Remove Entries from Existing Dial Plan
The steps to remove are almost identical to creation, except use “remove” not “add when calling the list of normalisation entries:
$nr1 = New-CsVoiceNormalizationRule -Parent Global -Name AU-SouthEast-Emergency -Description "Emergency number normalisation for Australia" -Pattern '^(000|112|911)
List Normalisation Rules Within a Dial Plan
(Get-CsTenantDialPlan AU-VIC-MEL-QST).NormalizationRules

Identify Who Has a Specific Dial Plan
To output a list of all users configured with a specific dial plan:
Get-CsOnlineuser | where-Object {$_.TenantDialPlan -eq "AU-VIC-MEL-QST"} | FT FirstName, LastName

Troubleshooting
Identify Effective Dial Plan
If you want to check what normalisation rules are being assigned to a user, run the following cmdlet:
Get-CsEffectiveTenantDialPlan -Identity Vincent.vega@insynctechnology.com.au| Select-Object -ExpandProperty NormalizationRules

You can also use a variation of the above cmdlet to test an individual number normalisation:
Get-CsEffectiveTenantDialPlan -Identity Vincent.vega@insynctechnology.com.au | Test-CsEffectiveTenantDialPlan -DialedNumber 000

Snooper
If you want to check what rules are being applied client side:
- Get your hands on Snooper
- From the Skype for Business client, ensure logging is set to full

- After logging into the client, locate the client logs. For Office 2016, they are found in %userprofile%\AppData\Local\Microsoft\Office\16.0\Lync\Tracing

- Open the UCCAPILOG file using Snooper. Click on the Messages tab, and search for LocationProfileDescription
- Expand out the Message-Body on the right, you will see the normalisation rules that have been applied to the user:

If you want to know more about Cloud PBX, and what it could do for your business, be sure to get in touch!
-Translation '+000' -InMemory $nr2 = New-CsVoiceNormalizationRule -Parent Global -Name AU-SouthEast-Local -Description "Local number normalisation for South East, Australia" -Pattern '^([2-9]\d{7})
- Assign this to user Vincent Vega:
After signing out and back in from the Skype for Business client, the additional normalisation rules are now applied:
From the client side trace, you will now see additional dial plan entries as well as the existing Service Country Dial Plan entries. Also, note the difference in the name. It’s now a combination of a unique identifier, Tenant User and Service Country Dial Plans:
Additional Useful Cmdlets
Import from CSV
If you have an existing on-premises Lync/Skype for Business environment, you can import rules from existing dial plans into Tenant Dial Plans. To do this:
- Run the following from on-premises Lync/Skype for Business Management Shell:
- Run the following from Skype for Business Online Remote PowerShell:
Get Service Level Dial Plan
The following cmdlet will list default dial plan entries that apply to a region. In this example, the region is AU:
Update Global Tenant Dial Plan with Normalisation Rules
If you have no need for Tenant User level dial plans, you can configure your additional normalisation rules at the Tenant Global level:
Remove Tenant User Dial Plan from a User
The following will remove a user level dial plan that’s been assigned to an individual user:
Remove a Tenant User Dial Plan (force will allow delete even if assigned to any users)
Whilst it’s recommended to gracefully remove a dial plan from all users it’s assigned to prior to deleting the dial plan, include -force if you want to remove anyway:
Remove Entries from Existing Dial Plan
The steps to remove are almost identical to creation, except use “remove” not “add when calling the list of normalisation entries:
List Normalisation Rules Within a Dial Plan
Identify Who Has a Specific Dial Plan
To output a list of all users configured with a specific dial plan:
Troubleshooting
Identify Effective Dial Plan
If you want to check what normalisation rules are being assigned to a user, run the following cmdlet:
You can also use a variation of the above cmdlet to test an individual number normalisation:
Snooper
If you want to check what rules are being applied client side:
- Get your hands on Snooper
- From the Skype for Business client, ensure logging is set to full
- After logging into the client, locate the client logs. For Office 2016, they are found in %userprofile%\AppData\Local\Microsoft\Office\16.0\Lync\Tracing
- Open the UCCAPILOG file using Snooper. Click on the Messages tab, and search for LocationProfileDescription
- Expand out the Message-Body on the right, you will see the normalisation rules that have been applied to the user:
If you want to know more about Cloud PBX, and what it could do for your business, be sure to get in touch!
-Translation '+613$1' -InMemory $nr3 = New-CsVoiceNormalizationRule -Parent Global -Name Internal-Extensions-2xx -Description "Internal Extensions VIC to E.164" -Pattern '^(2\d{2})
- Assign this to user Vincent Vega:
After signing out and back in from the Skype for Business client, the additional normalisation rules are now applied:
From the client side trace, you will now see additional dial plan entries as well as the existing Service Country Dial Plan entries. Also, note the difference in the name. It’s now a combination of a unique identifier, Tenant User and Service Country Dial Plans:
Additional Useful Cmdlets
Import from CSV
If you have an existing on-premises Lync/Skype for Business environment, you can import rules from existing dial plans into Tenant Dial Plans. To do this:
- Run the following from on-premises Lync/Skype for Business Management Shell:
- Run the following from Skype for Business Online Remote PowerShell:
Get Service Level Dial Plan
The following cmdlet will list default dial plan entries that apply to a region. In this example, the region is AU:
Update Global Tenant Dial Plan with Normalisation Rules
If you have no need for Tenant User level dial plans, you can configure your additional normalisation rules at the Tenant Global level:
Remove Tenant User Dial Plan from a User
The following will remove a user level dial plan that’s been assigned to an individual user:
Remove a Tenant User Dial Plan (force will allow delete even if assigned to any users)
Whilst it’s recommended to gracefully remove a dial plan from all users it’s assigned to prior to deleting the dial plan, include -force if you want to remove anyway:
Remove Entries from Existing Dial Plan
The steps to remove are almost identical to creation, except use “remove” not “add when calling the list of normalisation entries:
List Normalisation Rules Within a Dial Plan
Identify Who Has a Specific Dial Plan
To output a list of all users configured with a specific dial plan:
Troubleshooting
Identify Effective Dial Plan
If you want to check what normalisation rules are being assigned to a user, run the following cmdlet:
You can also use a variation of the above cmdlet to test an individual number normalisation:
Snooper
If you want to check what rules are being applied client side:
- Get your hands on Snooper
- From the Skype for Business client, ensure logging is set to full
- After logging into the client, locate the client logs. For Office 2016, they are found in %userprofile%\AppData\Local\Microsoft\Office\16.0\Lync\Tracing
- Open the UCCAPILOG file using Snooper. Click on the Messages tab, and search for LocationProfileDescription
- Expand out the Message-Body on the right, you will see the normalisation rules that have been applied to the user:
If you want to know more about Cloud PBX, and what it could do for your business, be sure to get in touch!
-Translation '+61386097$1' -IsInternalExtension $true -InMemory New-CsTenantDialPlan -Identity AU-VIC-MEL-QST -NormalizationRules @{Add=$nr1,$nr2,$nr3} 
- Assign this to user Vincent Vega:
After signing out and back in from the Skype for Business client, the additional normalisation rules are now applied:
From the client side trace, you will now see additional dial plan entries as well as the existing Service Country Dial Plan entries. Also, note the difference in the name. It’s now a combination of a unique identifier, Tenant User and Service Country Dial Plans:
Additional Useful Cmdlets
Import from CSV
If you have an existing on-premises Lync/Skype for Business environment, you can import rules from existing dial plans into Tenant Dial Plans. To do this:
- Run the following from on-premises Lync/Skype for Business Management Shell:
- Run the following from Skype for Business Online Remote PowerShell:
Get Service Level Dial Plan
The following cmdlet will list default dial plan entries that apply to a region. In this example, the region is AU:
Update Global Tenant Dial Plan with Normalisation Rules
If you have no need for Tenant User level dial plans, you can configure your additional normalisation rules at the Tenant Global level:
Remove Tenant User Dial Plan from a User
The following will remove a user level dial plan that’s been assigned to an individual user:
Remove a Tenant User Dial Plan (force will allow delete even if assigned to any users)
Whilst it’s recommended to gracefully remove a dial plan from all users it’s assigned to prior to deleting the dial plan, include -force if you want to remove anyway:
Remove Entries from Existing Dial Plan
The steps to remove are almost identical to creation, except use “remove” not “add when calling the list of normalisation entries:
List Normalisation Rules Within a Dial Plan
Identify Who Has a Specific Dial Plan
To output a list of all users configured with a specific dial plan:
Troubleshooting
Identify Effective Dial Plan
If you want to check what normalisation rules are being assigned to a user, run the following cmdlet:
You can also use a variation of the above cmdlet to test an individual number normalisation:
Snooper
If you want to check what rules are being applied client side:
- Get your hands on Snooper
- From the Skype for Business client, ensure logging is set to full
- After logging into the client, locate the client logs. For Office 2016, they are found in %userprofile%\AppData\Local\Microsoft\Office\16.0\Lync\Tracing
- Open the UCCAPILOG file using Snooper. Click on the Messages tab, and search for LocationProfileDescription
- Expand out the Message-Body on the right, you will see the normalisation rules that have been applied to the user:
If you want to know more about Cloud PBX, and what it could do for your business, be sure to get in touch!
-Translation '+000' -InMemory $nr2 = New-CsVoiceNormalizationRule -Parent Global -Name AU-SouthEast-Local -Description "Local number normalisation for South East, Australia" -Pattern '^([2-9]\d{7})
- Assign this to user Vincent Vega:
After signing out and back in from the Skype for Business client, the additional normalisation rules are now applied:
From the client side trace, you will now see additional dial plan entries as well as the existing Service Country Dial Plan entries. Also, note the difference in the name. It’s now a combination of a unique identifier, Tenant User and Service Country Dial Plans:
Additional Useful Cmdlets
Import from CSV
If you have an existing on-premises Lync/Skype for Business environment, you can import rules from existing dial plans into Tenant Dial Plans. To do this:
- Run the following from on-premises Lync/Skype for Business Management Shell:
- Run the following from Skype for Business Online Remote PowerShell:
Get Service Level Dial Plan
The following cmdlet will list default dial plan entries that apply to a region. In this example, the region is AU:
Update Global Tenant Dial Plan with Normalisation Rules
If you have no need for Tenant User level dial plans, you can configure your additional normalisation rules at the Tenant Global level:
Remove Tenant User Dial Plan from a User
The following will remove a user level dial plan that’s been assigned to an individual user:
Remove a Tenant User Dial Plan (force will allow delete even if assigned to any users)
Whilst it’s recommended to gracefully remove a dial plan from all users it’s assigned to prior to deleting the dial plan, include -force if you want to remove anyway:
Remove Entries from Existing Dial Plan
The steps to remove are almost identical to creation, except use “remove” not “add when calling the list of normalisation entries:
List Normalisation Rules Within a Dial Plan
Identify Who Has a Specific Dial Plan
To output a list of all users configured with a specific dial plan:
Troubleshooting
Identify Effective Dial Plan
If you want to check what normalisation rules are being assigned to a user, run the following cmdlet:
You can also use a variation of the above cmdlet to test an individual number normalisation:
Snooper
If you want to check what rules are being applied client side:
- Get your hands on Snooper
- From the Skype for Business client, ensure logging is set to full
- After logging into the client, locate the client logs. For Office 2016, they are found in %userprofile%\AppData\Local\Microsoft\Office\16.0\Lync\Tracing
- Open the UCCAPILOG file using Snooper. Click on the Messages tab, and search for LocationProfileDescription
- Expand out the Message-Body on the right, you will see the normalisation rules that have been applied to the user:
If you want to know more about Cloud PBX, and what it could do for your business, be sure to get in touch!
-Translation '+613$1' -InMemory $nr3 = New-CsVoiceNormalizationRule -Parent Global -Name Internal-Extensions-2xx -Description "Internal Extensions VIC to E.164" -Pattern '^(2\d{2})
- Assign this to user Vincent Vega:
After signing out and back in from the Skype for Business client, the additional normalisation rules are now applied:
From the client side trace, you will now see additional dial plan entries as well as the existing Service Country Dial Plan entries. Also, note the difference in the name. It’s now a combination of a unique identifier, Tenant User and Service Country Dial Plans:
Additional Useful Cmdlets
Import from CSV
If you have an existing on-premises Lync/Skype for Business environment, you can import rules from existing dial plans into Tenant Dial Plans. To do this:
- Run the following from on-premises Lync/Skype for Business Management Shell:
- Run the following from Skype for Business Online Remote PowerShell:
Get Service Level Dial Plan
The following cmdlet will list default dial plan entries that apply to a region. In this example, the region is AU:
Update Global Tenant Dial Plan with Normalisation Rules
If you have no need for Tenant User level dial plans, you can configure your additional normalisation rules at the Tenant Global level:
Remove Tenant User Dial Plan from a User
The following will remove a user level dial plan that’s been assigned to an individual user:
Remove a Tenant User Dial Plan (force will allow delete even if assigned to any users)
Whilst it’s recommended to gracefully remove a dial plan from all users it’s assigned to prior to deleting the dial plan, include -force if you want to remove anyway:
Remove Entries from Existing Dial Plan
The steps to remove are almost identical to creation, except use “remove” not “add when calling the list of normalisation entries:
List Normalisation Rules Within a Dial Plan
Identify Who Has a Specific Dial Plan
To output a list of all users configured with a specific dial plan:
Troubleshooting
Identify Effective Dial Plan
If you want to check what normalisation rules are being assigned to a user, run the following cmdlet:
You can also use a variation of the above cmdlet to test an individual number normalisation:
Snooper
If you want to check what rules are being applied client side:
- Get your hands on Snooper
- From the Skype for Business client, ensure logging is set to full
- After logging into the client, locate the client logs. For Office 2016, they are found in %userprofile%\AppData\Local\Microsoft\Office\16.0\Lync\Tracing
- Open the UCCAPILOG file using Snooper. Click on the Messages tab, and search for LocationProfileDescription
- Expand out the Message-Body on the right, you will see the normalisation rules that have been applied to the user:
If you want to know more about Cloud PBX, and what it could do for your business, be sure to get in touch!
-Translation '+61386097$1' -IsInternalExtension $true -InMemory New-CsTenantDialPlan -Identity AU-VIC-MEL-QST -NormalizationRules @{Add=$nr1,$nr2,$nr3}
- Assign this to user Vincent Vega:
After signing out and back in from the Skype for Business client, the additional normalisation rules are now applied:
From the client side trace, you will now see additional dial plan entries as well as the existing Service Country Dial Plan entries. Also, note the difference in the name. It’s now a combination of a unique identifier, Tenant User and Service Country Dial Plans:
Additional Useful Cmdlets
Import from CSV
If you have an existing on-premises Lync/Skype for Business environment, you can import rules from existing dial plans into Tenant Dial Plans. To do this:
- Run the following from on-premises Lync/Skype for Business Management Shell:
- Run the following from Skype for Business Online Remote PowerShell:
Get Service Level Dial Plan
The following cmdlet will list default dial plan entries that apply to a region. In this example, the region is AU:
Update Global Tenant Dial Plan with Normalisation Rules
If you have no need for Tenant User level dial plans, you can configure your additional normalisation rules at the Tenant Global level:
Remove Tenant User Dial Plan from a User
The following will remove a user level dial plan that’s been assigned to an individual user:
Remove a Tenant User Dial Plan (force will allow delete even if assigned to any users)
Whilst it’s recommended to gracefully remove a dial plan from all users it’s assigned to prior to deleting the dial plan, include -force if you want to remove anyway:
Remove Entries from Existing Dial Plan
The steps to remove are almost identical to creation, except use “remove” not “add when calling the list of normalisation entries:
List Normalisation Rules Within a Dial Plan
Identify Who Has a Specific Dial Plan
To output a list of all users configured with a specific dial plan:
Troubleshooting
Identify Effective Dial Plan
If you want to check what normalisation rules are being assigned to a user, run the following cmdlet:
You can also use a variation of the above cmdlet to test an individual number normalisation:
Snooper
If you want to check what rules are being applied client side:
- Get your hands on Snooper
- From the Skype for Business client, ensure logging is set to full
- After logging into the client, locate the client logs. For Office 2016, they are found in %userprofile%\AppData\Local\Microsoft\Office\16.0\Lync\Tracing
- Open the UCCAPILOG file using Snooper. Click on the Messages tab, and search for LocationProfileDescription
- Expand out the Message-Body on the right, you will see the normalisation rules that have been applied to the user:
If you want to know more about Cloud PBX, and what it could do for your business, be sure to get in touch!
-Translation '+613$1' -InMemory Set-CsTenantDialPlan -Identity Global -NormalizationRules @{Add=$nr1,$nr2}
Remove Tenant User Dial Plan from a User
The following will remove a user level dial plan that’s been assigned to an individual user:
Remove a Tenant User Dial Plan (force will allow delete even if assigned to any users)
Whilst it’s recommended to gracefully remove a dial plan from all users it’s assigned to prior to deleting the dial plan, include -force if you want to remove anyway:
Remove Entries from Existing Dial Plan
The steps to remove are almost identical to creation, except use “remove” not “add when calling the list of normalisation entries:
List Normalisation Rules Within a Dial Plan
Identify Who Has a Specific Dial Plan
To output a list of all users configured with a specific dial plan:
Troubleshooting
Identify Effective Dial Plan
If you want to check what normalisation rules are being assigned to a user, run the following cmdlet:
You can also use a variation of the above cmdlet to test an individual number normalisation:
Snooper
If you want to check what rules are being applied client side:
- Get your hands on Snooper
- From the Skype for Business client, ensure logging is set to full
- After logging into the client, locate the client logs. For Office 2016, they are found in %userprofile%\AppData\Local\Microsoft\Office\16.0\Lync\Tracing
- Open the UCCAPILOG file using Snooper. Click on the Messages tab, and search for LocationProfileDescription
- Expand out the Message-Body on the right, you will see the normalisation rules that have been applied to the user:
If you want to know more about Cloud PBX, and what it could do for your business, be sure to get in touch!
-Translation ‘+000’ -InMemory $nr2 = New-CsVoiceNormalizationRule -Parent Global -Name AU-SouthEast-Local -Description “Local number normalisation for South East, Australia” -Pattern ‘^([2-9]\d{7})
- Assign this to user Vincent Vega:
After signing out and back in from the Skype for Business client, the additional normalisation rules are now applied:
From the client side trace, you will now see additional dial plan entries as well as the existing Service Country Dial Plan entries. Also, note the difference in the name. It’s now a combination of a unique identifier, Tenant User and Service Country Dial Plans:
Additional Useful Cmdlets
Import from CSV
If you have an existing on-premises Lync/Skype for Business environment, you can import rules from existing dial plans into Tenant Dial Plans. To do this:
- Run the following from on-premises Lync/Skype for Business Management Shell:
- Run the following from Skype for Business Online Remote PowerShell:
Get Service Level Dial Plan
The following cmdlet will list default dial plan entries that apply to a region. In this example, the region is AU:
Update Global Tenant Dial Plan with Normalisation Rules
If you have no need for Tenant User level dial plans, you can configure your additional normalisation rules at the Tenant Global level:
Remove Tenant User Dial Plan from a User
The following will remove a user level dial plan that’s been assigned to an individual user:
Remove a Tenant User Dial Plan (force will allow delete even if assigned to any users)
Whilst it’s recommended to gracefully remove a dial plan from all users it’s assigned to prior to deleting the dial plan, include -force if you want to remove anyway:
Remove Entries from Existing Dial Plan
The steps to remove are almost identical to creation, except use “remove” not “add when calling the list of normalisation entries:
List Normalisation Rules Within a Dial Plan
Identify Who Has a Specific Dial Plan
To output a list of all users configured with a specific dial plan:
Troubleshooting
Identify Effective Dial Plan
If you want to check what normalisation rules are being assigned to a user, run the following cmdlet:
You can also use a variation of the above cmdlet to test an individual number normalisation:
Snooper
If you want to check what rules are being applied client side:
- Get your hands on Snooper
- From the Skype for Business client, ensure logging is set to full
- After logging into the client, locate the client logs. For Office 2016, they are found in %userprofile%\AppData\Local\Microsoft\Office\16.0\Lync\Tracing
- Open the UCCAPILOG file using Snooper. Click on the Messages tab, and search for LocationProfileDescription
- Expand out the Message-Body on the right, you will see the normalisation rules that have been applied to the user:
If you want to know more about Cloud PBX, and what it could do for your business, be sure to get in touch!
-Translation ‘+613$1’ -InMemory $nr3 = New-CsVoiceNormalizationRule -Parent Global -Name Internal-Extensions-2xx -Description “Internal Extensions VIC to E.164” -Pattern ‘^(2\d{2})
- Assign this to user Vincent Vega:
After signing out and back in from the Skype for Business client, the additional normalisation rules are now applied:
From the client side trace, you will now see additional dial plan entries as well as the existing Service Country Dial Plan entries. Also, note the difference in the name. It’s now a combination of a unique identifier, Tenant User and Service Country Dial Plans:
Additional Useful Cmdlets
Import from CSV
If you have an existing on-premises Lync/Skype for Business environment, you can import rules from existing dial plans into Tenant Dial Plans. To do this:
- Run the following from on-premises Lync/Skype for Business Management Shell:
- Run the following from Skype for Business Online Remote PowerShell:
Get Service Level Dial Plan
The following cmdlet will list default dial plan entries that apply to a region. In this example, the region is AU:
Update Global Tenant Dial Plan with Normalisation Rules
If you have no need for Tenant User level dial plans, you can configure your additional normalisation rules at the Tenant Global level:
Remove Tenant User Dial Plan from a User
The following will remove a user level dial plan that’s been assigned to an individual user:
Remove a Tenant User Dial Plan (force will allow delete even if assigned to any users)
Whilst it’s recommended to gracefully remove a dial plan from all users it’s assigned to prior to deleting the dial plan, include -force if you want to remove anyway:
Remove Entries from Existing Dial Plan
The steps to remove are almost identical to creation, except use “remove” not “add when calling the list of normalisation entries:
List Normalisation Rules Within a Dial Plan
Identify Who Has a Specific Dial Plan
To output a list of all users configured with a specific dial plan:
Troubleshooting
Identify Effective Dial Plan
If you want to check what normalisation rules are being assigned to a user, run the following cmdlet:
You can also use a variation of the above cmdlet to test an individual number normalisation:
Snooper
If you want to check what rules are being applied client side:
- Get your hands on Snooper
- From the Skype for Business client, ensure logging is set to full
- After logging into the client, locate the client logs. For Office 2016, they are found in %userprofile%\AppData\Local\Microsoft\Office\16.0\Lync\Tracing
- Open the UCCAPILOG file using Snooper. Click on the Messages tab, and search for LocationProfileDescription
- Expand out the Message-Body on the right, you will see the normalisation rules that have been applied to the user:
If you want to know more about Cloud PBX, and what it could do for your business, be sure to get in touch!
-Translation ‘+61386097$1’ -IsInternalExtension $true -InMemory New-CsTenantDialPlan -Identity AU-VIC-MEL-QST -NormalizationRules @{Add=$nr1,$nr2,$nr3}
- Assign this to user Vincent Vega:
After signing out and back in from the Skype for Business client, the additional normalisation rules are now applied:
From the client side trace, you will now see additional dial plan entries as well as the existing Service Country Dial Plan entries. Also, note the difference in the name. It’s now a combination of a unique identifier, Tenant User and Service Country Dial Plans:
Additional Useful Cmdlets
Import from CSV
If you have an existing on-premises Lync/Skype for Business environment, you can import rules from existing dial plans into Tenant Dial Plans. To do this:
- Run the following from on-premises Lync/Skype for Business Management Shell:
- Run the following from Skype for Business Online Remote PowerShell:
Get Service Level Dial Plan
The following cmdlet will list default dial plan entries that apply to a region. In this example, the region is AU:
Update Global Tenant Dial Plan with Normalisation Rules
If you have no need for Tenant User level dial plans, you can configure your additional normalisation rules at the Tenant Global level:
Remove Tenant User Dial Plan from a User
The following will remove a user level dial plan that’s been assigned to an individual user:
Remove a Tenant User Dial Plan (force will allow delete even if assigned to any users)
Whilst it’s recommended to gracefully remove a dial plan from all users it’s assigned to prior to deleting the dial plan, include -force if you want to remove anyway:
Remove Entries from Existing Dial Plan
The steps to remove are almost identical to creation, except use “remove” not “add when calling the list of normalisation entries:
List Normalisation Rules Within a Dial Plan
Identify Who Has a Specific Dial Plan
To output a list of all users configured with a specific dial plan:
Troubleshooting
Identify Effective Dial Plan
If you want to check what normalisation rules are being assigned to a user, run the following cmdlet:
You can also use a variation of the above cmdlet to test an individual number normalisation:
Snooper
If you want to check what rules are being applied client side:
- Get your hands on Snooper
- From the Skype for Business client, ensure logging is set to full
- After logging into the client, locate the client logs. For Office 2016, they are found in %userprofile%\AppData\Local\Microsoft\Office\16.0\Lync\Tracing
- Open the UCCAPILOG file using Snooper. Click on the Messages tab, and search for LocationProfileDescription
- Expand out the Message-Body on the right, you will see the normalisation rules that have been applied to the user:
If you want to know more about Cloud PBX, and what it could do for your business, be sure to get in touch!
-Translation ‘+000’ -InMemory $nr2 = New-CsVoiceNormalizationRule -Parent Global -Name AU-SouthEast-Local -Description “Local number normalisation for South East, Australia” -Pattern ‘^([2-9]\d{7})
- Assign this to user Vincent Vega:
After signing out and back in from the Skype for Business client, the additional normalisation rules are now applied:
From the client side trace, you will now see additional dial plan entries as well as the existing Service Country Dial Plan entries. Also, note the difference in the name. It’s now a combination of a unique identifier, Tenant User and Service Country Dial Plans:
Additional Useful Cmdlets
Import from CSV
If you have an existing on-premises Lync/Skype for Business environment, you can import rules from existing dial plans into Tenant Dial Plans. To do this:
- Run the following from on-premises Lync/Skype for Business Management Shell:
- Run the following from Skype for Business Online Remote PowerShell:
Get Service Level Dial Plan
The following cmdlet will list default dial plan entries that apply to a region. In this example, the region is AU:
Update Global Tenant Dial Plan with Normalisation Rules
If you have no need for Tenant User level dial plans, you can configure your additional normalisation rules at the Tenant Global level:
Remove Tenant User Dial Plan from a User
The following will remove a user level dial plan that’s been assigned to an individual user:
Remove a Tenant User Dial Plan (force will allow delete even if assigned to any users)
Whilst it’s recommended to gracefully remove a dial plan from all users it’s assigned to prior to deleting the dial plan, include -force if you want to remove anyway:
Remove Entries from Existing Dial Plan
The steps to remove are almost identical to creation, except use “remove” not “add when calling the list of normalisation entries:
List Normalisation Rules Within a Dial Plan
Identify Who Has a Specific Dial Plan
To output a list of all users configured with a specific dial plan:
Troubleshooting
Identify Effective Dial Plan
If you want to check what normalisation rules are being assigned to a user, run the following cmdlet:
You can also use a variation of the above cmdlet to test an individual number normalisation:
Snooper
If you want to check what rules are being applied client side:
- Get your hands on Snooper
- From the Skype for Business client, ensure logging is set to full
- After logging into the client, locate the client logs. For Office 2016, they are found in %userprofile%\AppData\Local\Microsoft\Office\16.0\Lync\Tracing
- Open the UCCAPILOG file using Snooper. Click on the Messages tab, and search for LocationProfileDescription
- Expand out the Message-Body on the right, you will see the normalisation rules that have been applied to the user:
If you want to know more about Cloud PBX, and what it could do for your business, be sure to get in touch!
-Translation ‘+613$1’ -InMemory $nr3 = New-CsVoiceNormalizationRule -Parent Global -Name Internal-Extensions-2xx -Description “Internal Extensions VIC to E.164” -Pattern ‘^(2\d{2})
- Assign this to user Vincent Vega:
After signing out and back in from the Skype for Business client, the additional normalisation rules are now applied:
From the client side trace, you will now see additional dial plan entries as well as the existing Service Country Dial Plan entries. Also, note the difference in the name. It’s now a combination of a unique identifier, Tenant User and Service Country Dial Plans:
Additional Useful Cmdlets
Import from CSV
If you have an existing on-premises Lync/Skype for Business environment, you can import rules from existing dial plans into Tenant Dial Plans. To do this:
- Run the following from on-premises Lync/Skype for Business Management Shell:
- Run the following from Skype for Business Online Remote PowerShell:
Get Service Level Dial Plan
The following cmdlet will list default dial plan entries that apply to a region. In this example, the region is AU:
Update Global Tenant Dial Plan with Normalisation Rules
If you have no need for Tenant User level dial plans, you can configure your additional normalisation rules at the Tenant Global level:
Remove Tenant User Dial Plan from a User
The following will remove a user level dial plan that’s been assigned to an individual user:
Remove a Tenant User Dial Plan (force will allow delete even if assigned to any users)
Whilst it’s recommended to gracefully remove a dial plan from all users it’s assigned to prior to deleting the dial plan, include -force if you want to remove anyway:
Remove Entries from Existing Dial Plan
The steps to remove are almost identical to creation, except use “remove” not “add when calling the list of normalisation entries:
List Normalisation Rules Within a Dial Plan
Identify Who Has a Specific Dial Plan
To output a list of all users configured with a specific dial plan:
Troubleshooting
Identify Effective Dial Plan
If you want to check what normalisation rules are being assigned to a user, run the following cmdlet:
You can also use a variation of the above cmdlet to test an individual number normalisation:
Snooper
If you want to check what rules are being applied client side:
- Get your hands on Snooper
- From the Skype for Business client, ensure logging is set to full
- After logging into the client, locate the client logs. For Office 2016, they are found in %userprofile%\AppData\Local\Microsoft\Office\16.0\Lync\Tracing
- Open the UCCAPILOG file using Snooper. Click on the Messages tab, and search for LocationProfileDescription
- Expand out the Message-Body on the right, you will see the normalisation rules that have been applied to the user:
If you want to know more about Cloud PBX, and what it could do for your business, be sure to get in touch!
-Translation ‘+61386097$1’ -IsInternalExtension $true -InMemory New-CsTenantDialPlan -Identity AU-VIC-MEL-QST -NormalizationRules @{Add=$nr1,$nr2,$nr3}
- Assign this to user Vincent Vega:
After signing out and back in from the Skype for Business client, the additional normalisation rules are now applied:
From the client side trace, you will now see additional dial plan entries as well as the existing Service Country Dial Plan entries. Also, note the difference in the name. It’s now a combination of a unique identifier, Tenant User and Service Country Dial Plans:
Additional Useful Cmdlets
Import from CSV
If you have an existing on-premises Lync/Skype for Business environment, you can import rules from existing dial plans into Tenant Dial Plans. To do this:
- Run the following from on-premises Lync/Skype for Business Management Shell:
- Run the following from Skype for Business Online Remote PowerShell:
Get Service Level Dial Plan
The following cmdlet will list default dial plan entries that apply to a region. In this example, the region is AU:
Update Global Tenant Dial Plan with Normalisation Rules
If you have no need for Tenant User level dial plans, you can configure your additional normalisation rules at the Tenant Global level:
Remove Tenant User Dial Plan from a User
The following will remove a user level dial plan that’s been assigned to an individual user:
Remove a Tenant User Dial Plan (force will allow delete even if assigned to any users)
Whilst it’s recommended to gracefully remove a dial plan from all users it’s assigned to prior to deleting the dial plan, include -force if you want to remove anyway:
Remove Entries from Existing Dial Plan
The steps to remove are almost identical to creation, except use “remove” not “add when calling the list of normalisation entries:
List Normalisation Rules Within a Dial Plan
Identify Who Has a Specific Dial Plan
To output a list of all users configured with a specific dial plan:
Troubleshooting
Identify Effective Dial Plan
If you want to check what normalisation rules are being assigned to a user, run the following cmdlet:
You can also use a variation of the above cmdlet to test an individual number normalisation:
Snooper
If you want to check what rules are being applied client side:
- Get your hands on Snooper
- From the Skype for Business client, ensure logging is set to full
- After logging into the client, locate the client logs. For Office 2016, they are found in %userprofile%\AppData\Local\Microsoft\Office\16.0\Lync\Tracing
- Open the UCCAPILOG file using Snooper. Click on the Messages tab, and search for LocationProfileDescription
- Expand out the Message-Body on the right, you will see the normalisation rules that have been applied to the user:
If you want to know more about Cloud PBX, and what it could do for your business, be sure to get in touch!
-Translation ‘+000’ -InMemory $nr2 = New-CsVoiceNormalizationRule -Parent Global -Name AU-SouthEast-Local -Description “Local number normalisation for South East, Australia” -Pattern ‘^([2-9]\d{7})
- Assign this to user Vincent Vega:
After signing out and back in from the Skype for Business client, the additional normalisation rules are now applied:
From the client side trace, you will now see additional dial plan entries as well as the existing Service Country Dial Plan entries. Also, note the difference in the name. It’s now a combination of a unique identifier, Tenant User and Service Country Dial Plans:
Additional Useful Cmdlets
Import from CSV
If you have an existing on-premises Lync/Skype for Business environment, you can import rules from existing dial plans into Tenant Dial Plans. To do this:
- Run the following from on-premises Lync/Skype for Business Management Shell:
- Run the following from Skype for Business Online Remote PowerShell:
Get Service Level Dial Plan
The following cmdlet will list default dial plan entries that apply to a region. In this example, the region is AU:
Update Global Tenant Dial Plan with Normalisation Rules
If you have no need for Tenant User level dial plans, you can configure your additional normalisation rules at the Tenant Global level:
Remove Tenant User Dial Plan from a User
The following will remove a user level dial plan that’s been assigned to an individual user:
Remove a Tenant User Dial Plan (force will allow delete even if assigned to any users)
Whilst it’s recommended to gracefully remove a dial plan from all users it’s assigned to prior to deleting the dial plan, include -force if you want to remove anyway:
Remove Entries from Existing Dial Plan
The steps to remove are almost identical to creation, except use “remove” not “add when calling the list of normalisation entries:
List Normalisation Rules Within a Dial Plan
Identify Who Has a Specific Dial Plan
To output a list of all users configured with a specific dial plan:
Troubleshooting
Identify Effective Dial Plan
If you want to check what normalisation rules are being assigned to a user, run the following cmdlet:
You can also use a variation of the above cmdlet to test an individual number normalisation:
Snooper
If you want to check what rules are being applied client side:
- Get your hands on Snooper
- From the Skype for Business client, ensure logging is set to full
- After logging into the client, locate the client logs. For Office 2016, they are found in %userprofile%\AppData\Local\Microsoft\Office\16.0\Lync\Tracing
- Open the UCCAPILOG file using Snooper. Click on the Messages tab, and search for LocationProfileDescription
- Expand out the Message-Body on the right, you will see the normalisation rules that have been applied to the user:
If you want to know more about Cloud PBX, and what it could do for your business, be sure to get in touch!
-Translation ‘+613$1’ -InMemory $nr3 = New-CsVoiceNormalizationRule -Parent Global -Name Internal-Extensions-2xx -Description “Internal Extensions VIC to E.164” -Pattern ‘^(2\d{2})
- Assign this to user Vincent Vega:
After signing out and back in from the Skype for Business client, the additional normalisation rules are now applied:
From the client side trace, you will now see additional dial plan entries as well as the existing Service Country Dial Plan entries. Also, note the difference in the name. It’s now a combination of a unique identifier, Tenant User and Service Country Dial Plans:
Additional Useful Cmdlets
Import from CSV
If you have an existing on-premises Lync/Skype for Business environment, you can import rules from existing dial plans into Tenant Dial Plans. To do this:
- Run the following from on-premises Lync/Skype for Business Management Shell:
- Run the following from Skype for Business Online Remote PowerShell:
Get Service Level Dial Plan
The following cmdlet will list default dial plan entries that apply to a region. In this example, the region is AU:
Update Global Tenant Dial Plan with Normalisation Rules
If you have no need for Tenant User level dial plans, you can configure your additional normalisation rules at the Tenant Global level:
Remove Tenant User Dial Plan from a User
The following will remove a user level dial plan that’s been assigned to an individual user:
Remove a Tenant User Dial Plan (force will allow delete even if assigned to any users)
Whilst it’s recommended to gracefully remove a dial plan from all users it’s assigned to prior to deleting the dial plan, include -force if you want to remove anyway:
Remove Entries from Existing Dial Plan
The steps to remove are almost identical to creation, except use “remove” not “add when calling the list of normalisation entries:
List Normalisation Rules Within a Dial Plan
Identify Who Has a Specific Dial Plan
To output a list of all users configured with a specific dial plan:
Troubleshooting
Identify Effective Dial Plan
If you want to check what normalisation rules are being assigned to a user, run the following cmdlet:
You can also use a variation of the above cmdlet to test an individual number normalisation:
Snooper
If you want to check what rules are being applied client side:
- Get your hands on Snooper
- From the Skype for Business client, ensure logging is set to full
- After logging into the client, locate the client logs. For Office 2016, they are found in %userprofile%\AppData\Local\Microsoft\Office\16.0\Lync\Tracing
- Open the UCCAPILOG file using Snooper. Click on the Messages tab, and search for LocationProfileDescription
- Expand out the Message-Body on the right, you will see the normalisation rules that have been applied to the user:
If you want to know more about Cloud PBX, and what it could do for your business, be sure to get in touch!
-Translation ‘+61386097$1’ -IsInternalExtension $true -InMemory New-CsTenantDialPlan -Identity AU-VIC-MEL-QST -NormalizationRules @{Add=$nr1,$nr2,$nr3}
- Assign this to user Vincent Vega:
After signing out and back in from the Skype for Business client, the additional normalisation rules are now applied:
From the client side trace, you will now see additional dial plan entries as well as the existing Service Country Dial Plan entries. Also, note the difference in the name. It’s now a combination of a unique identifier, Tenant User and Service Country Dial Plans:
Additional Useful Cmdlets
Import from CSV
If you have an existing on-premises Lync/Skype for Business environment, you can import rules from existing dial plans into Tenant Dial Plans. To do this:
- Run the following from on-premises Lync/Skype for Business Management Shell:
- Run the following from Skype for Business Online Remote PowerShell:
Get Service Level Dial Plan
The following cmdlet will list default dial plan entries that apply to a region. In this example, the region is AU:
Update Global Tenant Dial Plan with Normalisation Rules
If you have no need for Tenant User level dial plans, you can configure your additional normalisation rules at the Tenant Global level:
Remove Tenant User Dial Plan from a User
The following will remove a user level dial plan that’s been assigned to an individual user:
Remove a Tenant User Dial Plan (force will allow delete even if assigned to any users)
Whilst it’s recommended to gracefully remove a dial plan from all users it’s assigned to prior to deleting the dial plan, include -force if you want to remove anyway:
Remove Entries from Existing Dial Plan
The steps to remove are almost identical to creation, except use “remove” not “add when calling the list of normalisation entries:
List Normalisation Rules Within a Dial Plan
Identify Who Has a Specific Dial Plan
To output a list of all users configured with a specific dial plan:
Troubleshooting
Identify Effective Dial Plan
If you want to check what normalisation rules are being assigned to a user, run the following cmdlet:
You can also use a variation of the above cmdlet to test an individual number normalisation:
Snooper
If you want to check what rules are being applied client side:
- Get your hands on Snooper
- From the Skype for Business client, ensure logging is set to full
- After logging into the client, locate the client logs. For Office 2016, they are found in %userprofile%\AppData\Local\Microsoft\Office\16.0\Lync\Tracing
- Open the UCCAPILOG file using Snooper. Click on the Messages tab, and search for LocationProfileDescription
- Expand out the Message-Body on the right, you will see the normalisation rules that have been applied to the user:
If you want to know more about Cloud PBX, and what it could do for your business, be sure to get in touch!
-Translation ‘+613$1’ -InMemory Set-CsTenantDialPlan -Identity Global -NormalizationRules @{Add=$nr1,$nr2}
Remove Tenant User Dial Plan from a User
The following will remove a user level dial plan that’s been assigned to an individual user:
Remove a Tenant User Dial Plan (force will allow delete even if assigned to any users)
Whilst it’s recommended to gracefully remove a dial plan from all users it’s assigned to prior to deleting the dial plan, include -force if you want to remove anyway:
Remove Entries from Existing Dial Plan
The steps to remove are almost identical to creation, except use “remove” not “add when calling the list of normalisation entries:
List Normalisation Rules Within a Dial Plan
Identify Who Has a Specific Dial Plan
To output a list of all users configured with a specific dial plan:
Troubleshooting
Identify Effective Dial Plan
If you want to check what normalisation rules are being assigned to a user, run the following cmdlet:
You can also use a variation of the above cmdlet to test an individual number normalisation:
Snooper
If you want to check what rules are being applied client side:
- Get your hands on Snooper
- From the Skype for Business client, ensure logging is set to full
- After logging into the client, locate the client logs. For Office 2016, they are found in %userprofile%\AppData\Local\Microsoft\Office\16.0\Lync\Tracing
- Open the UCCAPILOG file using Snooper. Click on the Messages tab, and search for LocationProfileDescription
- Expand out the Message-Body on the right, you will see the normalisation rules that have been applied to the user:
If you want to know more about Cloud PBX, and what it could do for your business, be sure to get in touch!
-Translation ‘+000’ -InMemory $nr2 = New-CsVoiceNormalizationRule -Parent Global -Name AU-SouthEast-Local -Description “Local number normalisation for South East, Australia” -Pattern ‘^([2-9]\d{7})
- Assign this to user Vincent Vega:
After signing out and back in from the Skype for Business client, the additional normalisation rules are now applied:
From the client side trace, you will now see additional dial plan entries as well as the existing Service Country Dial Plan entries. Also, note the difference in the name. It’s now a combination of a unique identifier, Tenant User and Service Country Dial Plans:
Additional Useful Cmdlets
Import from CSV
If you have an existing on-premises Lync/Skype for Business environment, you can import rules from existing dial plans into Tenant Dial Plans. To do this:
- Run the following from on-premises Lync/Skype for Business Management Shell:
- Run the following from Skype for Business Online Remote PowerShell:
Get Service Level Dial Plan
The following cmdlet will list default dial plan entries that apply to a region. In this example, the region is AU:
Update Global Tenant Dial Plan with Normalisation Rules
If you have no need for Tenant User level dial plans, you can configure your additional normalisation rules at the Tenant Global level:
Remove Tenant User Dial Plan from a User
The following will remove a user level dial plan that’s been assigned to an individual user:
Remove a Tenant User Dial Plan (force will allow delete even if assigned to any users)
Whilst it’s recommended to gracefully remove a dial plan from all users it’s assigned to prior to deleting the dial plan, include -force if you want to remove anyway:
Remove Entries from Existing Dial Plan
The steps to remove are almost identical to creation, except use “remove” not “add when calling the list of normalisation entries:
List Normalisation Rules Within a Dial Plan
Identify Who Has a Specific Dial Plan
To output a list of all users configured with a specific dial plan:
Troubleshooting
Identify Effective Dial Plan
If you want to check what normalisation rules are being assigned to a user, run the following cmdlet:
You can also use a variation of the above cmdlet to test an individual number normalisation:
Snooper
If you want to check what rules are being applied client side:
- Get your hands on Snooper
- From the Skype for Business client, ensure logging is set to full
- After logging into the client, locate the client logs. For Office 2016, they are found in %userprofile%\AppData\Local\Microsoft\Office\16.0\Lync\Tracing
- Open the UCCAPILOG file using Snooper. Click on the Messages tab, and search for LocationProfileDescription
- Expand out the Message-Body on the right, you will see the normalisation rules that have been applied to the user:
If you want to know more about Cloud PBX, and what it could do for your business, be sure to get in touch!
-Translation ‘+613$1’ -InMemory $nr3 = New-CsVoiceNormalizationRule -Parent Global -Name Internal-Extensions-2xx -Description “Internal Extensions VIC to E.164” -Pattern ‘^(2\d{2})
- Assign this to user Vincent Vega:
After signing out and back in from the Skype for Business client, the additional normalisation rules are now applied:
From the client side trace, you will now see additional dial plan entries as well as the existing Service Country Dial Plan entries. Also, note the difference in the name. It’s now a combination of a unique identifier, Tenant User and Service Country Dial Plans:
Additional Useful Cmdlets
Import from CSV
If you have an existing on-premises Lync/Skype for Business environment, you can import rules from existing dial plans into Tenant Dial Plans. To do this:
- Run the following from on-premises Lync/Skype for Business Management Shell:
- Run the following from Skype for Business Online Remote PowerShell:
Get Service Level Dial Plan
The following cmdlet will list default dial plan entries that apply to a region. In this example, the region is AU:
Update Global Tenant Dial Plan with Normalisation Rules
If you have no need for Tenant User level dial plans, you can configure your additional normalisation rules at the Tenant Global level:
Remove Tenant User Dial Plan from a User
The following will remove a user level dial plan that’s been assigned to an individual user:
Remove a Tenant User Dial Plan (force will allow delete even if assigned to any users)
Whilst it’s recommended to gracefully remove a dial plan from all users it’s assigned to prior to deleting the dial plan, include -force if you want to remove anyway:
Remove Entries from Existing Dial Plan
The steps to remove are almost identical to creation, except use “remove” not “add when calling the list of normalisation entries:
List Normalisation Rules Within a Dial Plan
Identify Who Has a Specific Dial Plan
To output a list of all users configured with a specific dial plan:
Troubleshooting
Identify Effective Dial Plan
If you want to check what normalisation rules are being assigned to a user, run the following cmdlet:
You can also use a variation of the above cmdlet to test an individual number normalisation:
Snooper
If you want to check what rules are being applied client side:
- Get your hands on Snooper
- From the Skype for Business client, ensure logging is set to full
- After logging into the client, locate the client logs. For Office 2016, they are found in %userprofile%\AppData\Local\Microsoft\Office\16.0\Lync\Tracing
- Open the UCCAPILOG file using Snooper. Click on the Messages tab, and search for LocationProfileDescription
- Expand out the Message-Body on the right, you will see the normalisation rules that have been applied to the user:
If you want to know more about Cloud PBX, and what it could do for your business, be sure to get in touch!
-Translation ‘+61386097$1’ -IsInternalExtension $true -InMemory New-CsTenantDialPlan -Identity AU-VIC-MEL-QST -NormalizationRules @{Add=$nr1,$nr2,$nr3}
- Assign this to user Vincent Vega:
After signing out and back in from the Skype for Business client, the additional normalisation rules are now applied:
From the client side trace, you will now see additional dial plan entries as well as the existing Service Country Dial Plan entries. Also, note the difference in the name. It’s now a combination of a unique identifier, Tenant User and Service Country Dial Plans:
Additional Useful Cmdlets
Import from CSV
If you have an existing on-premises Lync/Skype for Business environment, you can import rules from existing dial plans into Tenant Dial Plans. To do this:
- Run the following from on-premises Lync/Skype for Business Management Shell:
- Run the following from Skype for Business Online Remote PowerShell:
Get Service Level Dial Plan
The following cmdlet will list default dial plan entries that apply to a region. In this example, the region is AU:
Update Global Tenant Dial Plan with Normalisation Rules
If you have no need for Tenant User level dial plans, you can configure your additional normalisation rules at the Tenant Global level:
Remove Tenant User Dial Plan from a User
The following will remove a user level dial plan that’s been assigned to an individual user:
Remove a Tenant User Dial Plan (force will allow delete even if assigned to any users)
Whilst it’s recommended to gracefully remove a dial plan from all users it’s assigned to prior to deleting the dial plan, include -force if you want to remove anyway:
Remove Entries from Existing Dial Plan
The steps to remove are almost identical to creation, except use “remove” not “add when calling the list of normalisation entries:
List Normalisation Rules Within a Dial Plan
Identify Who Has a Specific Dial Plan
To output a list of all users configured with a specific dial plan:
Troubleshooting
Identify Effective Dial Plan
If you want to check what normalisation rules are being assigned to a user, run the following cmdlet:
You can also use a variation of the above cmdlet to test an individual number normalisation:
Snooper
If you want to check what rules are being applied client side:
- Get your hands on Snooper
- From the Skype for Business client, ensure logging is set to full
- After logging into the client, locate the client logs. For Office 2016, they are found in %userprofile%\AppData\Local\Microsoft\Office\16.0\Lync\Tracing
- Open the UCCAPILOG file using Snooper. Click on the Messages tab, and search for LocationProfileDescription
- Expand out the Message-Body on the right, you will see the normalisation rules that have been applied to the user:
If you want to know more about Cloud PBX, and what it could do for your business, be sure to get in touch!
-Translation ‘+613$1’ -InMemory Set-CsTenantDialPlan -Identity Global -NormalizationRules @{remove=$nr1,$nr2}
List Normalisation Rules Within a Dial Plan
Identify Who Has a Specific Dial Plan
To output a list of all users configured with a specific dial plan:
Troubleshooting
Identify Effective Dial Plan
If you want to check what normalisation rules are being assigned to a user, run the following cmdlet:
You can also use a variation of the above cmdlet to test an individual number normalisation:
Snooper
If you want to check what rules are being applied client side:
- Get your hands on Snooper
- From the Skype for Business client, ensure logging is set to full
- After logging into the client, locate the client logs. For Office 2016, they are found in %userprofile%\AppData\Local\Microsoft\Office\16.0\Lync\Tracing
- Open the UCCAPILOG file using Snooper. Click on the Messages tab, and search for LocationProfileDescription
- Expand out the Message-Body on the right, you will see the normalisation rules that have been applied to the user:
If you want to know more about Cloud PBX, and what it could do for your business, be sure to get in touch!
-Translation ‘+000’ -InMemory $nr2 = New-CsVoiceNormalizationRule -Parent Global -Name AU-SouthEast-Local -Description “Local number normalisation for South East, Australia” -Pattern ‘^([2-9]\d{7})
- Assign this to user Vincent Vega:
After signing out and back in from the Skype for Business client, the additional normalisation rules are now applied:
From the client side trace, you will now see additional dial plan entries as well as the existing Service Country Dial Plan entries. Also, note the difference in the name. It’s now a combination of a unique identifier, Tenant User and Service Country Dial Plans:
Additional Useful Cmdlets
Import from CSV
If you have an existing on-premises Lync/Skype for Business environment, you can import rules from existing dial plans into Tenant Dial Plans. To do this:
- Run the following from on-premises Lync/Skype for Business Management Shell:
- Run the following from Skype for Business Online Remote PowerShell:
Get Service Level Dial Plan
The following cmdlet will list default dial plan entries that apply to a region. In this example, the region is AU:
Update Global Tenant Dial Plan with Normalisation Rules
If you have no need for Tenant User level dial plans, you can configure your additional normalisation rules at the Tenant Global level:
Remove Tenant User Dial Plan from a User
The following will remove a user level dial plan that’s been assigned to an individual user:
Remove a Tenant User Dial Plan (force will allow delete even if assigned to any users)
Whilst it’s recommended to gracefully remove a dial plan from all users it’s assigned to prior to deleting the dial plan, include -force if you want to remove anyway:
Remove Entries from Existing Dial Plan
The steps to remove are almost identical to creation, except use “remove” not “add when calling the list of normalisation entries:
List Normalisation Rules Within a Dial Plan
Identify Who Has a Specific Dial Plan
To output a list of all users configured with a specific dial plan:
Troubleshooting
Identify Effective Dial Plan
If you want to check what normalisation rules are being assigned to a user, run the following cmdlet:
You can also use a variation of the above cmdlet to test an individual number normalisation:
Snooper
If you want to check what rules are being applied client side:
- Get your hands on Snooper
- From the Skype for Business client, ensure logging is set to full
- After logging into the client, locate the client logs. For Office 2016, they are found in %userprofile%\AppData\Local\Microsoft\Office\16.0\Lync\Tracing
- Open the UCCAPILOG file using Snooper. Click on the Messages tab, and search for LocationProfileDescription
- Expand out the Message-Body on the right, you will see the normalisation rules that have been applied to the user:
If you want to know more about Cloud PBX, and what it could do for your business, be sure to get in touch!
-Translation ‘+613$1’ -InMemory $nr3 = New-CsVoiceNormalizationRule -Parent Global -Name Internal-Extensions-2xx -Description “Internal Extensions VIC to E.164” -Pattern ‘^(2\d{2})
- Assign this to user Vincent Vega:
After signing out and back in from the Skype for Business client, the additional normalisation rules are now applied:
From the client side trace, you will now see additional dial plan entries as well as the existing Service Country Dial Plan entries. Also, note the difference in the name. It’s now a combination of a unique identifier, Tenant User and Service Country Dial Plans:
Additional Useful Cmdlets
Import from CSV
If you have an existing on-premises Lync/Skype for Business environment, you can import rules from existing dial plans into Tenant Dial Plans. To do this:
- Run the following from on-premises Lync/Skype for Business Management Shell:
- Run the following from Skype for Business Online Remote PowerShell:
Get Service Level Dial Plan
The following cmdlet will list default dial plan entries that apply to a region. In this example, the region is AU:
Update Global Tenant Dial Plan with Normalisation Rules
If you have no need for Tenant User level dial plans, you can configure your additional normalisation rules at the Tenant Global level:
Remove Tenant User Dial Plan from a User
The following will remove a user level dial plan that’s been assigned to an individual user:
Remove a Tenant User Dial Plan (force will allow delete even if assigned to any users)
Whilst it’s recommended to gracefully remove a dial plan from all users it’s assigned to prior to deleting the dial plan, include -force if you want to remove anyway:
Remove Entries from Existing Dial Plan
The steps to remove are almost identical to creation, except use “remove” not “add when calling the list of normalisation entries:
List Normalisation Rules Within a Dial Plan
Identify Who Has a Specific Dial Plan
To output a list of all users configured with a specific dial plan:
Troubleshooting
Identify Effective Dial Plan
If you want to check what normalisation rules are being assigned to a user, run the following cmdlet:
You can also use a variation of the above cmdlet to test an individual number normalisation:
Snooper
If you want to check what rules are being applied client side:
- Get your hands on Snooper
- From the Skype for Business client, ensure logging is set to full
- After logging into the client, locate the client logs. For Office 2016, they are found in %userprofile%\AppData\Local\Microsoft\Office\16.0\Lync\Tracing
- Open the UCCAPILOG file using Snooper. Click on the Messages tab, and search for LocationProfileDescription
- Expand out the Message-Body on the right, you will see the normalisation rules that have been applied to the user:
If you want to know more about Cloud PBX, and what it could do for your business, be sure to get in touch!
-Translation ‘+61386097$1’ -IsInternalExtension $true -InMemory New-CsTenantDialPlan -Identity AU-VIC-MEL-QST -NormalizationRules @{Add=$nr1,$nr2,$nr3}
- Assign this to user Vincent Vega:
After signing out and back in from the Skype for Business client, the additional normalisation rules are now applied:
From the client side trace, you will now see additional dial plan entries as well as the existing Service Country Dial Plan entries. Also, note the difference in the name. It’s now a combination of a unique identifier, Tenant User and Service Country Dial Plans:
Additional Useful Cmdlets
Import from CSV
If you have an existing on-premises Lync/Skype for Business environment, you can import rules from existing dial plans into Tenant Dial Plans. To do this:
- Run the following from on-premises Lync/Skype for Business Management Shell:
- Run the following from Skype for Business Online Remote PowerShell:
Get Service Level Dial Plan
The following cmdlet will list default dial plan entries that apply to a region. In this example, the region is AU:
Update Global Tenant Dial Plan with Normalisation Rules
If you have no need for Tenant User level dial plans, you can configure your additional normalisation rules at the Tenant Global level:
Remove Tenant User Dial Plan from a User
The following will remove a user level dial plan that’s been assigned to an individual user:
Remove a Tenant User Dial Plan (force will allow delete even if assigned to any users)
Whilst it’s recommended to gracefully remove a dial plan from all users it’s assigned to prior to deleting the dial plan, include -force if you want to remove anyway:
Remove Entries from Existing Dial Plan
The steps to remove are almost identical to creation, except use “remove” not “add when calling the list of normalisation entries:
List Normalisation Rules Within a Dial Plan
Identify Who Has a Specific Dial Plan
To output a list of all users configured with a specific dial plan:
Troubleshooting
Identify Effective Dial Plan
If you want to check what normalisation rules are being assigned to a user, run the following cmdlet:
You can also use a variation of the above cmdlet to test an individual number normalisation:
Snooper
If you want to check what rules are being applied client side:
- Get your hands on Snooper
- From the Skype for Business client, ensure logging is set to full
- After logging into the client, locate the client logs. For Office 2016, they are found in %userprofile%\AppData\Local\Microsoft\Office\16.0\Lync\Tracing
- Open the UCCAPILOG file using Snooper. Click on the Messages tab, and search for LocationProfileDescription
- Expand out the Message-Body on the right, you will see the normalisation rules that have been applied to the user:
If you want to know more about Cloud PBX, and what it could do for your business, be sure to get in touch!
-Translation ‘+000’ -InMemory $nr2 = New-CsVoiceNormalizationRule -Parent Global -Name AU-SouthEast-Local -Description “Local number normalisation for South East, Australia” -Pattern ‘^([2-9]\d{7})
- Assign this to user Vincent Vega:
After signing out and back in from the Skype for Business client, the additional normalisation rules are now applied:
From the client side trace, you will now see additional dial plan entries as well as the existing Service Country Dial Plan entries. Also, note the difference in the name. It’s now a combination of a unique identifier, Tenant User and Service Country Dial Plans:
Additional Useful Cmdlets
Import from CSV
If you have an existing on-premises Lync/Skype for Business environment, you can import rules from existing dial plans into Tenant Dial Plans. To do this:
- Run the following from on-premises Lync/Skype for Business Management Shell:
- Run the following from Skype for Business Online Remote PowerShell:
Get Service Level Dial Plan
The following cmdlet will list default dial plan entries that apply to a region. In this example, the region is AU:
Update Global Tenant Dial Plan with Normalisation Rules
If you have no need for Tenant User level dial plans, you can configure your additional normalisation rules at the Tenant Global level:
Remove Tenant User Dial Plan from a User
The following will remove a user level dial plan that’s been assigned to an individual user:
Remove a Tenant User Dial Plan (force will allow delete even if assigned to any users)
Whilst it’s recommended to gracefully remove a dial plan from all users it’s assigned to prior to deleting the dial plan, include -force if you want to remove anyway:
Remove Entries from Existing Dial Plan
The steps to remove are almost identical to creation, except use “remove” not “add when calling the list of normalisation entries:
List Normalisation Rules Within a Dial Plan
Identify Who Has a Specific Dial Plan
To output a list of all users configured with a specific dial plan:
Troubleshooting
Identify Effective Dial Plan
If you want to check what normalisation rules are being assigned to a user, run the following cmdlet:
You can also use a variation of the above cmdlet to test an individual number normalisation:
Snooper
If you want to check what rules are being applied client side:
- Get your hands on Snooper
- From the Skype for Business client, ensure logging is set to full
- After logging into the client, locate the client logs. For Office 2016, they are found in %userprofile%\AppData\Local\Microsoft\Office\16.0\Lync\Tracing
- Open the UCCAPILOG file using Snooper. Click on the Messages tab, and search for LocationProfileDescription
- Expand out the Message-Body on the right, you will see the normalisation rules that have been applied to the user:
If you want to know more about Cloud PBX, and what it could do for your business, be sure to get in touch!
-Translation ‘+613$1’ -InMemory $nr3 = New-CsVoiceNormalizationRule -Parent Global -Name Internal-Extensions-2xx -Description “Internal Extensions VIC to E.164” -Pattern ‘^(2\d{2})
- Assign this to user Vincent Vega:
After signing out and back in from the Skype for Business client, the additional normalisation rules are now applied:
From the client side trace, you will now see additional dial plan entries as well as the existing Service Country Dial Plan entries. Also, note the difference in the name. It’s now a combination of a unique identifier, Tenant User and Service Country Dial Plans:
Additional Useful Cmdlets
Import from CSV
If you have an existing on-premises Lync/Skype for Business environment, you can import rules from existing dial plans into Tenant Dial Plans. To do this:
- Run the following from on-premises Lync/Skype for Business Management Shell:
- Run the following from Skype for Business Online Remote PowerShell:
Get Service Level Dial Plan
The following cmdlet will list default dial plan entries that apply to a region. In this example, the region is AU:
Update Global Tenant Dial Plan with Normalisation Rules
If you have no need for Tenant User level dial plans, you can configure your additional normalisation rules at the Tenant Global level:
Remove Tenant User Dial Plan from a User
The following will remove a user level dial plan that’s been assigned to an individual user:
Remove a Tenant User Dial Plan (force will allow delete even if assigned to any users)
Whilst it’s recommended to gracefully remove a dial plan from all users it’s assigned to prior to deleting the dial plan, include -force if you want to remove anyway:
Remove Entries from Existing Dial Plan
The steps to remove are almost identical to creation, except use “remove” not “add when calling the list of normalisation entries:
List Normalisation Rules Within a Dial Plan
Identify Who Has a Specific Dial Plan
To output a list of all users configured with a specific dial plan:
Troubleshooting
Identify Effective Dial Plan
If you want to check what normalisation rules are being assigned to a user, run the following cmdlet:
You can also use a variation of the above cmdlet to test an individual number normalisation:
Snooper
If you want to check what rules are being applied client side:
- Get your hands on Snooper
- From the Skype for Business client, ensure logging is set to full
- After logging into the client, locate the client logs. For Office 2016, they are found in %userprofile%\AppData\Local\Microsoft\Office\16.0\Lync\Tracing
- Open the UCCAPILOG file using Snooper. Click on the Messages tab, and search for LocationProfileDescription
- Expand out the Message-Body on the right, you will see the normalisation rules that have been applied to the user:
If you want to know more about Cloud PBX, and what it could do for your business, be sure to get in touch!
-Translation ‘+61386097$1’ -IsInternalExtension $true -InMemory New-CsTenantDialPlan -Identity AU-VIC-MEL-QST -NormalizationRules @{Add=$nr1,$nr2,$nr3}
- Assign this to user Vincent Vega:
After signing out and back in from the Skype for Business client, the additional normalisation rules are now applied:
From the client side trace, you will now see additional dial plan entries as well as the existing Service Country Dial Plan entries. Also, note the difference in the name. It’s now a combination of a unique identifier, Tenant User and Service Country Dial Plans:
Additional Useful Cmdlets
Import from CSV
If you have an existing on-premises Lync/Skype for Business environment, you can import rules from existing dial plans into Tenant Dial Plans. To do this:
- Run the following from on-premises Lync/Skype for Business Management Shell:
- Run the following from Skype for Business Online Remote PowerShell:
Get Service Level Dial Plan
The following cmdlet will list default dial plan entries that apply to a region. In this example, the region is AU:
Update Global Tenant Dial Plan with Normalisation Rules
If you have no need for Tenant User level dial plans, you can configure your additional normalisation rules at the Tenant Global level:
Remove Tenant User Dial Plan from a User
The following will remove a user level dial plan that’s been assigned to an individual user:
Remove a Tenant User Dial Plan (force will allow delete even if assigned to any users)
Whilst it’s recommended to gracefully remove a dial plan from all users it’s assigned to prior to deleting the dial plan, include -force if you want to remove anyway:
Remove Entries from Existing Dial Plan
The steps to remove are almost identical to creation, except use “remove” not “add when calling the list of normalisation entries:
List Normalisation Rules Within a Dial Plan
Identify Who Has a Specific Dial Plan
To output a list of all users configured with a specific dial plan:
Troubleshooting
Identify Effective Dial Plan
If you want to check what normalisation rules are being assigned to a user, run the following cmdlet:
You can also use a variation of the above cmdlet to test an individual number normalisation:
Snooper
If you want to check what rules are being applied client side:
- Get your hands on Snooper
- From the Skype for Business client, ensure logging is set to full
- After logging into the client, locate the client logs. For Office 2016, they are found in %userprofile%\AppData\Local\Microsoft\Office\16.0\Lync\Tracing
- Open the UCCAPILOG file using Snooper. Click on the Messages tab, and search for LocationProfileDescription
- Expand out the Message-Body on the right, you will see the normalisation rules that have been applied to the user:
If you want to know more about Cloud PBX, and what it could do for your business, be sure to get in touch!
-Translation ‘+613$1’ -InMemory Set-CsTenantDialPlan -Identity Global -NormalizationRules @{Add=$nr1,$nr2}
Remove Tenant User Dial Plan from a User
The following will remove a user level dial plan that’s been assigned to an individual user:
Remove a Tenant User Dial Plan (force will allow delete even if assigned to any users)
Whilst it’s recommended to gracefully remove a dial plan from all users it’s assigned to prior to deleting the dial plan, include -force if you want to remove anyway:
Remove Entries from Existing Dial Plan
The steps to remove are almost identical to creation, except use “remove” not “add when calling the list of normalisation entries:
List Normalisation Rules Within a Dial Plan
Identify Who Has a Specific Dial Plan
To output a list of all users configured with a specific dial plan:
Troubleshooting
Identify Effective Dial Plan
If you want to check what normalisation rules are being assigned to a user, run the following cmdlet:
You can also use a variation of the above cmdlet to test an individual number normalisation:
Snooper
If you want to check what rules are being applied client side:
- Get your hands on Snooper
- From the Skype for Business client, ensure logging is set to full
- After logging into the client, locate the client logs. For Office 2016, they are found in %userprofile%\AppData\Local\Microsoft\Office\16.0\Lync\Tracing
- Open the UCCAPILOG file using Snooper. Click on the Messages tab, and search for LocationProfileDescription
- Expand out the Message-Body on the right, you will see the normalisation rules that have been applied to the user:
If you want to know more about Cloud PBX, and what it could do for your business, be sure to get in touch!
-Translation ‘+000’ -InMemory $nr2 = New-CsVoiceNormalizationRule -Parent Global -Name AU-SouthEast-Local -Description “Local number normalisation for South East, Australia” -Pattern ‘^([2-9]\d{7})
- Assign this to user Vincent Vega:
After signing out and back in from the Skype for Business client, the additional normalisation rules are now applied:
From the client side trace, you will now see additional dial plan entries as well as the existing Service Country Dial Plan entries. Also, note the difference in the name. It’s now a combination of a unique identifier, Tenant User and Service Country Dial Plans:
Additional Useful Cmdlets
Import from CSV
If you have an existing on-premises Lync/Skype for Business environment, you can import rules from existing dial plans into Tenant Dial Plans. To do this:
- Run the following from on-premises Lync/Skype for Business Management Shell:
- Run the following from Skype for Business Online Remote PowerShell:
Get Service Level Dial Plan
The following cmdlet will list default dial plan entries that apply to a region. In this example, the region is AU:
Update Global Tenant Dial Plan with Normalisation Rules
If you have no need for Tenant User level dial plans, you can configure your additional normalisation rules at the Tenant Global level:
Remove Tenant User Dial Plan from a User
The following will remove a user level dial plan that’s been assigned to an individual user:
Remove a Tenant User Dial Plan (force will allow delete even if assigned to any users)
Whilst it’s recommended to gracefully remove a dial plan from all users it’s assigned to prior to deleting the dial plan, include -force if you want to remove anyway:
Remove Entries from Existing Dial Plan
The steps to remove are almost identical to creation, except use “remove” not “add when calling the list of normalisation entries:
List Normalisation Rules Within a Dial Plan
Identify Who Has a Specific Dial Plan
To output a list of all users configured with a specific dial plan:
Troubleshooting
Identify Effective Dial Plan
If you want to check what normalisation rules are being assigned to a user, run the following cmdlet:
You can also use a variation of the above cmdlet to test an individual number normalisation:
Snooper
If you want to check what rules are being applied client side:
- Get your hands on Snooper
- From the Skype for Business client, ensure logging is set to full
- After logging into the client, locate the client logs. For Office 2016, they are found in %userprofile%\AppData\Local\Microsoft\Office\16.0\Lync\Tracing
- Open the UCCAPILOG file using Snooper. Click on the Messages tab, and search for LocationProfileDescription
- Expand out the Message-Body on the right, you will see the normalisation rules that have been applied to the user:
If you want to know more about Cloud PBX, and what it could do for your business, be sure to get in touch!
-Translation ‘+613$1’ -InMemory $nr3 = New-CsVoiceNormalizationRule -Parent Global -Name Internal-Extensions-2xx -Description “Internal Extensions VIC to E.164” -Pattern ‘^(2\d{2})
- Assign this to user Vincent Vega:
After signing out and back in from the Skype for Business client, the additional normalisation rules are now applied:
From the client side trace, you will now see additional dial plan entries as well as the existing Service Country Dial Plan entries. Also, note the difference in the name. It’s now a combination of a unique identifier, Tenant User and Service Country Dial Plans:
Additional Useful Cmdlets
Import from CSV
If you have an existing on-premises Lync/Skype for Business environment, you can import rules from existing dial plans into Tenant Dial Plans. To do this:
- Run the following from on-premises Lync/Skype for Business Management Shell:
- Run the following from Skype for Business Online Remote PowerShell:
Get Service Level Dial Plan
The following cmdlet will list default dial plan entries that apply to a region. In this example, the region is AU:
Update Global Tenant Dial Plan with Normalisation Rules
If you have no need for Tenant User level dial plans, you can configure your additional normalisation rules at the Tenant Global level:
Remove Tenant User Dial Plan from a User
The following will remove a user level dial plan that’s been assigned to an individual user:
Remove a Tenant User Dial Plan (force will allow delete even if assigned to any users)
Whilst it’s recommended to gracefully remove a dial plan from all users it’s assigned to prior to deleting the dial plan, include -force if you want to remove anyway:
Remove Entries from Existing Dial Plan
The steps to remove are almost identical to creation, except use “remove” not “add when calling the list of normalisation entries:
List Normalisation Rules Within a Dial Plan
Identify Who Has a Specific Dial Plan
To output a list of all users configured with a specific dial plan:
Troubleshooting
Identify Effective Dial Plan
If you want to check what normalisation rules are being assigned to a user, run the following cmdlet:
You can also use a variation of the above cmdlet to test an individual number normalisation:
Snooper
If you want to check what rules are being applied client side:
- Get your hands on Snooper
- From the Skype for Business client, ensure logging is set to full
- After logging into the client, locate the client logs. For Office 2016, they are found in %userprofile%\AppData\Local\Microsoft\Office\16.0\Lync\Tracing
- Open the UCCAPILOG file using Snooper. Click on the Messages tab, and search for LocationProfileDescription
- Expand out the Message-Body on the right, you will see the normalisation rules that have been applied to the user:
If you want to know more about Cloud PBX, and what it could do for your business, be sure to get in touch!
-Translation ‘+61386097$1’ -IsInternalExtension $true -InMemory New-CsTenantDialPlan -Identity AU-VIC-MEL-QST -NormalizationRules @{Add=$nr1,$nr2,$nr3}
- Assign this to user Vincent Vega:
After signing out and back in from the Skype for Business client, the additional normalisation rules are now applied:
From the client side trace, you will now see additional dial plan entries as well as the existing Service Country Dial Plan entries. Also, note the difference in the name. It’s now a combination of a unique identifier, Tenant User and Service Country Dial Plans:
Additional Useful Cmdlets
Import from CSV
If you have an existing on-premises Lync/Skype for Business environment, you can import rules from existing dial plans into Tenant Dial Plans. To do this:
- Run the following from on-premises Lync/Skype for Business Management Shell:
- Run the following from Skype for Business Online Remote PowerShell:
Get Service Level Dial Plan
The following cmdlet will list default dial plan entries that apply to a region. In this example, the region is AU:
Update Global Tenant Dial Plan with Normalisation Rules
If you have no need for Tenant User level dial plans, you can configure your additional normalisation rules at the Tenant Global level:
Remove Tenant User Dial Plan from a User
The following will remove a user level dial plan that’s been assigned to an individual user:
Remove a Tenant User Dial Plan (force will allow delete even if assigned to any users)
Whilst it’s recommended to gracefully remove a dial plan from all users it’s assigned to prior to deleting the dial plan, include -force if you want to remove anyway:
Remove Entries from Existing Dial Plan
The steps to remove are almost identical to creation, except use “remove” not “add when calling the list of normalisation entries:
List Normalisation Rules Within a Dial Plan
Identify Who Has a Specific Dial Plan
To output a list of all users configured with a specific dial plan:
Troubleshooting
Identify Effective Dial Plan
If you want to check what normalisation rules are being assigned to a user, run the following cmdlet:
You can also use a variation of the above cmdlet to test an individual number normalisation:
Snooper
If you want to check what rules are being applied client side:
- Get your hands on Snooper
- From the Skype for Business client, ensure logging is set to full
- After logging into the client, locate the client logs. For Office 2016, they are found in %userprofile%\AppData\Local\Microsoft\Office\16.0\Lync\Tracing
- Open the UCCAPILOG file using Snooper. Click on the Messages tab, and search for LocationProfileDescription
- Expand out the Message-Body on the right, you will see the normalisation rules that have been applied to the user:
If you want to know more about Cloud PBX, and what it could do for your business, be sure to get in touch!