Earlier in the week, I presented a webinar for Microsoft covering Skype for Business and Cloud PBX for the school environment. The session starts with a high level look at what the connected school/classroom of the future could look like, before delving into Cloud PBX, what it is, and how to start using it.
Whilst aimed at education, there’s still great content in here that’s relevant to all organisations.
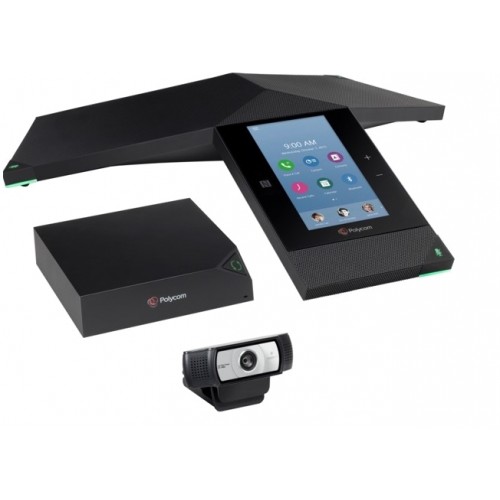
Late last year saw the release of Polycom’s latest Lync/Skype for Business certified conference phone: the Polycom Trio 8800. Polycom also surprised most of us with not only audio, but video capabilities, when the unit is paired with the Visual+ module. In my opinion, this is the perfect device for the small to medium size meeting spaces that were too small for larger VC infrastructure solutions, but where audio and video capabilities made sense. You can read more about the Trio 8800 here.
This article will cover off on the following topics:
How Polycom phones obtain configuration files from a central Polycom Provisioning Server
What issues may arise if Trio devices are allowed to download and apply VVX configuration files, and how to mitigate against this
An example Trio 8800 configuration file for you to use
Under the hood, the Trio devices run Polycom UC Software (UCS). This is from the same family as the VVX line of phones. When deploying VVX phones, it’s common (and recommended) to deploy a Polycom Provisioning Server, which is tasked with providing a uniform base configuration file that all VVX phones can access, download and apply. This occurs when the phones boot, and gives administrators centralised and granular control over what features are available across all phones in a deployment. Very handy. Microsoft Solutions Architect, MVP and all round Polycom guru Jeff Schertz had written a great article on how to centrally provision Polycom SIP Phones using a Provisioning Server. I strongly suggest reading that before proceeding, as this post will build on topics covered there.
As Trio devices are based on the same software as the VVX phones, they also are capable of obtaining their configuration the same way: pulling base configuration from the Polycom Provisioning Server automatically on boot up. However, the fact that the Trios use the same logic as the VVX handsets to download base configuration can be somewhat of an issue.
Why?
Prior to the Trio devices being released, there was not usually a need to deploy different configuration files to different devices. The same configuration file would be pushed out to all phones, nice and simple. However, if both Trio and VVX devices are deployed into the same environment, it’s a good idea to ensure each device type gets its own specific configuration file. From my experience, there are some settings you may want to implement on one type of device, but not the other. For example, in some of my deployments I remove the “End Call” button from VVX phones using the configuration file. I do this to free up space on the main screen for another button, and End Call is not that important as I can end the call by simply hanging up, pressing the speaker button (if on a speaker phone call) or pressing the headset button (if I have a headset plugged into the phone). If this same configuration file is applied to the Trio phone, the hang up button on the touch screen disappears, and you can’t hang up a call. Not ideal.
To help better understand how we can get around this issue, the following diagram outlines the high level logic an out of the box UCS device goes through when placed on the network. In this example the device in question has a MAC address 0004f2fcc770:
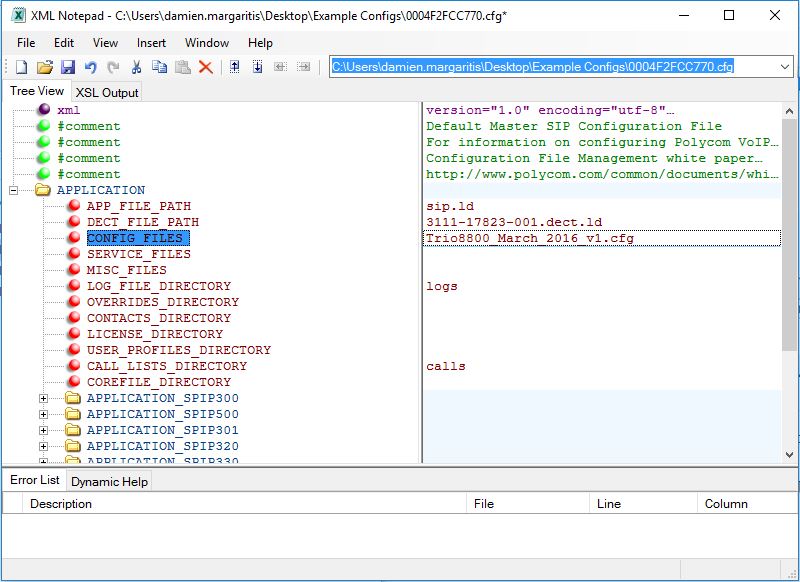
For the sake of this blog, the important piece of the above logic is the first (pink) decision point. For deployments where there is only a single type of device, there is usually no need for a specific configuration file to exist that matches the MAC address of a single phone (unless of course you would like to push out different configuration for some of those phones). As such, the answer is No and the phone will then look for a default configuration file named 000000000000.cfg. This one does exist, and will direct the phone to an additional configuration file to apply. Here’s an example of a default configuration file:
Note that, within this configuration file, a second configuration file is called. Apart from some other basic configuration elements (refer to Jeffs blog for further details on these), The bulk of the configuration elements are contained within February2016v1.cfg. If I want to change settings for all phones at once, I simply edit this file, and all phones will be able to download the updated configuration.
Using the above logic we now have a way to target Trio phones, allowing them to download their own specific configuration:
Take a copy of the default configuration file (000000000000.cfg)
Use the MAC address of the Trio to name it (e.g. 0004f2fcc770.cfg)
Update the configuration files that’s called (e.g. Trio8800_March_2016_v1.cfg)
Repeat the above steps for all Trio devices
As long as there is a default configuration file that is created for every Trio device, they can all point at the same configuration file where the bulk of the configuration elements are stored. You can now update a single file to manage all Trios.
What can I configure?
There are literally hundreds, if not thousands of configuration elements that can be configured using a configuration file. If you would like to see what can be configured, download the RealPresence Trio Administrators Guide (360 odd pages)from the Polycom Trio Support page.
Or…
Download this Polycom Trio configuration file I’ve created (link below). In it, I outline configuration elements I find the most useful, and give an explanation as to what each one does.
Tip: download XML Notepad – will make your life a lot easier
Microsoft has released the next version of the Office Web Apps (WAC) server, and it’s had a name change. It’s now known as Office Online Server (OOS). You can read more about it here.
This role is used by Lync 2013/Skype for Business environments as a way to dynamically get PowerPoint presentations out to meeting participants. Here, I’ll outline how to deploy OOS into a Skype for Business environment, but would be identical if you happen to be deploying into a Lync 2013 environment also. The process is more or less identical as deploying the WAC server role, but I did hit a couple issues along the way. I’ve outlined these below.
NOTE: As was the case with Office Web Apps server, it’s not supported to install OOS on a server with other existing applications, such as Exchange, Skype for Business, Domain Controller etc.
Requirements
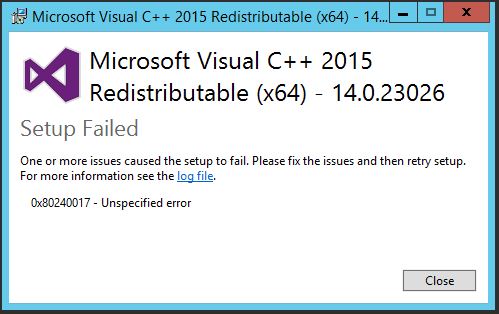
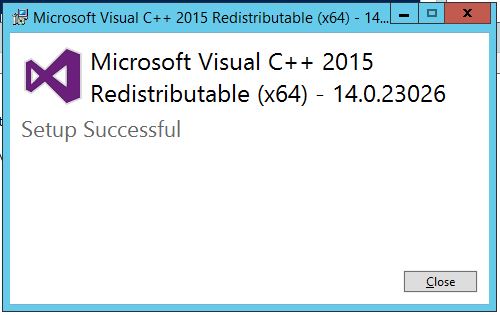
OOS is only supported on Windows Server 2012 R2. Also, make sure you install all Windows updates prior to deploying OOS. I deliberately tried to install OOS prior to doing this, and was presented with the below error. Installing all available updates resolved this issue:
With prerequisites finalised, run through the following steps to install and configure Office Online Server:
Obtain and import an SSL certificate with the fully qualified domain name(s) of the Office Online Server
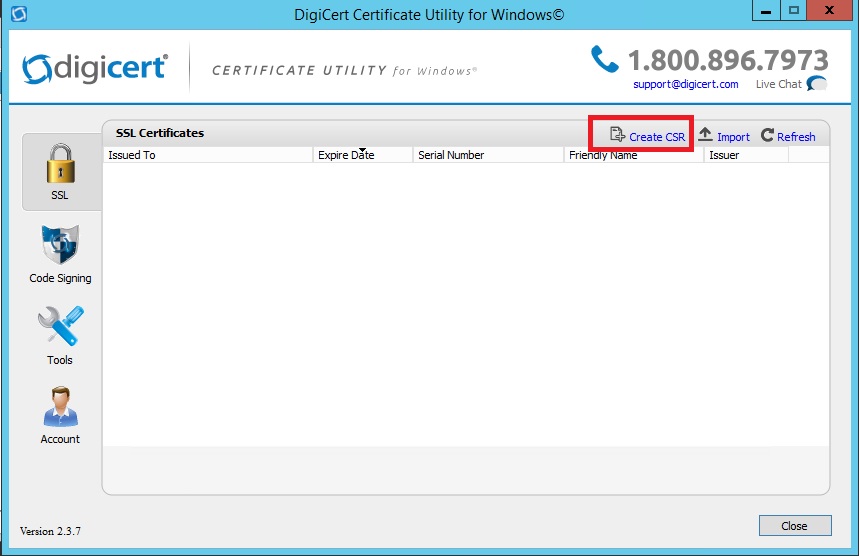
I use Digicert’s free Certificate Utility for Windows to create CSRs (get it here). Install the tool on the server, and click on Create CSR:
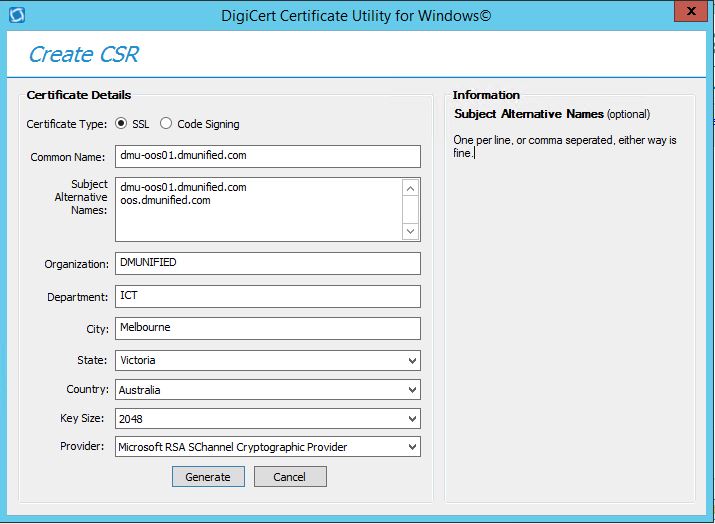
For the Common Name, use the FQDN of the OOS Server. I also add this to the SAN list, as well as the external FQDN (traffic that routes to the OOS server via a reverse proxy for external users):
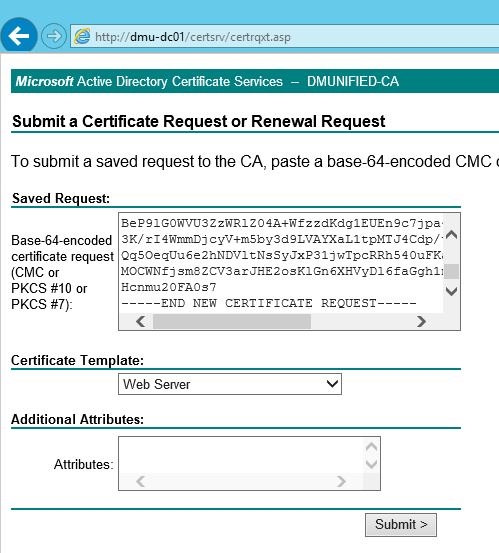
Generate the CSR, copy it, and use it to generate a certificate from your CA. This process will vary depending on your CA type, but in my case it’s a stock standard internal Windows CA server:
Copy the certificate to the server and import it:
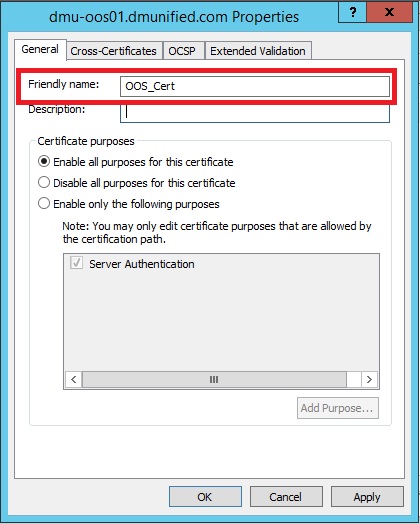
Right-click the certificate, select Properties, and enter in a friendly name for the certificate. This is required, as the PowerShell cmdlet we use later to configure OOS refers to the certificate by its friendly name:
Download Office Online Server from the Volume License Service Center. If your a MSDN subscriber, you can also get it there
Mount the ISO and run Setup.exe
Follow the Office Online Server setup wizard, select an installation location and then click Install Now. You’ll see the following when the install is complete:
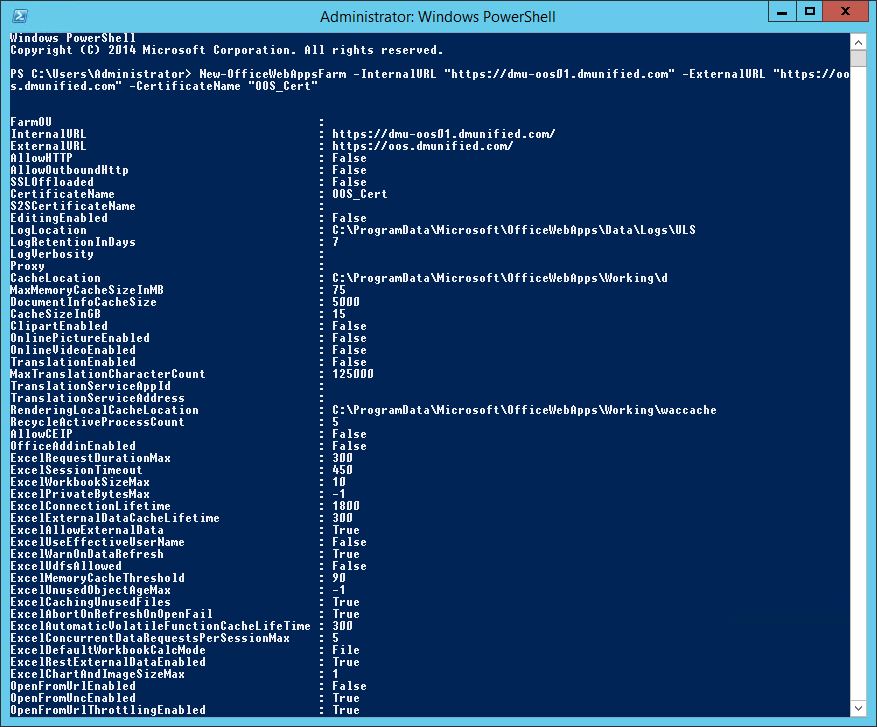
Open Windows PowerShell and run the following command:
Here’s what you’ll see once the last step has run… looks very familiar:
Reboot the OOS server. Although not called out as a requirement in official documentation, I’ve found that sometimes it’s required before the sharing of PowerPoint presentations in meetings would work
Configure Skype for Business to use OOS
Now that the Office Online server has been deployed, it needs to be added to the Skype for Business Topology and associated with at least one pool. to do this:
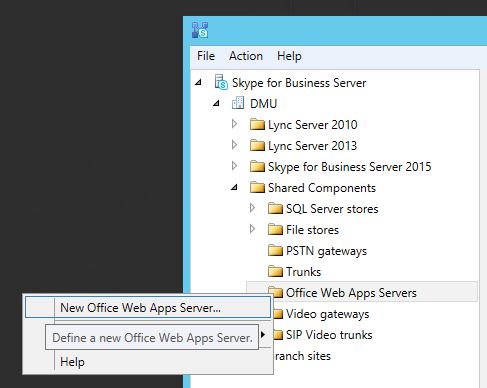
Open the Skype for Business Topology Builder with elevated privileges
Under the Shared Components node, right-click Office Web Apps Servers and select New Office Web Apps Server
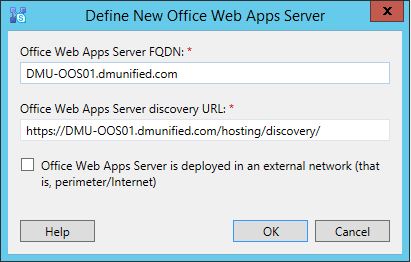
Enter in the FQDN of the Office Online Server, and click Ok (copy the discovery URL from here, we’ll use it later for testing purposes):
Right click each pool you would like to associate with the OOS Server, and select Edit Properties. Associate the Office Online Server with the Skype for Business pool:
Save and Publish the Topology
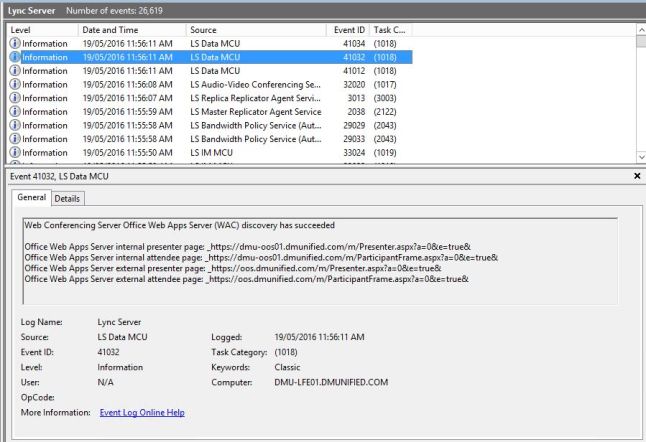
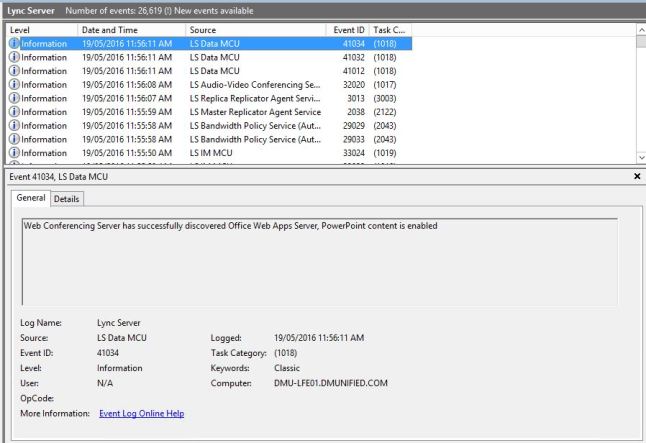
A few minutes after the Topology is published, be on the lookout for event IDs 41032 & 41034 on the Skype for Business Front End Server. These confirm that the discovery of the Office Online Server has been successful:
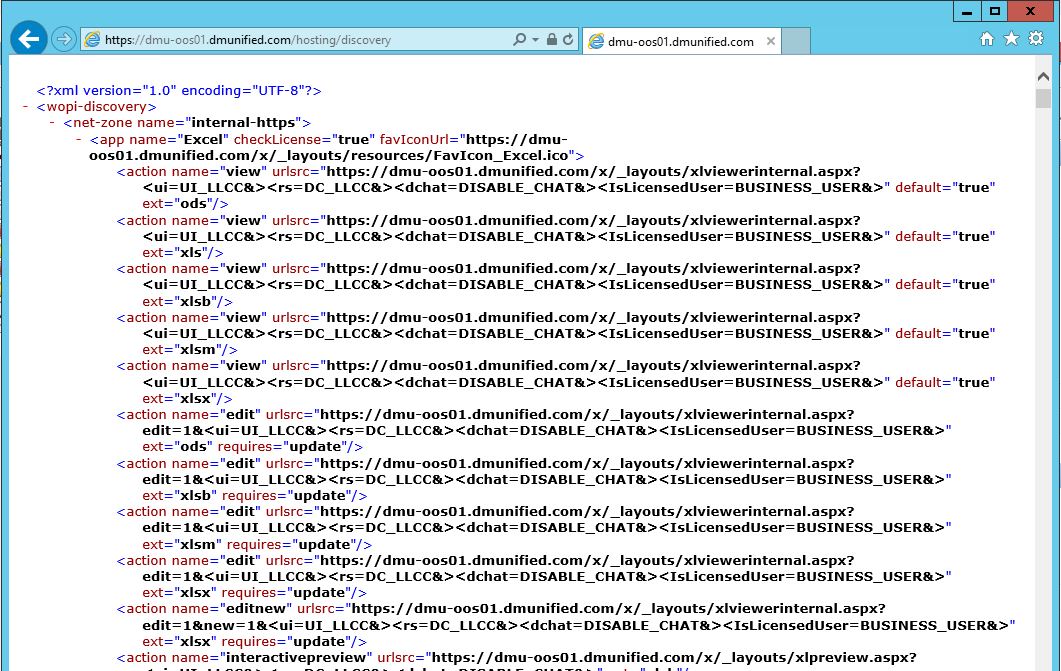
From a web browser, paste in the discovery URL you saved earlier. You should be presented with something similar to the following:
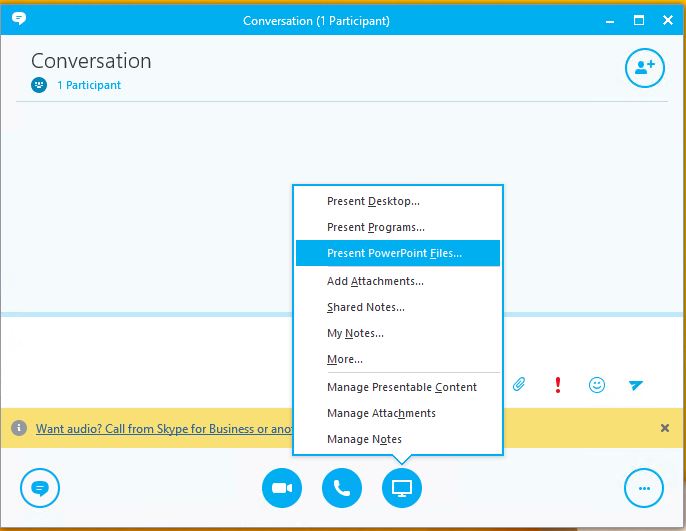
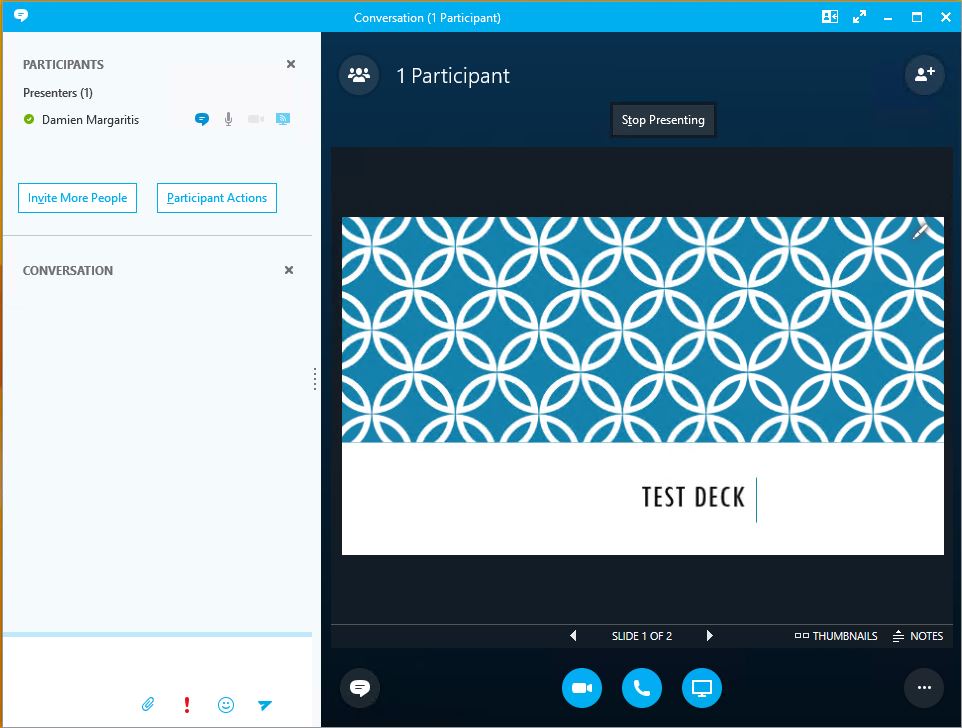
Finally, from a Lync 2013 or Skype for Business client, start a conference, and test uploading a PowerPoint presentation:
You’ve deployed your Virtual Machines on Hyper-V hosts that are running Windows Server 2012 or 2012 R2. Everything appears to be running swimmingly. However, you soon start to experience the following symptoms:
Virtual machines randomly lose network connectivity. The network adapter appears to be working in the virtual machine. However, you cannot ping or access network resources from the virtual machine. Restarting the virtual machine does not resolve the issue
You cannot ping or connect to a virtual machine from a remote computer, you are only able to connect via the Hyper-V console
When this occurs, the only fix is to restart the Hyper-V host. Restarting the VM does not resolve the issue. This also does not address the underlying issue as to why this is occurring in the first place.
VMQ
This issue has been around for sometime, with Microsoft acknowledging and discussing it here. However, this only refers to the “NetXtreme 1-gigabit network adapters”, which in my case were not being used. Looking a little deeper, the issue affected a broader number of network adapters, all of which used common components manufactured by a company called Emulex. If you were using an affected adapter on a Windows Server 2012 or 2012 R2 Hyper-V host, and you had Virtual Machine Queue (VMQ) enabled, you could potentially see this issue.
VMQ is only relevant if the network adapters used on your Hyper-V hosts are 10-gigabit or faster. In my case, all adapters were 1-gigabit, meaning I could simply disable VMQ and see if that resolved my problem. To check whether or not VMQ is enabled, run the following:
Get-NetAdapterVmq
To disable:
Set-NetAdaptervmq -Name “Embedded LOM 1 Port 2” -Enabled $false
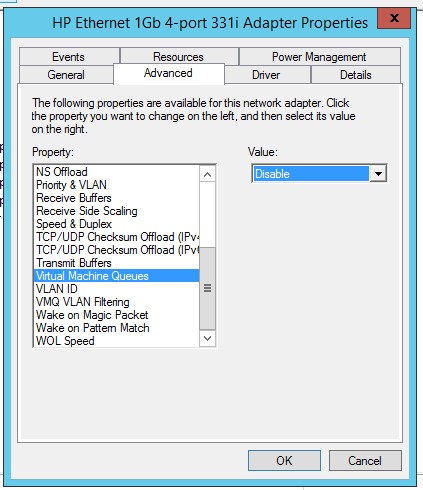
Alternatively, you can also disable from Device Manager:
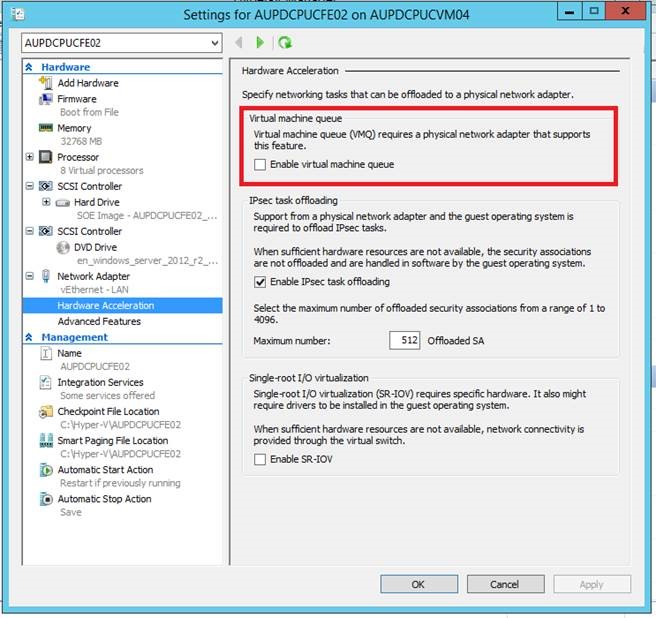
Once you have disabled VMQ on the adapter, make sure you also disable it from the Hardware Acceleration menu from Setting on all Virtual Machines
Recently, I came across an issue that was affecting Lync 2013 SBA homed users after the re-IP addressing of a Lync 2013 Enterprise Edition pool. After all IP addresses were updated, and pool homed users were fully functional once again, it was discovered that any users homed to an SBA were unable to answer Response Group calls. If this user was re-homed to the Front End pool, they were able to answer Response Group calls without issue. I knew the issue wasn’t related to media connectivity, as the media path was the same regardless of where the user was homed.
Client logs showed the following error:
05/04/2016|11:30:43.586 600:170 INFO :: SIP/2.0 403 Forbidden
Authentication-Info: TLS-DSK qop="auth", opaque="3ABEF158", srand="31091ABF", snum="38", rspauth="790b91f7a5abbea876977ce72e86026df6ce58e3", targetname="CCSKYPE-SBA1.domain.com.au", realm="SIP Communications Service", version=4
From: <sip:damien.margaritis@domain.com.au>;tag=5754c5e173;epid=88298561e1
To: <sip:ccskype-sba1.domain.com.au;gruu;opaque=srvr:MediationServer:e-3LXCPwP1ygJ_ZYnQPLDgAA;grid=867b2eb0972c470abf649f860fea0228>;tag=483B98359D534CAE3AF3C594C5A2E9FC
Call-ID: fbe370b250e94f2291980707b607399c
CSeq: 1 INVITE
Via: SIP/2.0/TLS 10.240.67.13:54942;ms-received-port=54942;ms-received-cid=791C00
ms-diagnostics: 1020;reason="Identity of the referrer could not be verified with the ms-identity parameter";ErrorType="Failed to establish a connection to the signing server";Referrer="teamuc@domain.com.au";HRESULT="0xC3E93D66(SIPPROXY_E_CONNECTION_NOT_FOUND)";cause="Failed to establish a connection to the signing server";signer="DPSKYPE-FE2.domain.com.au";source="CCSKYPE-SBA1.domain.com.au"
 Server: RTC/5.0
 Content-Length: 0
This somewhat stumped me. Having a quick look around the internet, I found a similar issue Csaba Vegso’s had run into when working on the development of UCMA workflows (a great read by the way). Whilst the error was the same, I wasn’t working with custom UCMA workflows, and it only affected users homed to the SBA. The only other variable that was different post IP re-addressing was that there was now a firewall between the SBA and the Front End Pool…
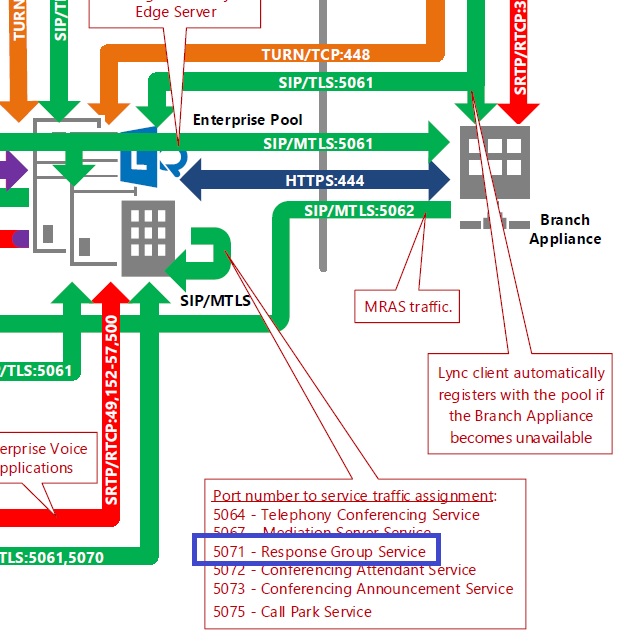
I reviewed the Lync 2013 Protocol Workloads poster, and confirmed with the firewall team that all ports shown were open:
Keeping in mind that, in the past, the Protocol Workloads poster hasn’t been infallible (A fellow MCM Randy Wintle ran into this issue quite some time ago when deploying an SBA), I requested the firewall team capture traces while I reproduce the issue. Lo and behold:
In the above capture, 10.211.208.250 is the SBA, and 10.2.5.12 is one of the Front End servers. for every failed call, there was a corresponding Deny of TCP 5071 from SBA to FE. This port is outlined on the Protocol Workloads poster, and in firewall port documentation, but not outlined as required to be open Between SBA and FE:
Opening port TCP 5071 from SBA to Lync pool resolved the issue.
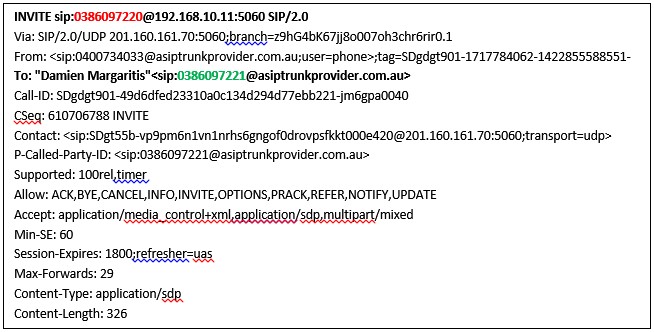
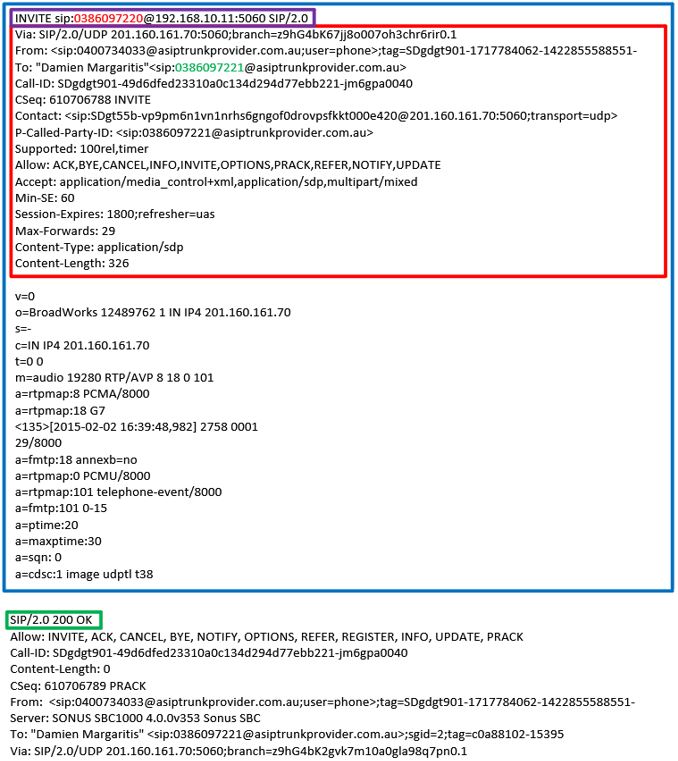
Recently I was working with a SIP Trunk provider (who shall remain nameless) who was doing something rather annoying. Any INVITEs that were being received from downstream for inbound calls were using the service’s pilot number in the Request URI (RURI) header field. The phone number of the party the external caller was actually trying to reach was found further down in the To field:
In the example above, the inbound call was to 0386097221. However, the number in the RURI field is 0386097220. In fact, any INVITEs received from the service provider to any direct in dial number would always have the pilot number in the RURI field. Unless you plan for all inbound calls to route to the same destination, such as an Auto Attendant or Response Group, this is going to cause you problems.
Introduction to SIP Message Manipulation
The above scenario outlines one of the advantages of having a Session Border Controller (SBC) deployed in your Lync environment. If we were terminating the SIP Trunk directly on a Mediation server, we would be limited in what approaches we can take to get around this problem.
With an SBC in place, we can use SIP Message Manipulations to re-write the RURI header field, which will make the issue transparent to Lync. Any Lync certified SBC should be able to do this for you, here I’ll will be outlining the process on a Sonus SBC 1000.
For a more thorough and detailed outline of SIP Message Manipulation on a Sonus SBC series appliance, check out the full SBC documentation (Page 1066 onwards). This article deals specifically with how to get the phone number from the TO field into the RURI field.
Solution
From the main settings tab, open SIP > Message Manipulation > Message Rule Tables:
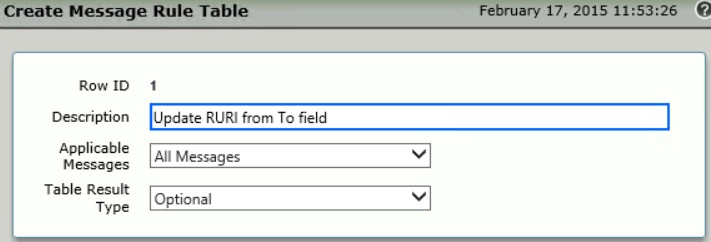
Click the green plus sign to create a new table. Enter in a description, and click Ok:
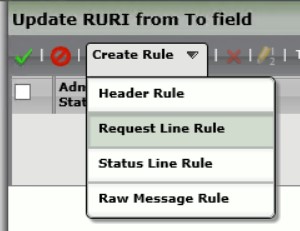
Click on the newly created Message Rule Table. From the Create Rule drop down menu, select Request Line Rule:
Aside – Manipulation Rule Types
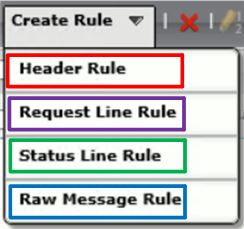
Depending on what part of the SIP message you want to manipulate, you have four manipulation rules to choose from:
Below, I’ve highlighted which part of the SIP message is being worked with depending on which rule type you select:
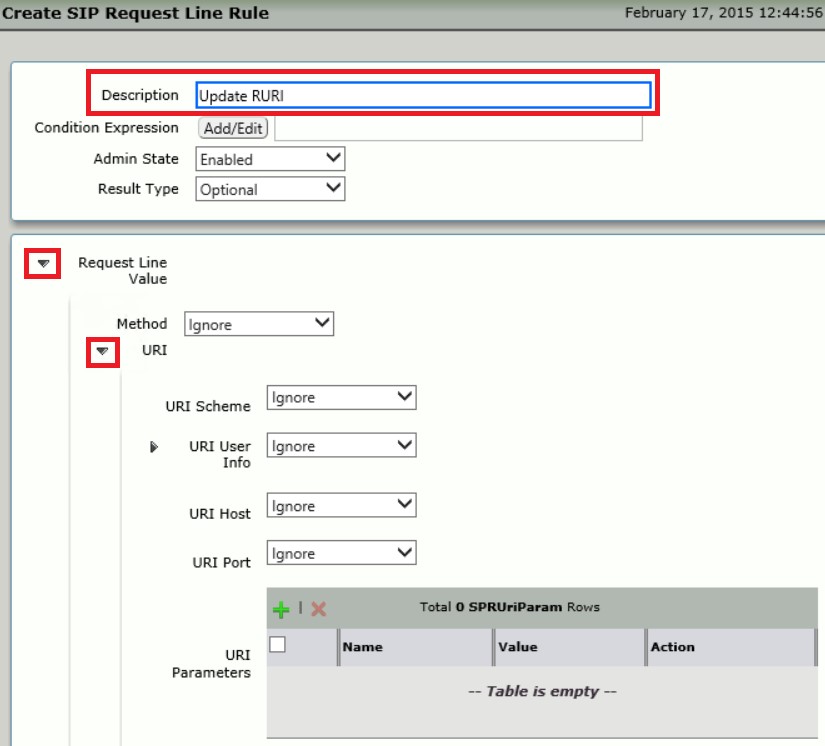
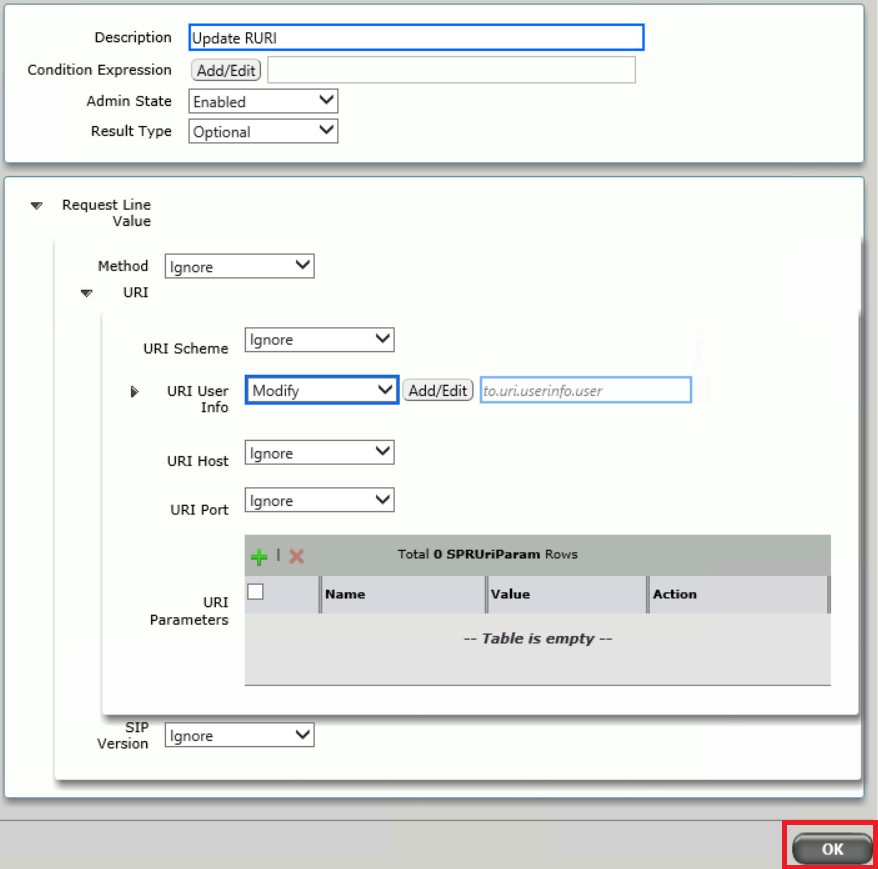
Enter in a description, and click the arrow to the left of Request Line Value and URI to expand out the rest of the rule options:
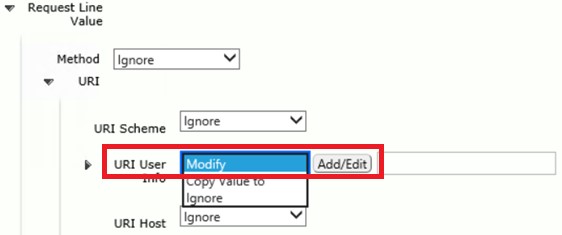
For URI User Info, Select Modify, and click on Add/Edit:
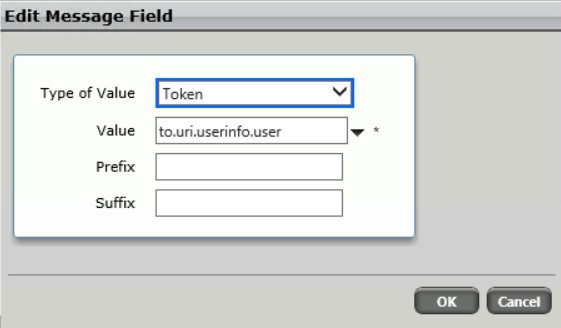
For Type of Value, select Token, and enter in a Value of to.uri.userinfo.user, and click Ok:
At the bottom of the SIP Request Line Rule, make sure you click Ok:
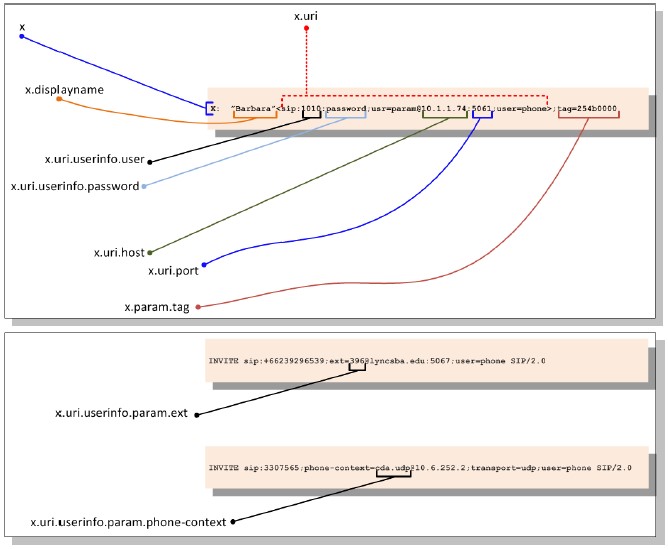
Aside – Tokens
Tokens are pre-assigned variable names that have been given to different portions of a SIP message. Similar to how the numbers in an incoming SIP message are mapped to a Transformation Table (Called Number, Calling Number, etc), various portions of a SIP packet are mapped to SIP Manipulation Table (SMM) Tokens.
Example token mappings are shown below, with x representing a SIP Request Status Line, in our case, the To field:
Test
Once you have created the manipulation rule, use the built in test function to ensure the configuration is correct:
Click on the Message Rule Table, and select Test Message from the top menu:
Copy in the SIP header, and click ok. In the result pane that appears below, it will show the original header at the top, scroll down to see the updated header. There, you will see the RURI header field now has the correct phone number:
Apply to Signalling Group
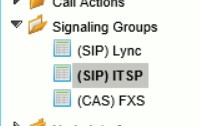
Now that the Message Manipulation Rule has been created and tested, it needs to be applied to the SIP Trunk provider’s Signalling Group:
From the settings menu, click on Signalling Groups and select the signalling group for your SIP Trunk provider:
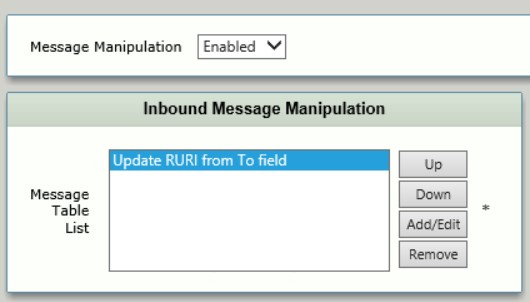
Near the bottom of the configuration options, Enable Message Manipulation, and select the Message Table created earlier for Inbound Message Manipulation, and click Apply:
You’re done
This article only covers one scenario where an SBC can be useful when dealing with irregular SIP messages from a SIP trunk provider. Using the same logic, pretty much anything can be manipulated to ensure Lync plays well with all providers.