
Microsoft has released the next version of the Office Web Apps (WAC) server, and it’s had a name change. It’s now known as Office Online Server (OOS). You can read more about it here.
This role is used by Lync 2013/Skype for Business environments as a way to dynamically get PowerPoint presentations out to meeting participants. Here, I’ll outline how to deploy OOS into a Skype for Business environment, but would be identical if you happen to be deploying into a Lync 2013 environment also. The process is more or less identical as deploying the WAC server role, but I did hit a couple issues along the way. I’ve outlined these below.
NOTE: As was the case with Office Web Apps server, it’s not supported to install OOS on a server with other existing applications, such as Exchange, Skype for Business, Domain Controller etc.
Requirements
OOS is only supported on Windows Server 2012 R2. Also, make sure you install all Windows updates prior to deploying OOS. I deliberately tried to install OOS prior to doing this, and was presented with the below error. Installing all available updates resolved this issue:

Server Prerequisites
-
Install .NET Framework 4.5.2 (get it here)
-
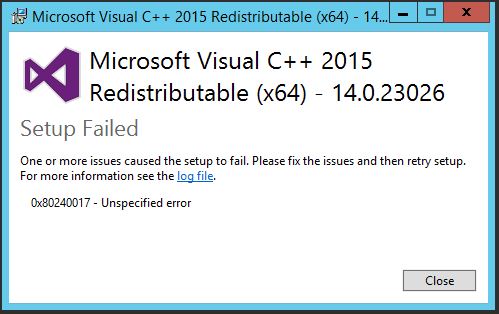
Install Visual C++ Redistributable for Visual Studio 2015 (get it here)
The Visual C++ install was failing for me, displaying the following error:
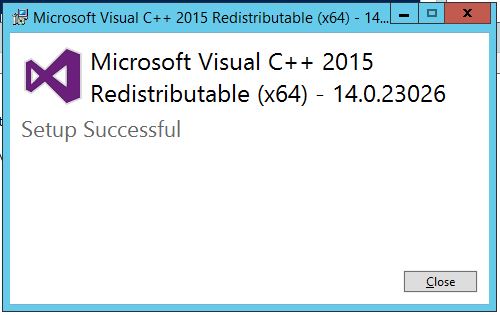
I found the following post that contained a solution to the issue, namely:
- Locate Windows8.1-KB2999226-x64.msu (which for me was in C:\ProgramData\Package Cache\FC6260C33678BB17FB8B88536C476B4015B7C5E9\packages\Patch\x64)
- For simplicities sake, copy to folder of your choice, along with vc_redist.x64 that you previously downloaded

- From an elevated PowerShell session, navigate to this folder and run the following:
wusa.exe Windows8.1-KB2999226-x64.msu /extract:c:\fix

DISM.exe /Online /Add-Package /PackagePath:c:\fix\Windows8.1-KB2999226-x64.cab

.\vc_redist.x64.exe /repair
- Run repair

- Installation should now be successful
- Install the required operating system features by running the following command from an elevated PowerShell session, then reboot:
Install-WindowsFeature Web-Server, Web-Mgmt-Tools, Web-Mgmt-Console, Web-WebServer, Web-Common-Http, Web-Default-Doc, Web-Static-Content, Web-Performance, Web-Stat-Compression, Web-Dyn-Compression, Web-Security, Web-Filtering, Web-Windows-Auth, Web-App-Dev, Web-Net-Ext45, Web-Asp-Net45, Web-ISAPI-Ext, Web-ISAPI-Filter, Web-Includes, InkandHandwritingServices, Windows-Identity-Foundation
OOS Installation and Configuration
With prerequisites finalised, run through the following steps to install and configure Office Online Server:
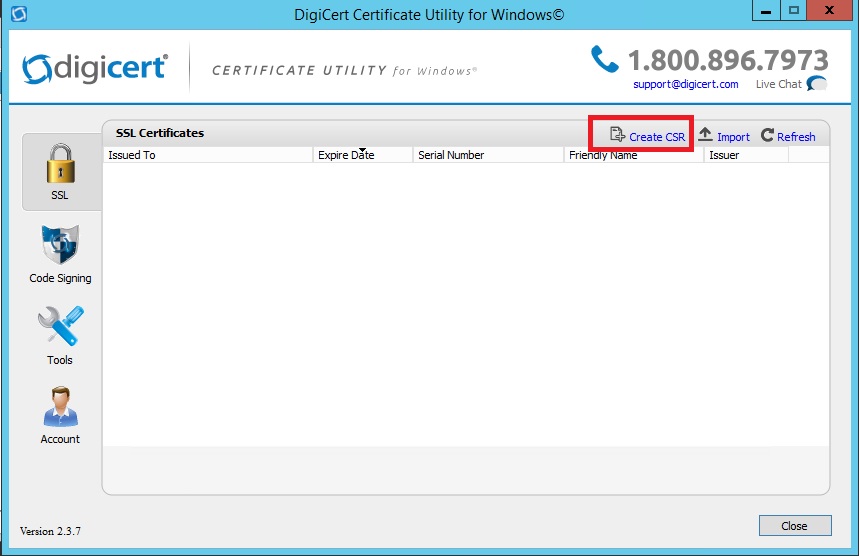
- Obtain and import an SSL certificate with the fully qualified domain name(s) of the Office Online Server
- I use Digicert’s free Certificate Utility for Windows to create CSRs (get it here). Install the tool on the server, and click on Create CSR:
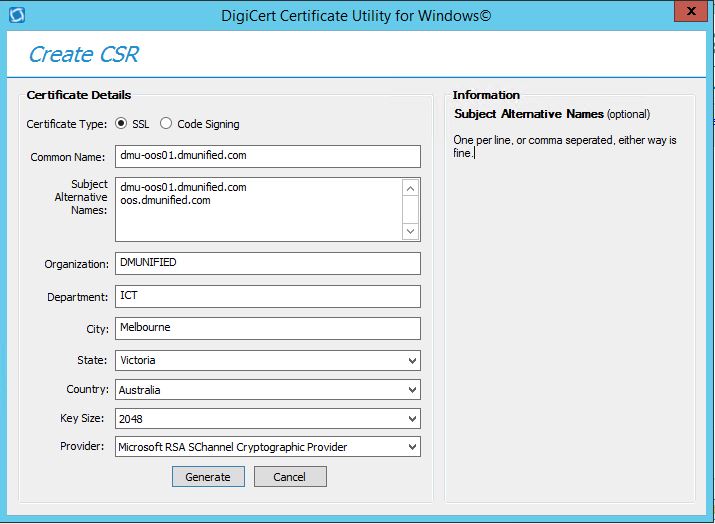
- For the Common Name, use the FQDN of the OOS Server. I also add this to the SAN list, as well as the external FQDN (traffic that routes to the OOS server via a reverse proxy for external users):
- Generate the CSR, copy it, and use it to generate a certificate from your CA. This process will vary depending on your CA type, but in my case it’s a stock standard internal Windows CA server:
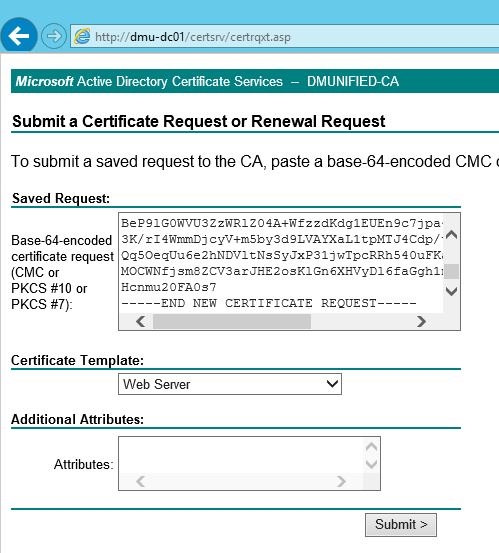
- Copy the certificate to the server and import it:

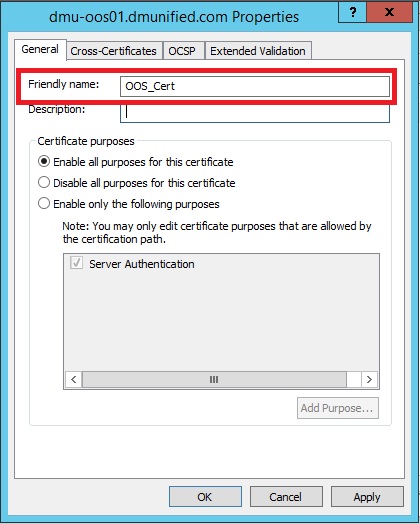
- Right-click the certificate, select Properties, and enter in a friendly name for the certificate. This is required, as the PowerShell cmdlet we use later to configure OOS refers to the certificate by its friendly name:
- Download Office Online Server from the Volume License Service Center. If your a MSDN subscriber, you can also get it there
- Mount the ISO and run Setup.exe
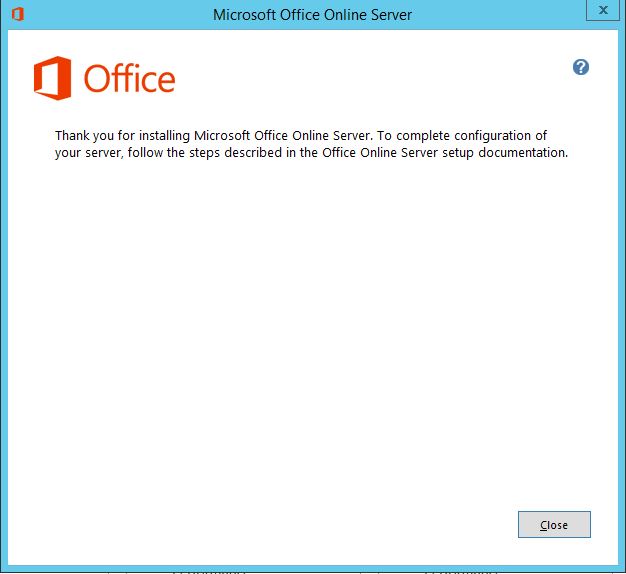
- Follow the Office Online Server setup wizard, select an installation location and then click Install Now. You’ll see the following when the install is complete:
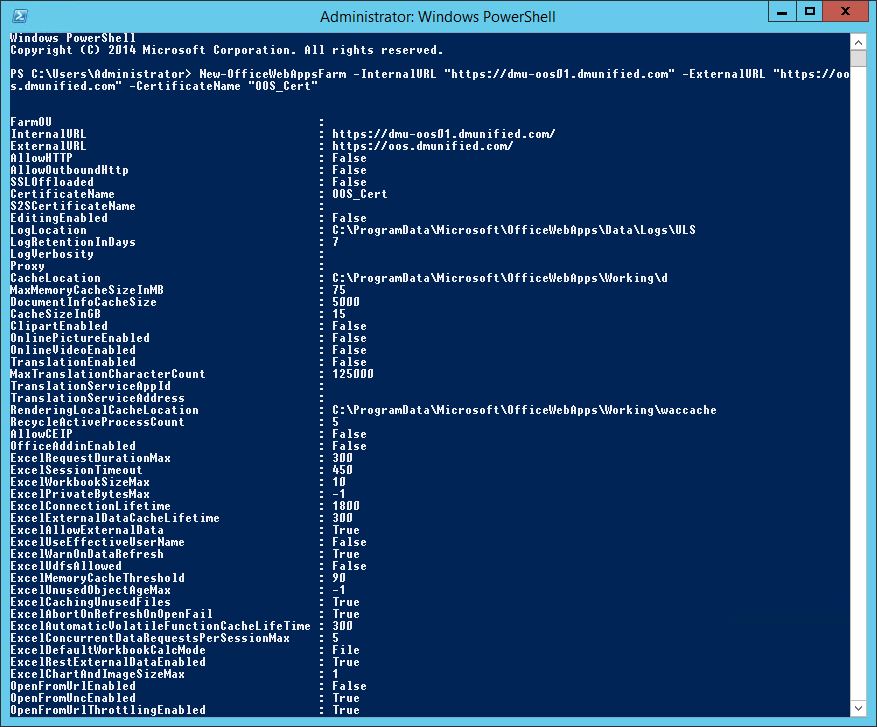
- Open Windows PowerShell and run the following command:
New-OfficeWebAppsFarm -InternalURL "https://dmu-oos01.dmunified.com" -ExternalURL "https://oos.dmunified.com" -CertificateName "OOS_Cert"
- Here’s what you’ll see once the last step has run… looks very familiar:
- Reboot the OOS server. Although not called out as a requirement in official documentation, I’ve found that sometimes it’s required before the sharing of PowerPoint presentations in meetings would work
Configure Skype for Business to use OOS
Now that the Office Online server has been deployed, it needs to be added to the Skype for Business Topology and associated with at least one pool. to do this:
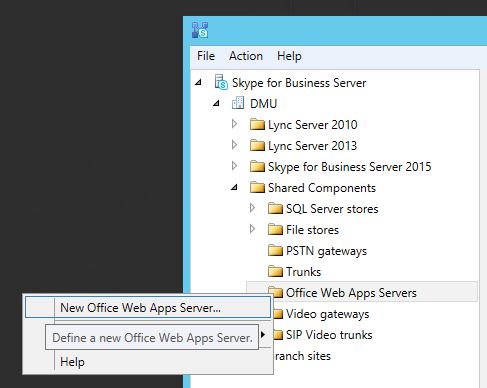
- Open the Skype for Business Topology Builder with elevated privileges
- Under the Shared Components node, right-click Office Web Apps Servers and select New Office Web Apps Server
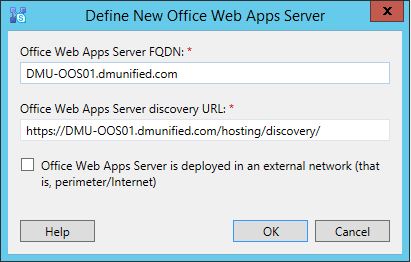
- Enter in the FQDN of the Office Online Server, and click Ok (copy the discovery URL from here, we’ll use it later for testing purposes):
- Right click each pool you would like to associate with the OOS Server, and select Edit Properties. Associate the Office Online Server with the Skype for Business pool:

- Save and Publish the Topology
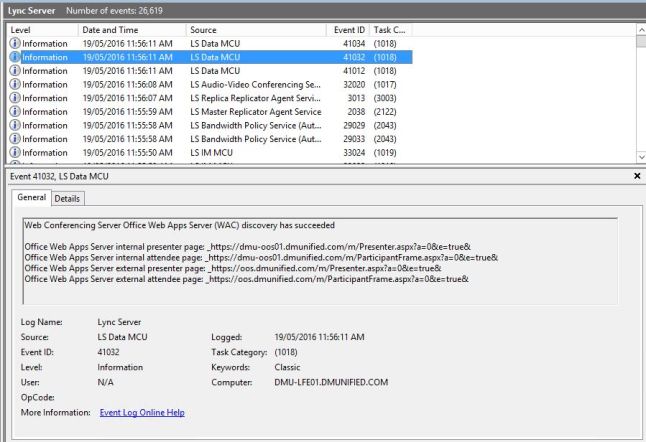
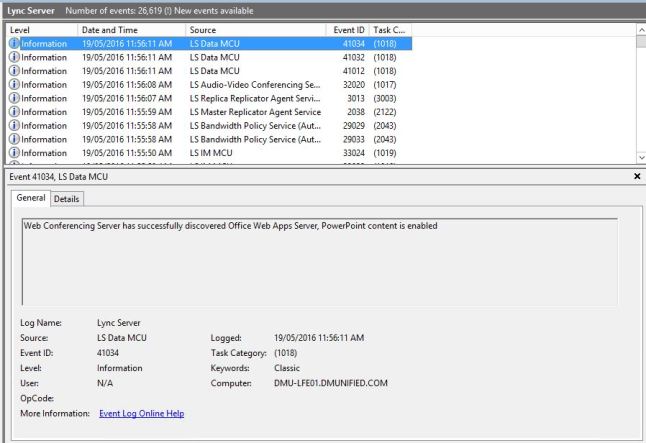
A few minutes after the Topology is published, be on the lookout for event IDs 41032 & 41034 on the Skype for Business Front End Server. These confirm that the discovery of the Office Online Server has been successful:
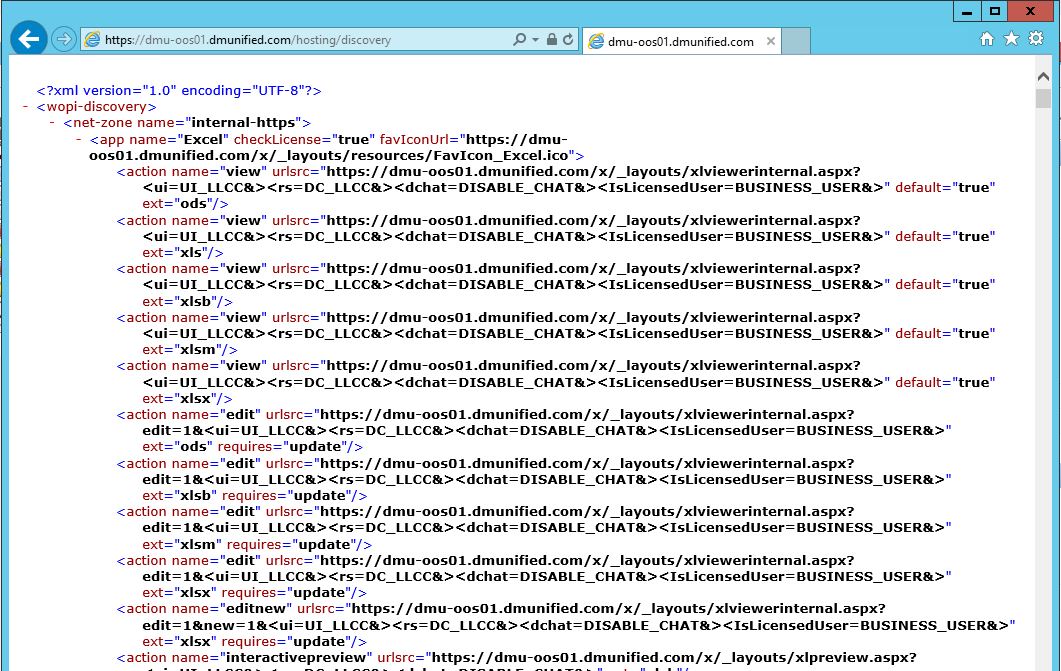
From a web browser, paste in the discovery URL you saved earlier. You should be presented with something similar to the following:
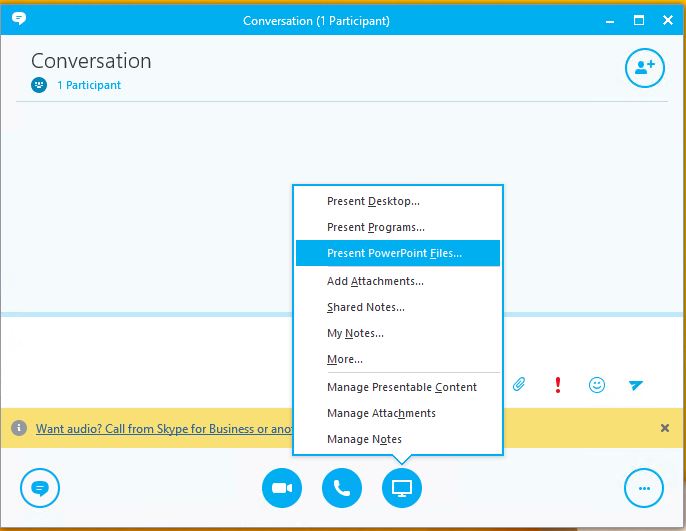
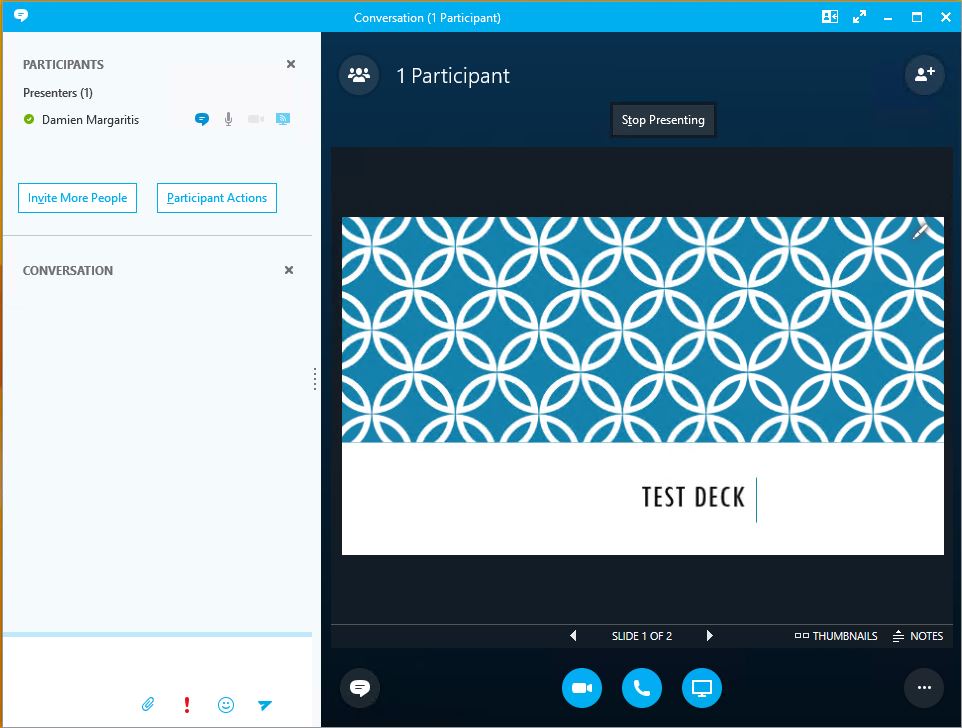
Finally, from a Lync 2013 or Skype for Business client, start a conference, and test uploading a PowerPoint presentation:
Damien Margaritis

Leave a comment