As per this HUGE announcement, Microsoft Phone System Direct Routing is now available!
What does this mean?
In essence, this means that it is now possible to configure a SIP Trunk directly from a supported on-premises Session Border Controller (SBC) to Microsoft Teams via the internet.

Microsoft’s Enterprise Voice Strategy for the Cloud
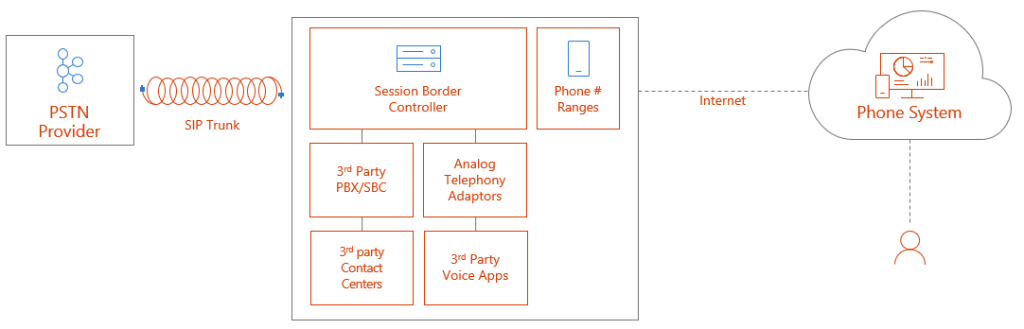
To understand how this fits into the overall picture, the diagram below outlines the main components that come together to enable PSTN connectivity for Office 365 in Australia. This diagram assumes I do not have an on-premises Skype for Business server deployed, and simply want to enable voice services for users homed within Office 365 with minimal on-premises infrastructure:

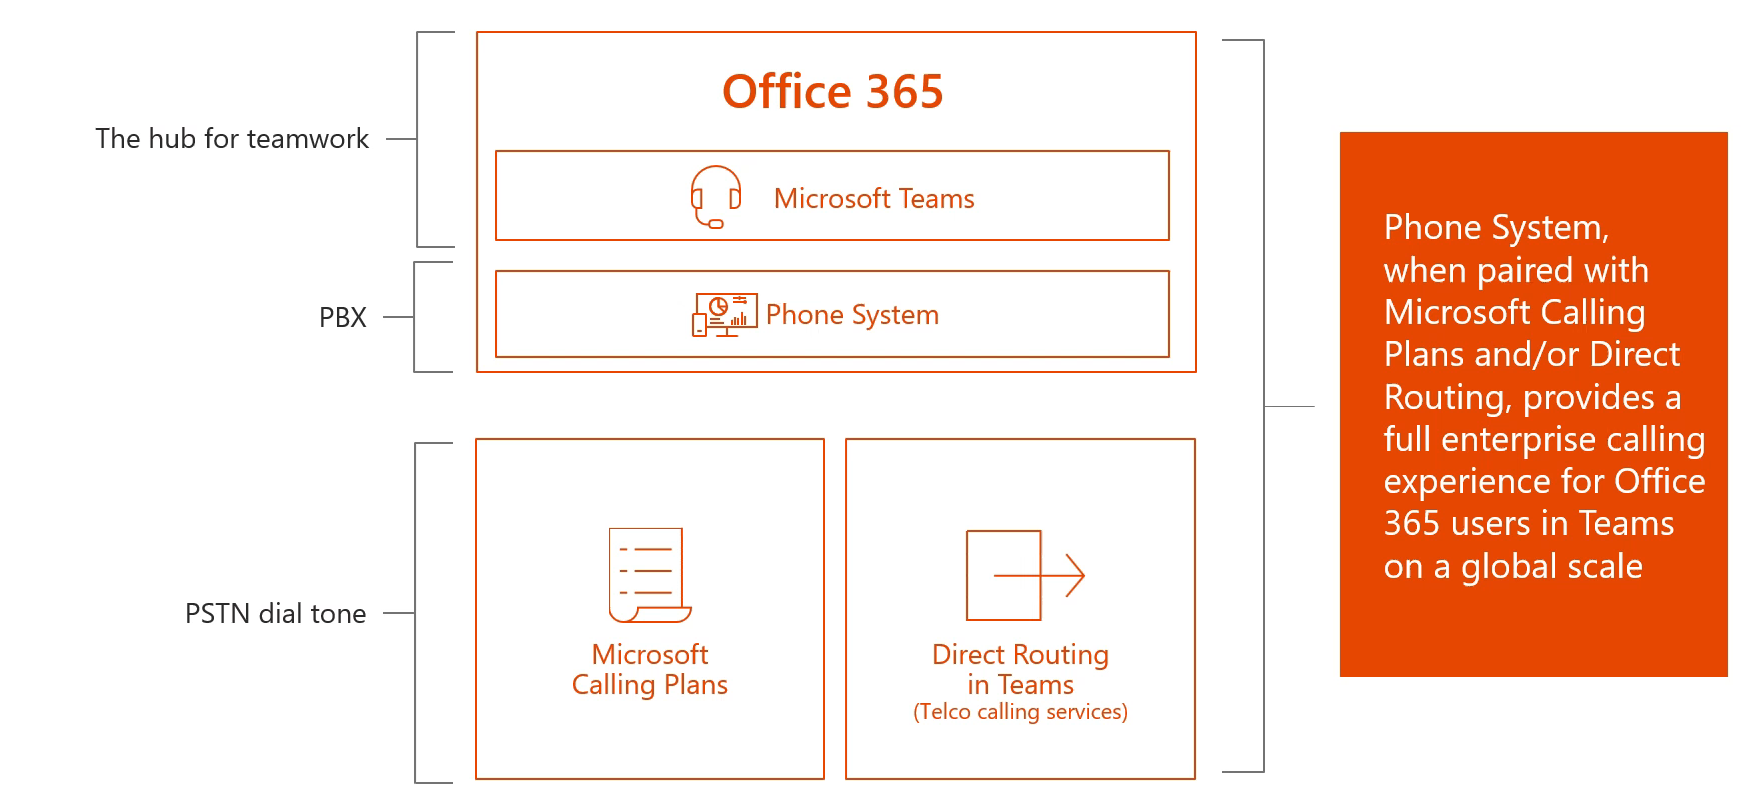
To summarise the options for PSTN connectivity available today:
- There are two platforms in the Microsoft cloud that can provide voice services: Skype for Business & Microsoft Teams
- To enable PBX like capabilities in either, users must have a Phone System license
- To enable connectivity to the PSTN network, there are three options:
- Direct routing for Teams – enables PSTN connectivity for Microsoft Teams only. Requires on-premises infrastructure (SBC).
- Telstra Calling for Office 365 – enables PSTN connectivity for both Skype for Business Online and Microsoft Teams. A pure cloud offering.
- Cloud Connector Edition (CCE) – enables PSTN connectivity for Skype for Business Online only. Requires on-premises infrastructure (SBC & Hyper-V Host with VMs).
How does Direct Routing Differ from CCE?
Microsoft Cloud Connector edition was a great way to enable PSTN connectivity for Skype for Business Online users, particularly as native cloud calling plans are only now available in Australia. However, CCE will support PSTN connectivity for Skype for Business Online only, not Microsoft Teams. The other key differentiator with Direct Routing is that I no longer need to deploy the Cloud Connector Edition virtual machines as well as an SBC to provide connectivity to the Office 365 cloud: a certified SBC is all that is required.
Another major difference with Direct Routing is that it can be deployed side by side with Telstra Calling for Office 365 Calling Plans. This means we now have greater flexibility in deployment options: I can choose to have some calls route via on-premises infrastructure, and other calls to route to the PSTN network direct from the cloud via Telstra Calling. This is useful in environments where I may want to route some calls to existing on-premises infrastructure (call centres, analogue endpoints, other 3rd party telephony infrastructure), but have the bulk of my organisation’s PSTN calls route via a Telstra Calling Plan (ignore “Microsoft Calling Plan” in the diagram below, in Australia it’s known as a Telstra Calling Plan):
Call Routing Options with Microsoft Teams
Now that there are two ways I can route calls to the PSTN from Microsoft Teams at the same time, how do I control what routes where?
Per User Call Routing
Using this approach, users are configured to route all their calls via Direct Routing or via a Telstra Calling Plan. In this example, one user is assigned a Calling Plan (pure cloud), the other a Direct Routing policy (via on-premises SBC):

Route Based on Dial Pattern
Using this approach, calls are routed via Telstra Calling plan or Direct Routing based on the number dialled. For example, if I dial numbers associated with an on-premises call centre, these route via Direct Routing, all other calls route via a Telstra Calling Plan:

Call Flow Logic
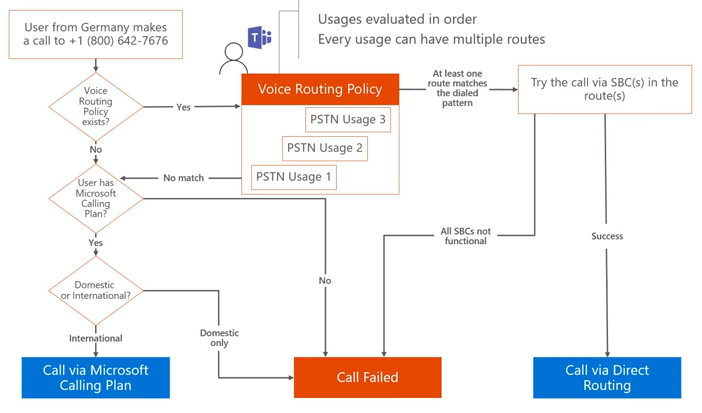
In the above example, calls route one of two ways depending on the number dialled. But what’s the logic? How does it “know” to route via a calling plan if Direct Routing fails to find a match? The following diagram outlines the decision tree when a user makes a phone call. As long as the user is licensed for Telstra Calling from within the Office 365 portal, the call will automatically route if no matching Direct Routes are found:
Direct Routing: How to Configure
In this section, I will walk through end to end configuration that enables Direct Routing with Microsoft Teams from an on-premises SIP Trunk, via a Ribbon SBC Edge 1000. This section assumes you have an intimate knowledge of Ribbon SBC configuration!
What Do I Need?
The following diagram gives a good overview of all the requirements needed to enable Direct Routing:

For more details on planning and configuring direct routing, check out the following Microsoft Docs:
Network Requirements
In order to support direct routing, a single public IP address is required that must be presented to the SBC. In my example configuration below, I created a new dedicated one-to-one NAT on the perimeter firewall: 121.50.209.233 <> 192.168.1.187. The private address was then bound as an additional IP address to Ethernet 1:

FQDNs and Firewall Port Requirements
The connection point for Direct Routing are the following three FQDNs:
- sip.pstnhub.microsoft.com – Global FQDN – must be tried first. When the SBC sends a request to resolve this name, the Microsoft Azure DNS servers return an IP address pointing to the primary Azure datacenter assigned to the SBC. The assignment is based on performance metrics of the datacenters and geographical proximity to the SBC. The IP address returned corresponds to the primary FQDN
- sip2.pstnhub.microsoft.com – Secondary FQDN – geographically maps to the second priority region
- sip3.pstnhub.microsoft.com – Tertiary FQDN – geographically maps to the third priority region
Placing these three FQDNs in order is required to:
- Provide optimal experience (less loaded and closest to the SBC datacentre assigned by querying the first FQDN)
- Provide failover when connection from an SBC is established to a datacentre that is experiencing a temporary issue
The FQDNs sip.pstnhub.microsoft.com, sip2.pstnhub.microsoft.com and sip3.pstnhub.microsoft.com will be resolved to one of the following IP addresses:
- 52.114.148.0
- 52.114.132.46
- 52.114.75.24
- 52.114.76.76
- 52.114.7.24
- 52.114.14.70
- 52.114.20.29
- 52.114.16.74
If your firewall supports DNS name resolution, the FQDN sip-all.pstnhub.microsoft.com resolves to all IP addresses listed above.
Note: The firewall port requirements below assume media bypass is not enabled. For additional port requirements for media bypass scenarios, see Plan for media bypass with Direct Routing
The following firewall ports are required to be open for all the above IP addresses:
| Traffic | From | To | Source Port | Destination Port | Description |
| SIP/TLS | Teams SIP Proxy
(IP addresses above) | Ribbon SBC | 1024-65535 TCP | Defined on SBC | SIP signalling from Teams to Ribbon SBC. In example below, destination port selected for SIP signalling is 5061. |
| SIP/TLS | Ribbon SBC | Teams SIP Proxy
(IP addresses above) | 1024-65535 TCP | 5061 TCP | SIP signalling from Ribbon SBC to Teams. |
| UDP/SRTP | Teams Media Processor 52.112.0.0/14 52.120.0.0/14 | Ribbon SBC | 3478-3481 & 49152-53247 UDP | Defined on SBC | Media from Teams to Ribbon SBC. The destination port is configurable on the SBC. |
| UDP/SRTP | Ribbon SBC | Teams Media Processor 52.112.0.0/14 52.120.0.0/14 | Defined on SBC | 3478-3481 & 49152-53247 UDP | Media from Ribbon SBC to Teams. The source port is configurable on the SBC. |
DNS Requirements
Before moving onto the configuration steps below, make sure you have created a public DNS A record for your Direct Routing trunk FQDNs. In this example, I created an A record for teamstrunk.insynctechnology.com.au pointing at 121.50.209.233.
Step 1: Office 365 Tenant Direct Routing Configuration
- Connect to Office 365 Remote PowerShell
$acctName="admin@domain.onmicrosoft.com"
$sfboSession = New-CsOnlineSession -UserName $acctName
Import-PSSession $sfboSession
- Create Online PSTN Gateway
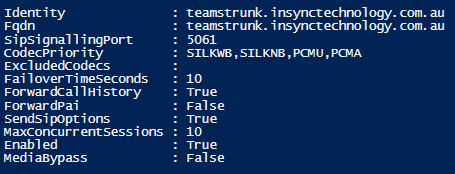
New-CsOnlinePSTNGateway -Fqdn teamstrunk.insynctechnology.com.au -SipSignalingPort 5061 -MaxConcurrentSessions 10 -ForwardCallHistory $true -Enabled $true
- Create an empty PSTN Usage
Set-CsOnlinePstnUsage -Identity Global -Usage @{Add="Australia"}

- Create Voice Routes and Associate with PSTN Usage
New-CsOnlineVoiceRoute -Identity "AU-Emergency" -NumberPattern "^\+000$" -OnlinePstnGatewayList teamstrunk.insynctechnology.com.au -Priority 1 -OnlinePstnUsages "Australia"
New-CsOnlineVoiceRoute -Identity "AU-Service" -NumberPattern "^\+61(1\d{2,8})$" -OnlinePstnGatewayList teamstrunk.insynctechnology.com.au -Priority 1 -OnlinePstnUsages "Australia"
New-CsOnlineVoiceRoute -Identity "AU-National" -NumberPattern "^\+61\d{9}$" -OnlinePstnGatewayList teamstrunk.insynctechnology.com.au -Priority 1 -OnlinePstnUsages "Australia"
New-CsOnlineVoiceRoute -Identity "AU-International" -NumberPattern "^\+(?!(61190))([1-9]\d{9,})$" -OnlinePstnGatewayList teamstrunk.insynctechnology.com.au -Priority 1 -OnlinePstnUsages "Australia"

- Create Voice Routing Policy
New-CsOnlineVoiceRoutingPolicy "Australia" -OnlinePstnUsages "Australia"

Step 2: Ribbon SBC Edge 1000 Configuration
Node-Level settings
Ensure the following general node level setting have been configured:
- From the SBC Web GUI, navigate to System > Node-Level Settings
- Check NTP configured and time is correct (TLS trunk will not negotiate if time is incorrect)
- DNS Server configured. To test DNS resolution, make sure the following can be resolved: sip.pstnhub.microsoft.com (test from Diagnostics > Ping Destination)

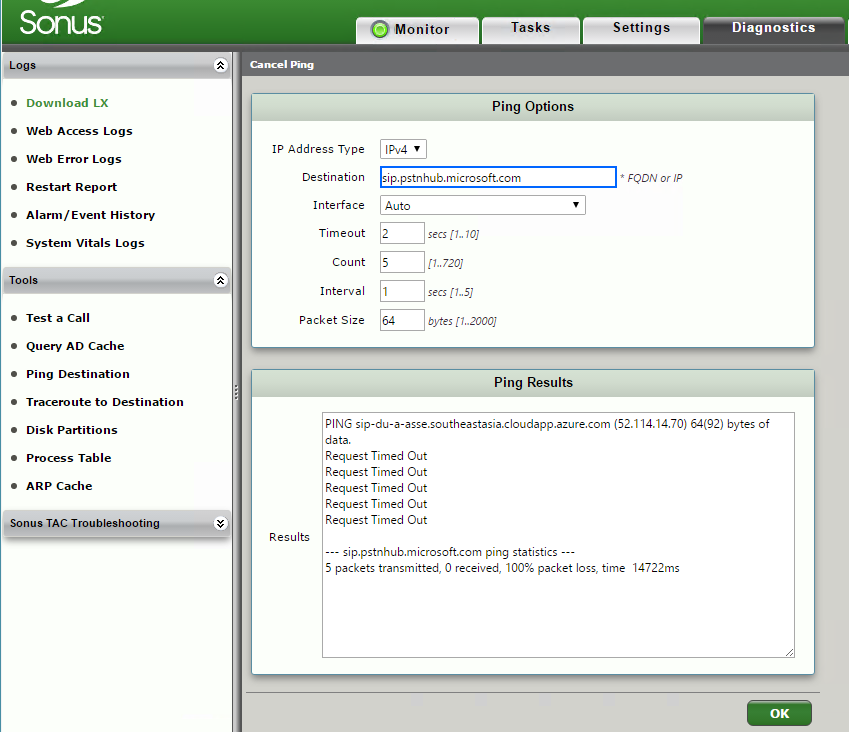
Note: Don’t expect a valid ICMP response, all we care about is a valid DNS resolution (the above example shows a successful resolution).
Certificates
The SIP Trunk I’ll be configuring between the SBC and Microsoft Teams must be a secure TLS trunk. To support this, a public certificate is required.
Important: Ribbon SBC Edge series appliances can only support one certificate installed at a time. If you’re planning to use an existing Edge series SBC for Direct Routing to Teams, you may already be using a certificate to support TLS trunks. If that’s the case, you’ll need to either revert to using TCP for existing trunks before updating the certificate, or adding your SBC’s FQDN to the public certificate that you plan to use for Direct Routing to Teams.
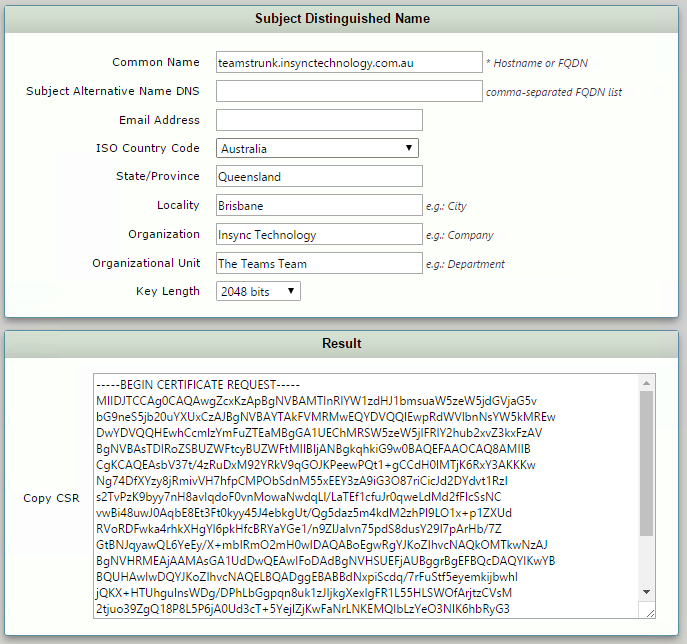
Request Certificate
- From the SBC Web GUI, navigate to Settings > Security > SBC Certificates
- Click Generate Sonus CSR
- Fill in the required fields
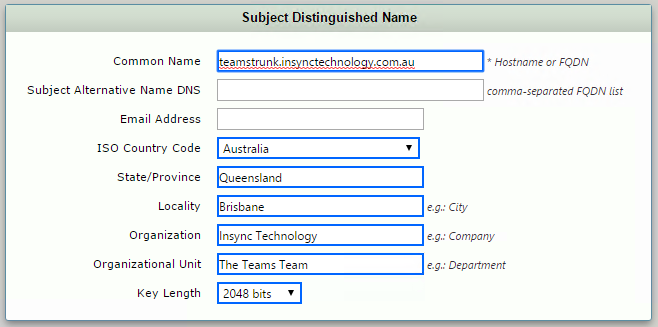
- Copy the Resultant CSR to your clipboard, and use to request a certificate from one of the supported public certificate providers
- Make sure to also obtain Trusted Root and Intermediary certificates from your public certification authority, as these will need to be imported to the Ribbon SBC also
Apply Certificates
After receiving the certificates from the certification authority, install the SBC certificate and the Root/Intermediate certificates:
- From the SBC Web GUI, navigate to Settings > Security > SBC Certificates > Trusted Root Certificates
- At the top left of the page click “import” and select the trusted root and (if applicable) any intermediate certificates
- Validate that the certificate installed correctly

- From the SBC Web GUI, navigate to Settings > Security > SBC Certificates > Sonus Certificate
- At the top of the page click Import > X.509 Signed Certificate and install
- Validate that the certificate installed correctly

Deploy Baltimore Trusted Root Certificate
The Microsoft Phone System Hybrid Voice Connectivity Interface has DNS name sip.pstnhub.microsoft.com. This interface uses a public certificate provided by Cyber Baltimore CyberTrust Root, which will also need to be trusted by your SBC:
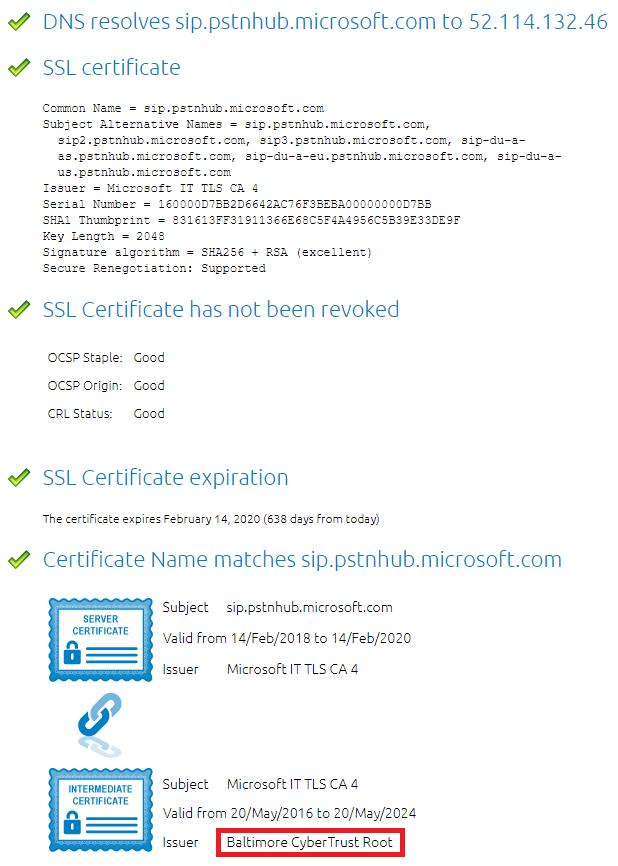
- Download the certificate from https://cacert.omniroot.com/bc2025.crt
- From the SBC Web GUI, navigate to Settings > Security > SBC Certificates > Trusted Root Certificates
- At the top left of the page click “import” and select the Baltimore trusted root cert
- Validate that the certificate installed correctly

TLS Configuration
Create TLS Profile
The TLS profile defines the crypto parameters for the SIP protocol. To create a new TLS profile:
- From the SBC Web GUI, navigate to Settings > Security > TLS Profiles
- At the top left corner of the main pane click “+” and add a new TLS Profile
| Parameter | Value |
| Description | MS Phone System TLS Profile |
| TLS Protocol | TLS 1.2 Only |
| Handshake Inactivity Timeout | 30 |
| Validate Client FQDN | Disabled |

SIP Profile Configuration
SIP profiles allows configuring such parameters as SIP Headers customizations, options tags etc.
- From the SBC Web GUI, navigate to Settings > SIP > SIP Profiles
- At the top left corner click “+” and add a new SIP profile
| Parameter | Value |
| Description | MS Phone System SIP Profile |
| FQDN in From Header | Sonus SBC FQDN |
| FQDN In Contact Header | Sonus SBC FQDN |
| Origin Field name | Ribbon SBC FQDN |

Media Configuration
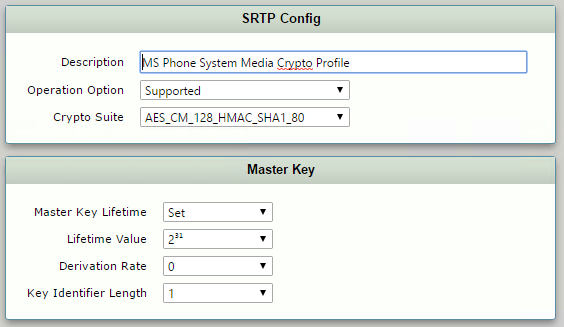
Configure Media Crypto Profile
The Media Crypto Profile defines the encryption mechanism to use between the SBC and Microsoft Phone System Interface. To add a Media Crypto Profile:
- From the SBC Web GUI, navigate to Settings > Media > Media Crypto Profiles
- At the top left corner click “+” and add a new Media Crypto Profile
| Parameter | Value |
| Description | MS Phone System Media Crypto Profile |
| Operation Option | Supported |
| Crypto Suite | AES_CM_128_HMAC_SHA1_80 |
Configure Media List
The Media List defines the codecs and if the crypto mechanism will be used. To create a media Profile:
- From the SBC Web GUI, navigate to Settings > Media > Media List
- At the top left corner click “+” and add a new Media List:
| Parameter | Value |
| Description | MS Phone System Media List |
| Media Profiles List | Default G711a
Default G711u |
| Crypto Profile ID | MS Phone System Media Crypto Profile |

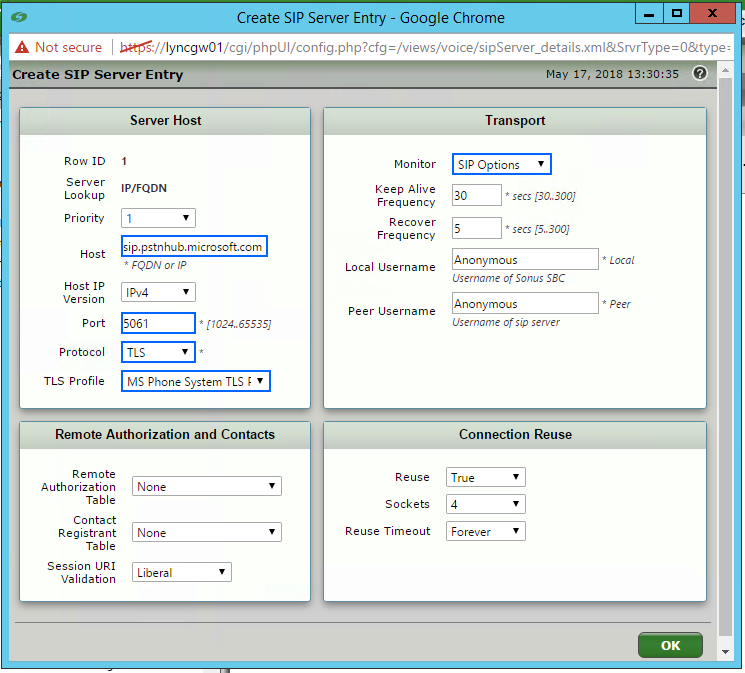
Configure SIP Server Table
The SIP server table defines the information about the SIP interfaces connected to the Sonus SBC. To add a new SIP Server Table:
- From the SBC Web GUI, navigate to Settings > SIP > SIP Server Tables
- At the top left corner of the main pane click “+” and add a new SIP Server Table
- Name the Table and click save
- Click on the new SIP Server Table, and configure the following
| Parameter | SBC 1 | SBC 2 | SBC 3 |
| Priority | 1 | 2 | 3 |
| Host | sip.pstnhub.microsoft.com | sip2.pstnhub.microsoft.com | sip3.pstnhub.microsoft.com |
| Port | 5061 | 5061 | 5061 |
| Protocol | TLS | TLS | TLS |
| TLS Profile | Microsoft Phone System | Microsoft Phone System | Microsoft Phone System |
| Monitor | SIP Options | SIP Options | SIP Options |

Configure Transformation Tables and Routing Tables
If you’ve made it this far, I would assume you are already familiar with transformation and routing table configuration. For completeness sake, here’s the ones I created for my test Direct Routing number:


Configure Route Table
You will need to route calls both to and from your Microsoft Teams Direct Routing trunk:


Create Signalling Group
To create a new signalling group:
- From the SBC Web GUI, navigate to Settings > Signalling Groups
- At the top left corner of the main pane click Create SIP Signalling Group
| Parameter | Value |
| Description | MS Phone System |
| Call Routing Table | From MS Phone System |
| No. of Channels | 10 |
| SIP Profile | MS Phone System SIP Profile |
| SIP Server Table | MS Phone System Sip Server Table |
| Load Balancing | Priority |
| Media List ID | MS Phone System Media List |
| Signalling Media/Private IP | Ethernet 1 (whichever port you’re using to route to/from Office 365) |
| Outbound NAT Traversal | Static NAT |
| NAT Public IP (Signalling/Media) | 121.50.209.233 |
| Listen Port | Port: 5061
Protocol: TLS TLS Profile ID: MS Phone System TLS Profile |
| Federated IP/FQDN | sip.pstnhub.microsoft.com
sip2.pstnhub.microsoft.com sip3.pstnhub.microsoft.com sip-all.pstnhub.microsoft.com |

Important: Make sure to add sip-all.pstnhub.microsoft.com to the Federated IP/FQDN list. In testing, I was receiving SIP invites from IP addresses that were not resolvable via the three Microsoft documented “pstnhub” FQDNs. This meant that every third inbound call to Microsoft Teams would fail as the source IP was unknown. adding this additional record was the solution.
Once this has been created, confirm you are sending and receiving SIP Options and 200 OK responses in both directions:
- From the SBC Web GUI, navigate to Settings > Signalling Groups
- For the MS Phone System Signalling Group, click on Counters

Step 3: Enable Users for Direct Routing with Microsoft Teams
Now that the SBC configuration has been completed, we can now enable our Microsoft Teams users for calls via Direct Routing.
Ensure User is Homed to Office 365
If you are still sporting a hybrid Skype for Business environment, it’s only supported to enable users for Direct Routing with Teams if they are homed in Office 365. To check this, run the following cmdlet and ensure the Registrar Pool fqdn ends in “infra.lync.com:
Get-CsOnlineUser -Identity "Patrick Bateman" | fl RegistrarPool
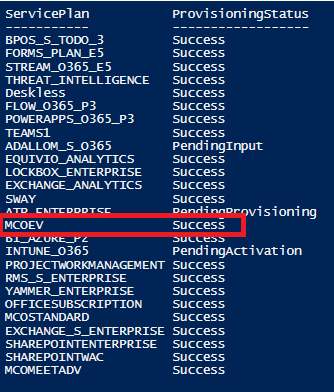
Ensure User is Licensed for Phone System
Your users will need to be licensed for Microsoft Phone System in order to enable calls within Microsoft Teams. To check:
Connect-MsolService

(Get-MsolUser -UserPrincipalName patrick.bateman@insynctechnology.com.au).Licenses.ServiceStatus
Enable Telephony Features and Configure Phone Number
The following cmdlet will enable the user for Phone System calling, enable Azure Voicemail, and configure their phone number:
Set-CsUser -Identity patrick.bateman@insynctechnology.com.au -EnterpriseVoiceEnabled $true -HostedVoiceMail $true -OnPremLineURI tel:+61799999999

Configure Voice Routing
The final step is to assign the Online Voice Routing Policy we created earlier to the user. To do this:
Grant-CsOnlineVoiceRoutingPolicy -Identity "patrick.bateman@insynctechnology.com.au" -PolicyName Australia
To Check everything has been configured correctly, run the following:
Get-CsOnlineUser -Identity "patrick.bateman@insynctechnology.com.au" | Format-List -Property FirstName, LastName, EnterpriseVoiceEnabled, HostedVoiceMail, LineURI, UsageLocation, UserPrincipalName, WindowsEmailAddress, SipAddress, OnPremLineURI, OnlineVoiceRoutingPolicy

Testing
Once configuration has been completed, it may take a while for changes to take effect. The first thing you should notice is the calls button appear in the Teams client:
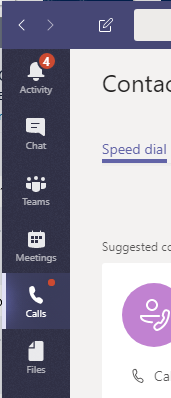
Once this appears, you should now be able to route calls to and from Microsoft Teams!
Outbound Call from Teams to PSTN


Inbound Call from PSTN to Teams

Resources
A lot of the diagrams for this post came from a great video available on YouTube. Check it out here: Direct Routing in Microsoft Teams
I hope you find this post useful. As usual, ping me with any questions or queries, always happy to help.

Leave a reply to BC Cancel reply