Recently I was working on a Lync 2013 deployment, where trusted application servers (used for Remote Call Control with an NEC PBX) needed to be moved from 2010 to 2013. This work was carried out by an external contractor, who removed the trusted application servers from the Lync Topology, published, and then re-added them to the 2013 pool. I can’t be sure exactly what steps were followed, however shortly after it was discovered that all Lync Front End services across all Front End servers would not start:
Trying to manually start the services would result in the following error:
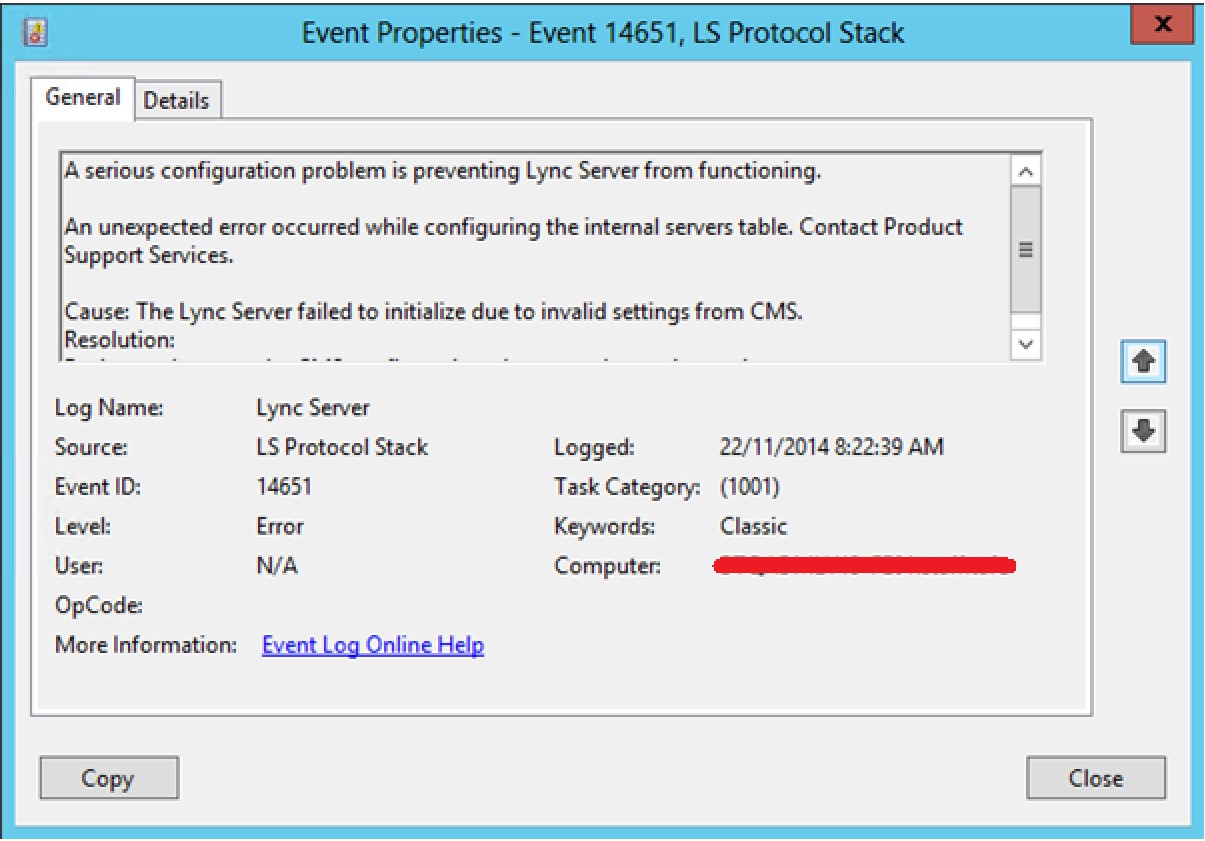
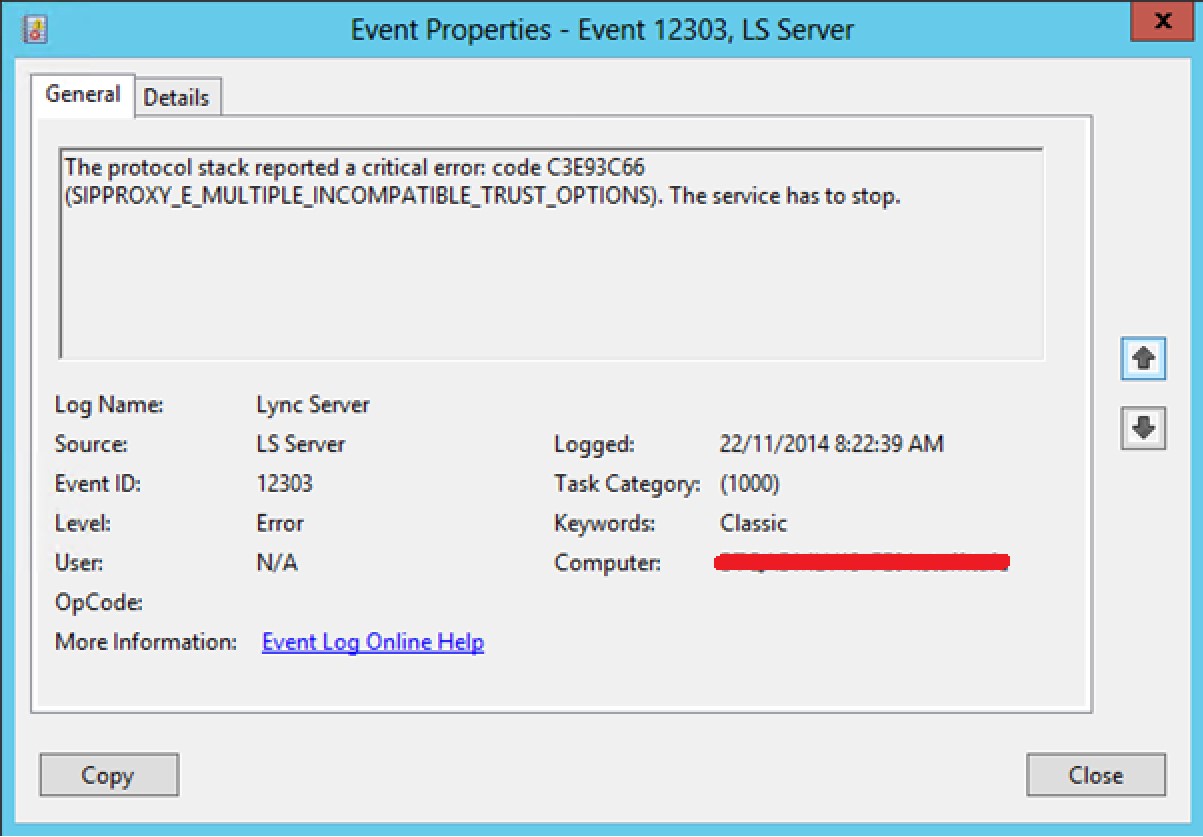
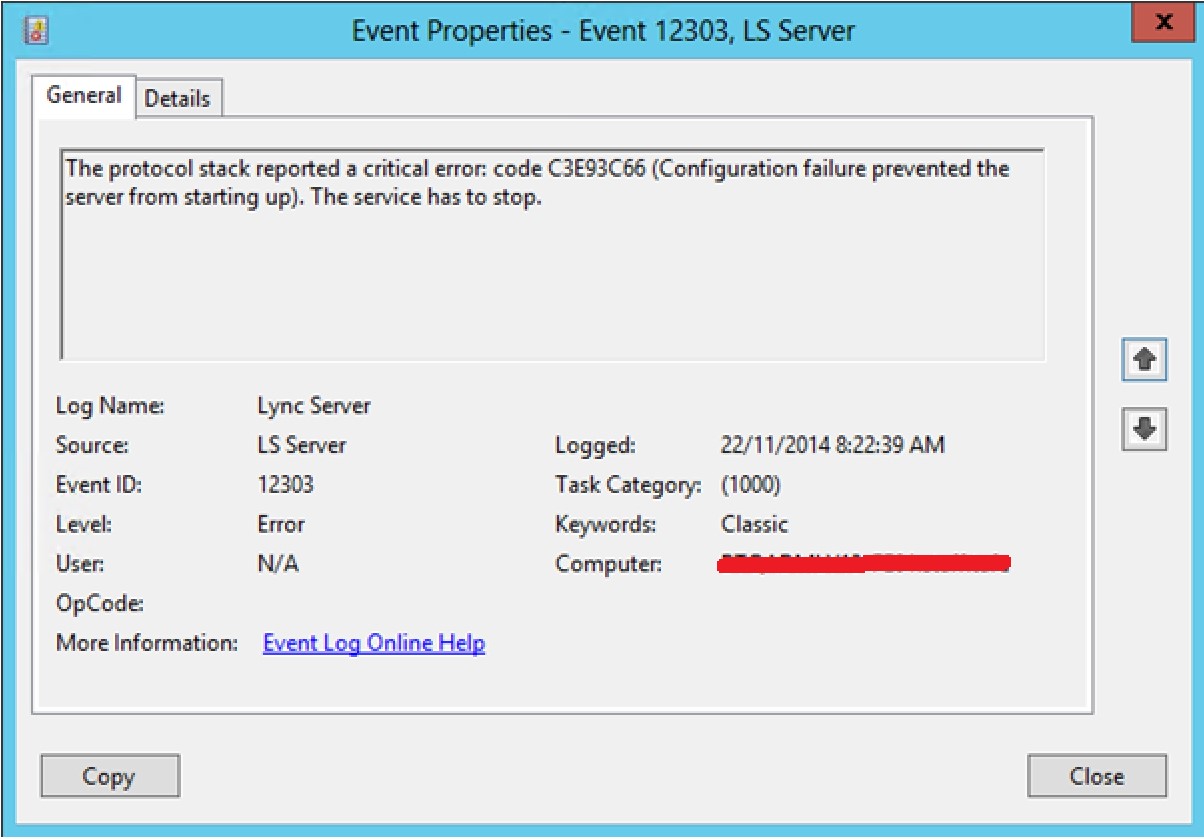
Checking the Event logs, I could see the following errors:
Again, I’m not sure how this occurred, but it would seem that CMS lost IP address configuration for the Front End servers.
Resolution
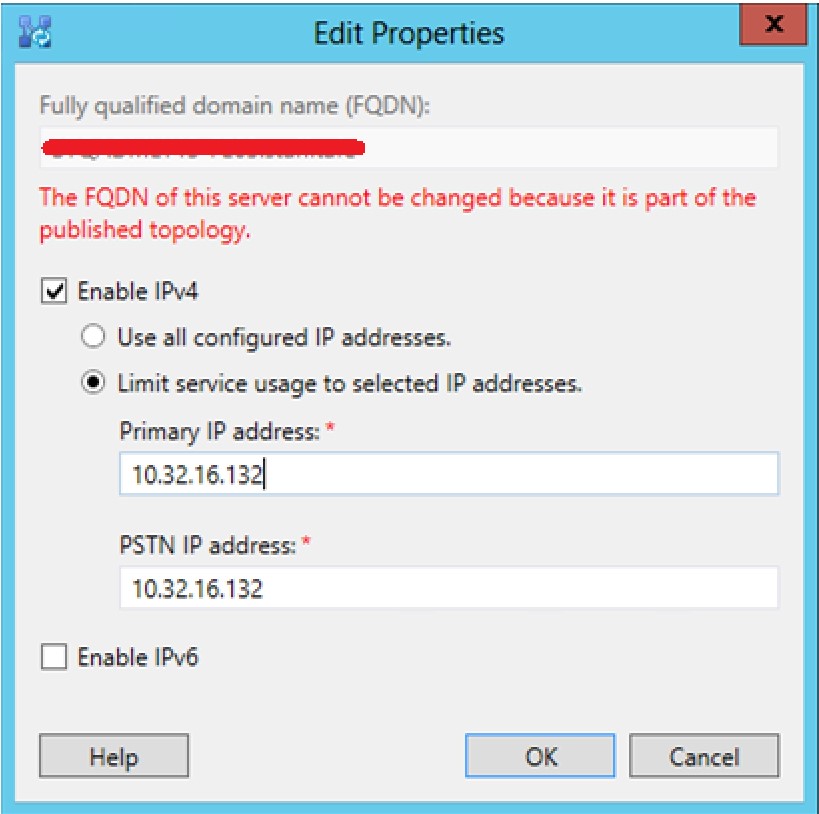
To fix the issue, I manually added the Front End server IP addresses to Topology Builder. To do this:
Open Topology Builder,
Right click on each Front End server in your pool, and select Edit Properties…
Instead of using all configured IP Addresses, manually add the server’s IP address
Publish the topology
Once replicated, I could once again start Lync Front End services.
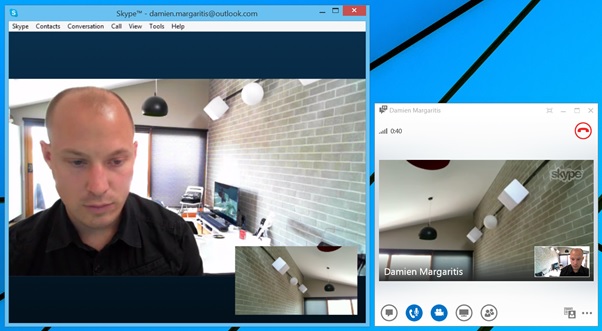
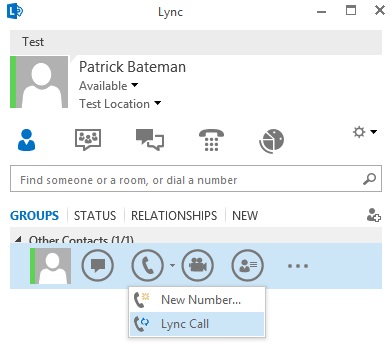
For this to work, the Skype user needs to be on the latest Skype for Windows client (7.0.85.100). When I tried updating the Skype client directly from the client itself, it didn’t update me to v7. I ended up going here to get the latest version.
Once installed, I was able to get calls between my Lync 2013 client and the Skype for Windows client:
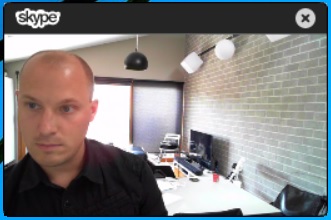
If the Skype client isn’t in focus, you also get a handy video only view that floats above your other apps:
Within the Lync community, we have all been waiting for the inevitable. Finally, it’s been announced: Lync 2013 will be rebranded Skype for Business. Note the terminology I’ve used here: rebranded. Skype is not replacing Lync 2013, it’s simply adopting the name. Whilst there has been endless discussions about what this means for integrators and end users, I personally am for it, and can understand Microsoft’s desire to use a well known brand (I mean, it’s also a verb) to help end users identify with what Universal Communications is. Many a time when I’ve been trying to describe to non technical friends and family what I do for a living, I’ve usually phrased it as “Skype for the workplace”, or “Skype on steroids”. If nothing else, the rebranding may help get the UC message across to an even larger audience.
What’s going to change?
When Skype for Business is released next year, there will be an in-place server upgrade, and a new client to deploy. It’s important to note that no modifications need to be made to existing Lync 2013 infrastructure to support Skype for Business. The prerequisites required are identical. This should allay any fears clients should have around if/when they deploy or migrate to Lync 2013. A full side by side migration (as was required when migrating from OCS to Lync 2010 or Lync 2010 to Lync 2013) will not be required. Additionally, all Lync phones, video conferencing endpoints, headsets, gateways, etc will be fully supported on the Skype for Business platform.
What’s the difference between Skype and Skype for Business?
Skype will continue to be the consumer product offered to the public. Skype for Business on the other hand, will be the Enterprise grade solution for organisations that need more. What exactly is more? Here are some of the differences:
Skype is free, Skype for Business is paid and subject to licensing
Skype is subject to ads, Skype for Business is not
Skype offers limited PSTN calling, Skype for Business can be deployed with full Enterprise Voice functionality, including call centre integration, call park, delegation, advanced call routing, integration with 3rd party gateway and legacy PABX systems
Skype does not have a web client, Skype for Business does
Skype has limited conferencing capabilities, Skype for Business offers a rich conferencing experience, including audio/video/desktop sharing/application sharing/whiteboarding/meeting recording/the list goes on.
If you want to read more about Skype for Business, get a look at the new client and watch a short demo, head over to the Skype Blog.
This is something I’ve been meaning to write since the release of Lync Server 2013. However, I’ve been waiting to have all the components I need in my lab to successfully capture all the relevant screenshots and traces, and for Microsoft to resolve a bug with the Mediation server role that was rectified with CU3 (more on that later). This article is broken into the following sections:
Overview
Terminology
Lync call forwarding behaviour
What’s the Problem?
What’s the Fix?
Configure Lync to present B Party information in Sim Ring/Call Forwarding SIP INVITE
NOTE: To carry out the configuration changes outlined in the fix section of this article, it is assumed that the reader has an in depth understanding of Lync Enterprise Voice configuration (particularly the Mediation server role and the SIP protocol) as well as experience configuring Sonus Session Border Controllers (SBCs).
Overview
Terminology
Before looking at the technical configuration aspects of this post, here’s a brief overview of some of the terms I’ll be using:
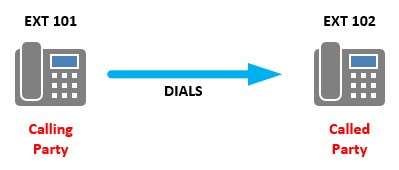
Called/Calling Party
These terms refer to an endpoint that initiates a call (calling party) and an endpoint that receives the call (called party).
A/B/C Party
When displaying call flows for calls that are forwarded to another destination, it’s common to see the parties involved in the call flow referred to as A, B and C Party:
A Party: The endpoint that initiates the call
B Party: The endpoint that receives the call
C Party: The endpoint the call is ultimately forwarded to
SIP INVITE: FROM/TO
To facilitate the setup, management and tear down of calls, the SIP protocol makes use of SIP Headers. This article is concerned with the SIP INVITE header, and how we manipulate it with the help of a Session Border Controller (SBC) to achieve a desired outcome. Within the header is a number of fields, each of which has a specific purpose to assist with communication between two endpoints (Nick Galea over at 3cx.com has a great blog post that explains the SIP HEADER in greater detail). The two fields within the header that are of interest for this article are the FROM and TO fields. The FROM field is used to identify the initiator of the request, while the TO field specifies the logical recipient of the request (simplified descriptions, but sufficient for the scope of this article).
Lync Call Forward Behaviour
When a Lync user has their client or device configured for call forwarding or simultaneous ring, the Mediation server initiates an outbound call on behalf of the user to the C Party endpoint. When constructing the SIP INVITE for this call, Lync will use the C party number in the TO field of the SIP header (called number) and the A party number in the FROM field of the SIP header (calling number).
The important takeaway from this is that the B Party number (the Lync user’s number) is not present in the outbound INVITE.
What’s The Problem?
The lack of B party information in the outbound SIP INVITE first started to cause problems for me on deployments once SIP Trunks (as opposed to ISDN trunks) started to become more widely adopted on Lync deployments. When deploying ISDN trunks, this issue usually remained unnoticed. Why?
If you think about a standard call from Lync to the PSTN, you have the usual called and calling parties: A Party is the internal Lync user, and B party is the PSTN number you’re dialling. Before the call is routed out to the PSTN, you will typically manipulate the called and calling numbers into a format the trunk provider is expecting. For example:
E.164 From Lync
Manipulate To
Called Number
+61400734033
400734033
Calling Number
+61386097221
386097221
If you get the called number manipulation wrong, the call will fail, as the Telco won’t know where to route your call. If you get the calling number manipulation wrong, and the trunk to the PSTN trunk is using ISDN, the Telco will usually replace the incorrect number with the pilot number for the trunk; for example 0386097220 (commonly, the pilot number is reception or the main Auto Attendant number). However, if the trunk to the PSTN is a SIP Trunk, some Telcos will drop the call. This is because the Telco does not recognise the B Party number as being part of the number range your organisation owns. When tracing, this is commonly represented by a 404 Not Found response from your SIP trunk provider.
Applying the above logic to Simultaneous Ring or Call Forwarded calls, you may start to see where the issue arises. If the B Party number (the Lync User’s number) does not appear anywhere in the outbound SIP INVITE, it’s impossible for me to manipulate out into the FROM field of the SIP header.
Even when working with SIP Trunk providers who do not drop the call, and treat the call the same was as ISDN (replacing Calling Number with the pilot number), it is still of benefit to know what the B Party number is for outbound calls, for a couple of reasons:
Better decision point for users receiving a forwarded/simultaneous ring call
When a user receives a simultaneous ring call on their mobile phone, the call appears to be coming from their own Direct in Dial (DID) number instead of the Pilot number for the organisation. Either someone is standing at their desk and calling them from their phone (unlikely), or they can be confident in the fact that this is a forwarded/simultaneous ring call for them, and not a call from reception.
Deployments with multiple area code SIP trunks deployed on a single gateway
For sites with a single area code SIP trunk terminated on their SBC, not knowing the B Party number and displaying the Pilot Number for forwarded/simultaneous ring calls may not be a problem. But what about deployments that have multiple area code SIP Trunks terminated on a single SBC? How would you know what pilot number to use for the Calling Number field? Knowing the B Party numbers resolves this issue.
What’s the Fix?
In the following configuration/traces, I’m using the following parameters:
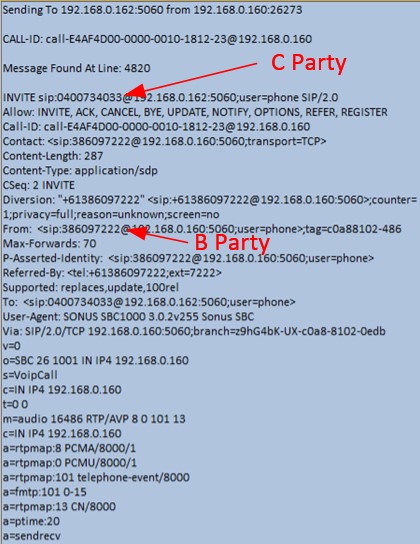
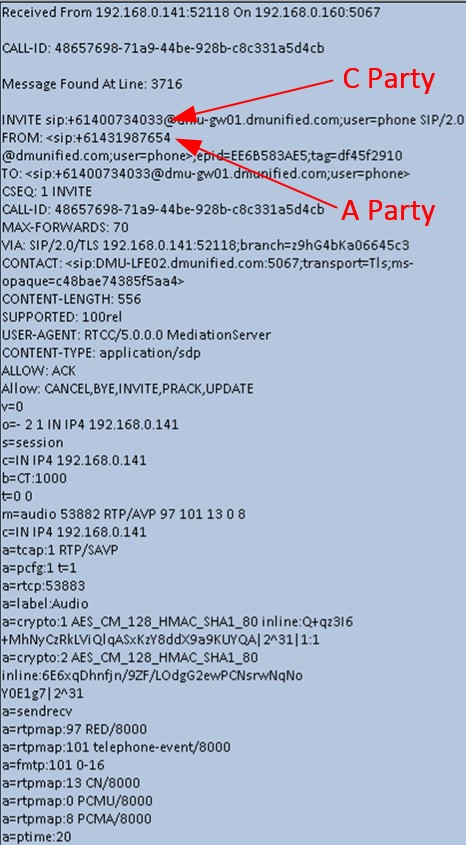
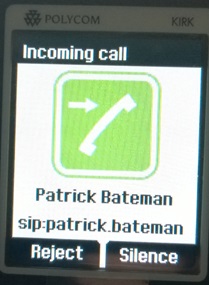
A Party: +61 431 987 654(Call From PSTN)
B Party: +61 3 8609 7222(Lync user Patrick Bateman)
C Party: +61 400 734 033 (Patrick Bateman’s Mobile)
Lync 2010
The Lync Server 2010 Cumulative Update 2 (CU2) introduced a fix that allowed for B Party information to be present in the outbound call forwarding/simultaneous ring INVITE. Below is a trace of a simultaneous ring outbound SIP INVITE without the fix (note the lack of B Party information anywhere in the INVITE)
Applying the Fix
Lync Server 2010 Configuration
Ensure at least CU2 is applied across your Lync 2010 environment
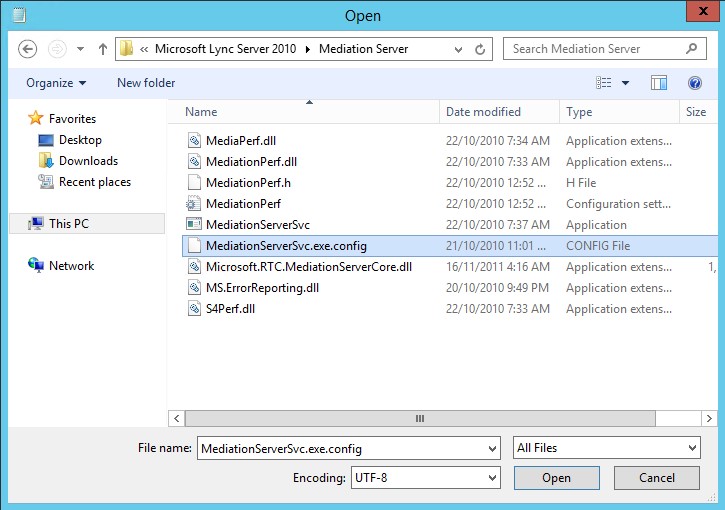
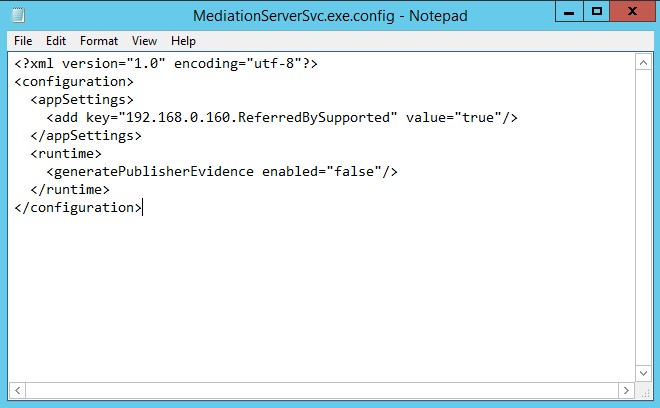
On each Lync 2010 Server in your deployment hosting the Mediation Server role, run Notepad as an administrator and open MediationServerSVC.exe.config located in Program Files > Microsoft Lync Server 2010 > Mediation Server:
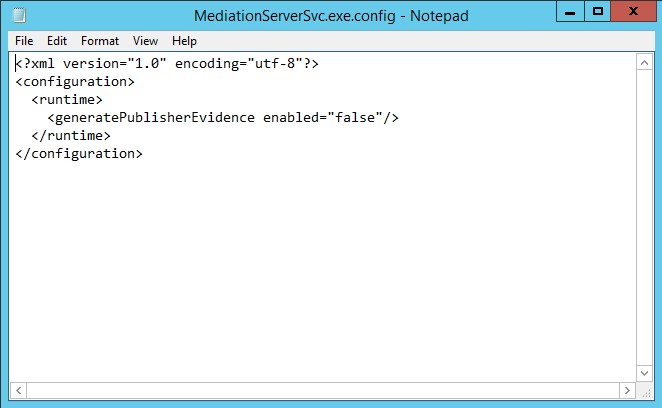
You should be presented with this:
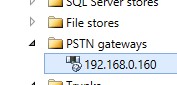
Add in the following configuration (highlighted in red below) with one “add key” entry required per PSTN gateway in your deployment. In this example, the PSTN gateway is configured to communicate via TCP (unsecured), so the IP address of the gateway was configured in Topology Builder instead of the FQDN. Make sure you enter in the FQDN of the PSTN gateway if that’s what you have used in your deployment:
For the change to take effect, you’ll need to restart the Mediation service (if the service fails to start, you’ve made a mistake when editing the MediationServerSVC.exe.config file. Fix the errors, and try again):
Looking at a call trace now, notice the addition of B Party information now contained in the REFERRED-BY Field:
Now that we have the B Party information we want in the SIP INVITE, the next step is to configure the SBC to take this value and use it as the Calling Number for the outbound SIP INVITE to the SIP Trunk provider. In this example, we are using a Sonus SBC1000 as our Session Border Controller.
Sonus SBC 1000 Configuration
First up, let’s look at the existing Lync – ITSP transformation table I had configured that did not take into account the Referred-By B Party value for the outbound INVITE:
Using this as a base, here’s a new table I created where I’ve added a new entry: Redirecting Number:
The Input Field Type Redirecting Number will take the Referred-By value, and as shown above we are outputting to Calling Address/Number. The second Redirecting Number entry is a catch all, ensuring the route table entry is still valid for non-forwarded call that won’t have the Referred-By field present.
With this configuration in place, when an outbound SIP INVITE is received at the SBC with REFERRED-BY in the header, the B Party number is manipulated by the new transformation table and slotted into the Calling Number field on the outbound SIP INVITE to the ITSP. Looking at the trace below, you can see the Received Simultaneous Ring INVITE (Arrived 22) showing the A and C Party, followed by the INVITE that’s sent to the SIP Trunk Provider with the Called and Calling numbers we want: B Party and C Party:
Delving a little deeper in the logs, you can see the Successful REGEX match of the Redirecting number with the B Party number, and it being successfully manipulated ready to send out to the Telco:
Successful regex match of “tfRedirectingNumber” field for “(\+.*)” (updated “(\+.*)”) with input of “+61386097222” Regex replacement output of “tfCallingNumber” field is “+61386097222“Performing OPTIONAL transformation using entry Lync – ISDN: CLI (8.7(6)).Successful regex match of “tfCallingNumber” field for “\+61(\d{9})” (updated “\+61(\d{9})”) with input of “+61386097222“Regex replacement output of “tfCallingNumber” field is “386097222“
Finally, here’s the outbound INVITE to the SIP Trunk provider:
Lync 2013/Skype for Business 2015
Lync Server 2013 introduced the ability to present B Party caller info in the outbound SIP INVITE, however there was a bug within the Mediation Server role up until CU2 that prevented the information from being added to the SIP INVITE if the user’s Line URI was configured with the extension (i.e. +61386097222;ext=7222). In CU3, this issue was resolved.
Before we configure anything, below is a trace showing no B Party information in an outbound Simultaneous Ring SIP INVITE from the Mediation Server Role:
Applying the Fix
Lync Server 2013/Skype for Business Server 2015 Configuration
Unlike the 2010 fix, there’s no need to update any Mediation Server config files. First up:
If you are still on Lync Server 2013, ensure at least CU3 has been applied across your Lync 2013 environment
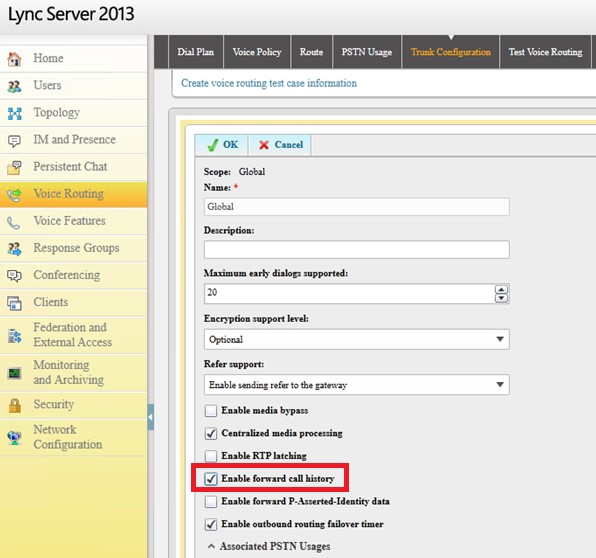
From the Lync Control Panel, open Voice Routing > Trunk Configuration and tick Enable forward call history
Wait for replication across your Lync environment
Now that we’ve enabled forward call history, here’s a trace showing B Party information in the outbound SIP INVITE from Lync. Note that the B Party information is found in the HISTORY-INFO field, not the REFERRED-BY field as it was in the Lync 2010 fix:
Sonus SBC 1k2k Configuration
The following table will capture B Party information if it’s present (i.e. a Forwarded or Sim Ring call). Note the inclusion of the second entry for Redirecting Number. This allows us to use a single table for all outbound calls from Lync, regardless of whether or not HISTORY-INFO is present or not. This negates the need to use two separate tables. This is possible, as regex (.*) on a Sonus gateway means “something or nothing”. If it’s not there, it still matches, and passes through nothing:
I hope you have found this blog post useful. If you would like to know more about Lync and Sonus integration, would like a demo or would like to talk more about a solution that’s right for you, feel free to get in touch: damien.margaritis@insynctechnology.com.au.
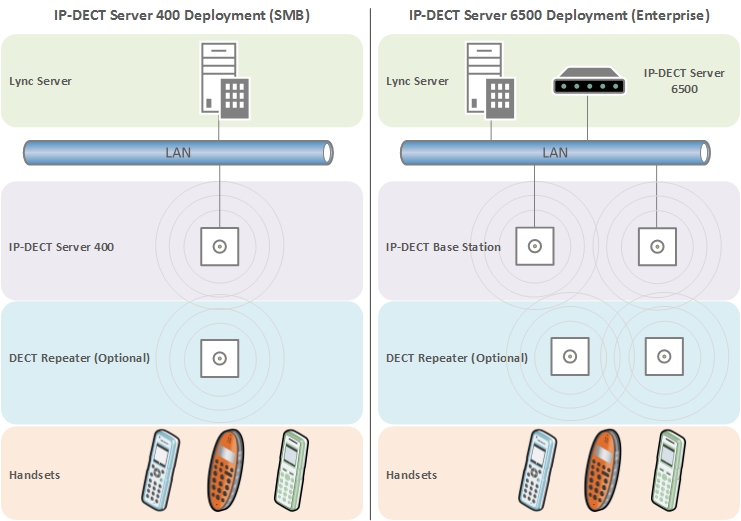
One of the things that many clients want with any deployment is the option for at least a few wireless handsets. Whilst it could be argued that Lync 2013 offers a range of options when it comes to supporting a wireless client over Wi-Fi or 3/4G, it’s not always the magic bullet we would all like it to be. Internal Wi-Fi networks can sometimes be less than ideal, particularly when attempting to support real time communications, and it’s still common to come across 3/4G black spots, particularly when inside a building or in regional areas. There is of course another technology option if we would like to support medium range wireless telephony within our Lync deployments: DECT
We’re all familiar with DECT, or Digital Enhanced Cordless Communications. It’s the same technology we’ve had in our homes for years, and is utilised today by a range of Lync certified wireless headsets (some examples can be found over at Plantronics and Jabra). What’s been missing is a native Lync DECT handset solution.
We can all be thankful then that Spectralink have a range of handsets that have been tested and qualified for use with Microsoft Lync 2010 and 2013, in both WiFi and DECT models. This article focuses on Spectralink’s DECT offering, providing integrators with a DECT wireless option when deploying Enterprise Voice for their customers.
The Handsets
There are a range of DECT handsets to choose from, each targeting a specific vertical:
The Spectralink 7000 Site Survey handset is also available, which looks to be a handy tool for integrators deploying Spectralink DECT networks. Looking forward to trialling this in the future.
The Infrastructure
The DECT handsets subscribe to an IP-DECT server, which in turn communicates with the Lync environment. The system could consist of a single IP-DECT server and a few handsets, right through to a network of IP-DECT servers, base stations and repeaters that support hundreds of handsets.
Larger organisations, modular, supports up to 4,096 wireless users
Note that the number of channels supported by each server version is reduced when Secure RTP (SRTP) is enabled between the Spectralink servers and Lync.
DECT Base Station/Repeater
The IP-DECT base stations are controlled by the IP-DECT server, providing a link between the handset and the IP-DECT server. The DECT repeater can be used to extend the coverage of the DECT servers/base stations.
Building block that extends the DECT coverage area
For smaller deployments, the IP-DECT Server 400 combines the role of server and base station into a single unit. For larger deployments, the IP-DECT server requires the deployment of at least one IP-DECT Base Station. Both servers support the deployment of DECT repeaters, however these are not a required component:
The Configuration
Guides
I’ve referred to the following guides when configuring integration between Spectralink and Microsoft Lync Server 2013:
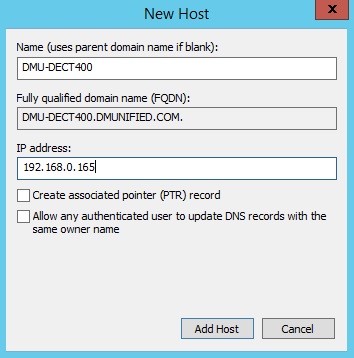
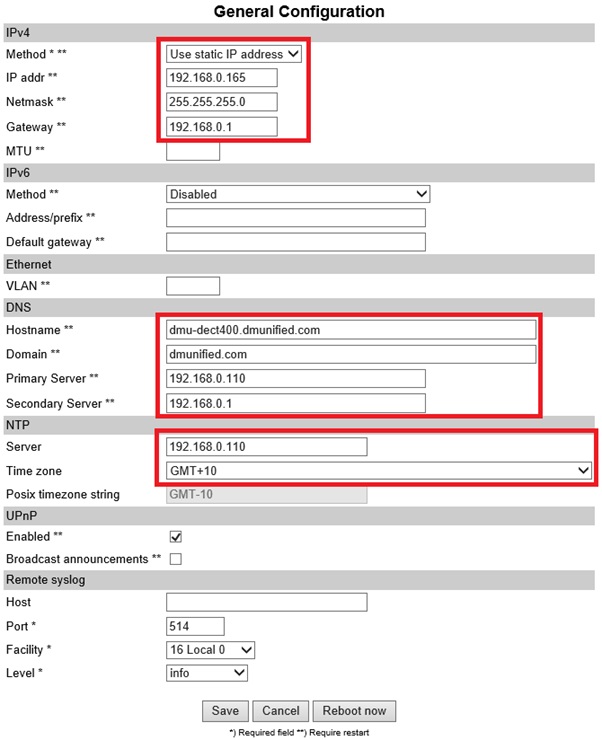
Choose a FQDN for your Spectralink server, and add it to DNS. In this example, I’m using DMU-DECT400.dmunified.com
Lync Configuration
There are two methods that we can use to register a user to Lync: System Authentication (Trusted Server) or User Authentication (NTLM):
Trusted Server method – When configured this way, the Spectralink 400 server is setup as a trusted application server within the Lync environment. When configuring user accounts from the Spectralink Web GUI, only the SIP prefix (e.g. Damien.Margaritis) needs to be specified. It’s also possible to change the SIP prefix from the handset instead of the Web GUI, something you can’t do when using NTLM authentication (there’s no way to enter AD credentials from the handset).
NTLM method – When configured for NTLM authentication, the Spectralink 400 server is not added as a trusted application server to the Lync environment. Because of this, each user that’s configured via the Spectralink Web GUI will require AD username and password details to support NTLM authentication.
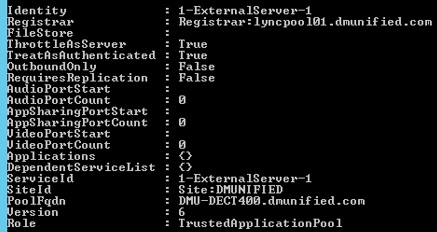
In this blog article, we’re going to configure the Spectralink server as a trusted application server from the Lync Management Shell (this is Spectralink’s recommended method)
Configure Trusted Application Server
From the Lync Management Shell:
If you don’t know your Lync Site ID, run Get-CsSite first and note it down
Click Y when presented with the topology publishing warning (this is expected). You should see something similar to this:
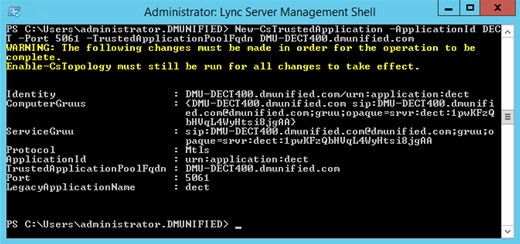
Run New-CsTrustedApplication -ApplicationId DECT -Port 5061 -TrustedApplicationPoolFqdn DMU-DECT400.dmunified.com
Run Enable-CsTopology
Spectralink 400 Server Configuration
General Configuration
From the Web GUI, open Configuration > General, and configure the following settings:
IPv4
DNS
NTP
Firmware Version
Make sure your firmware version is up to date (at time of writing, latest version was PCS14, download here.
From the Web GUI, openStatus > General. Confirm the PCS version is current
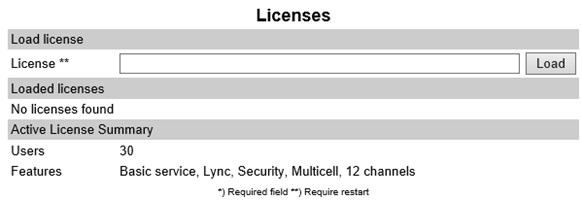
Licensing
To support integration with Lync, a license is required. Make sure this is applied:
From the Web GUI, open Administration > License
Copy the License key into the License field, and click Load
Reboot the server. You should now see the Lync license applied:
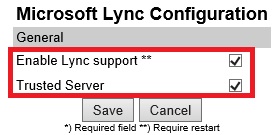
Enable Lync Support
Open the Web GUI to Configuration > Lync, and select both options, and click Save
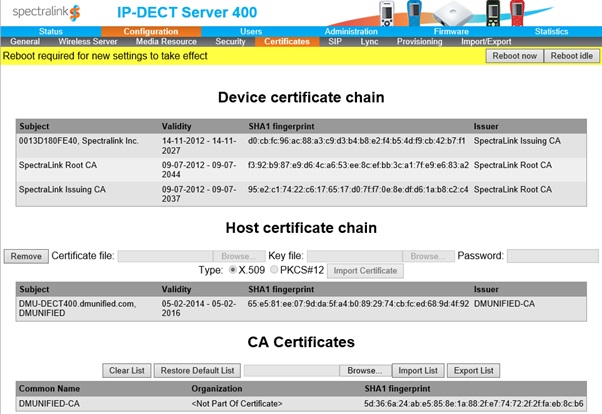
Certificates
So that media communication is secured between endpoints, you’ll need to import your Internal CA Root Certificate and Create/Import a host certificate.
Import Root CA certificate
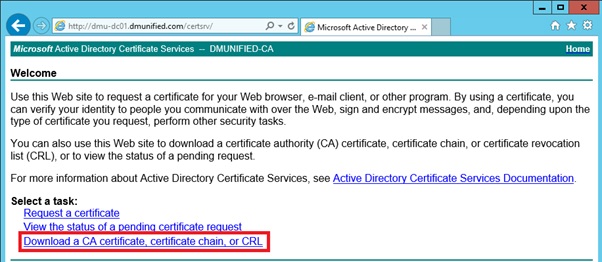
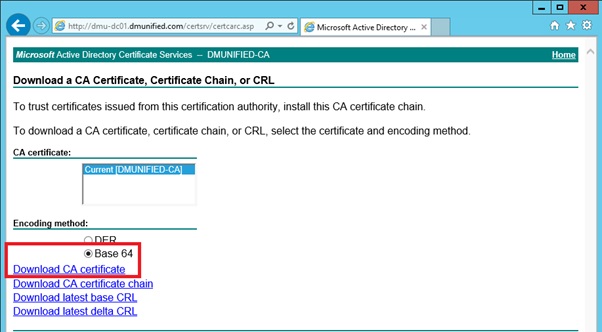
To obtain the root certificate from your internal CA:
Select Download a CA Certificate, certificate chain, or CRL
Ensure Base 64 is selected, and click on Download CA Certificate
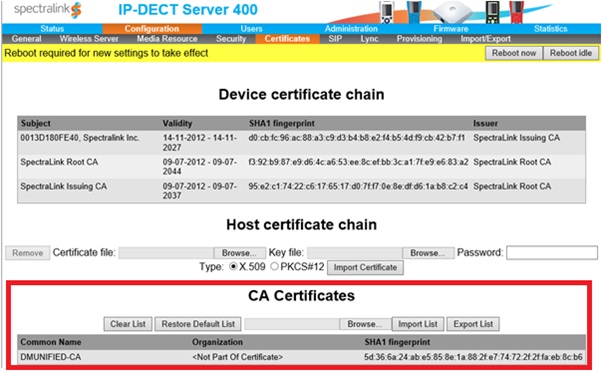
Back on the Spectralink 400 server, open Configuration > Certificates
Under CA Certificates, browse to the root CA you exported above, and select Import List. This will replace the default list with your internal root certificate
Create/Import Host Certificate
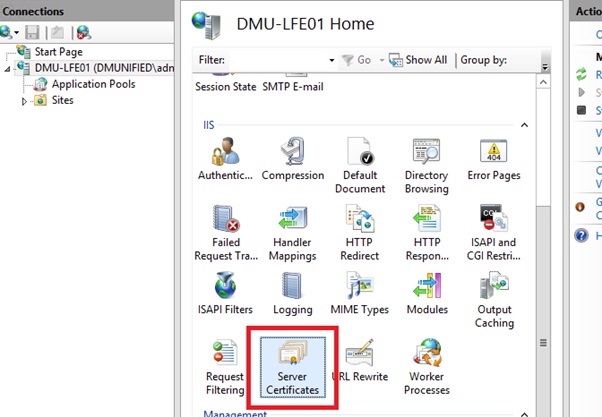
From your Lync Front End server, open IIS, and select Server Certificates
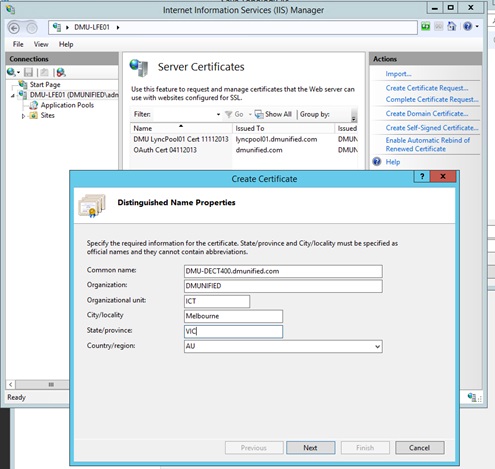
From the menu on the left, click on Create Domain Certificate…
For the common name, ensure you enter in the FQDN of the Spectralink server that you entered into DNS earlier. Fill in the rest of the details, and complete the wizard
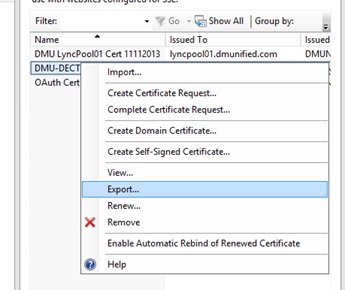
Right click the new certificate, and click on Export
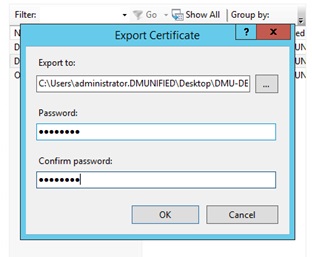
Choose a file location to export to, set a password and click OK
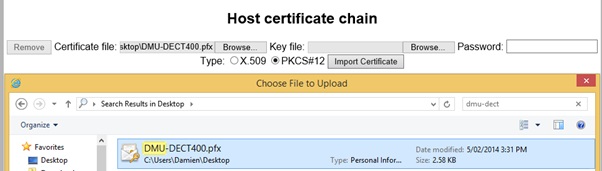
Import the Host Certificate onto the Spectralink Server. From the Web GUI, open Configuration > Certificates
From the Host Certificate Chain section, browse to the certificate file location, enter in the password and ensure you select PKCS#12
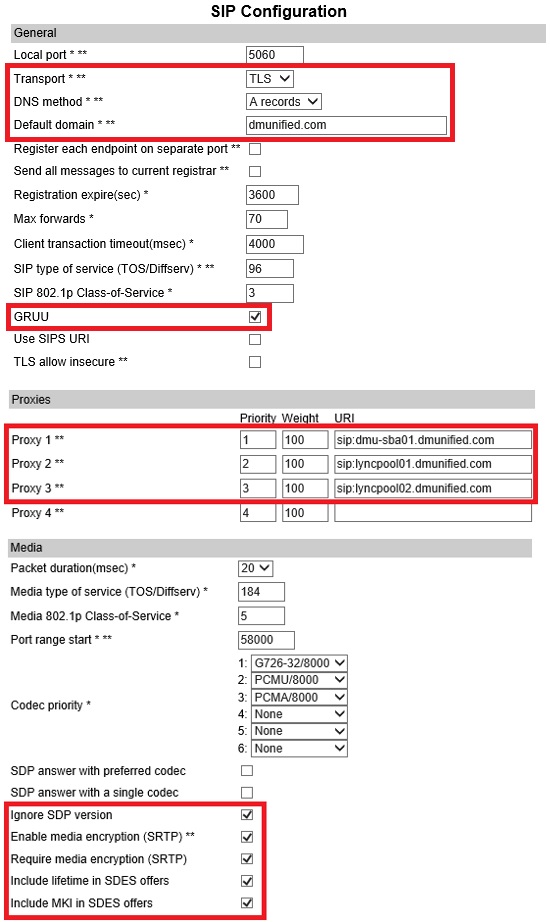
Note: In my lab, I have two Front End pools and an SBA. A single entry for proxies is fine.
Save and Reboot
Configure Lync User/Handset Registration
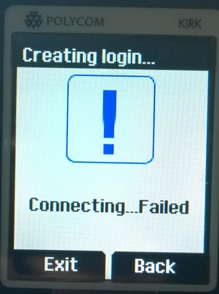
At this point, if you try to register the handset against the Spectralink server, it will fail:
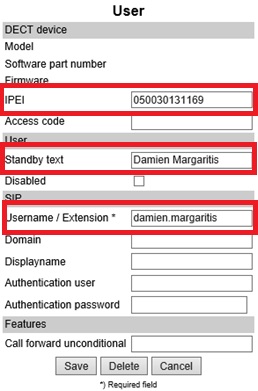
For this to work, you first need to enter in the phones IPEI number from the Spectralink Web GUI, along with the Lync user’s SIP prefix.
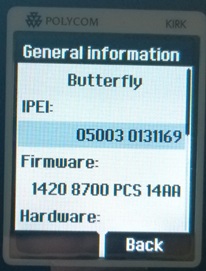
From the Spectralink handset, go to Menu > Settings > Status > General Information, and note down the IPEI Number
Open the Spectralink Web GUI to Users
Click on New
Enter in the IPEI number of the handset, the standby text you want displayed for the user (optional), and the users SIP prefix in the Username/Extension field
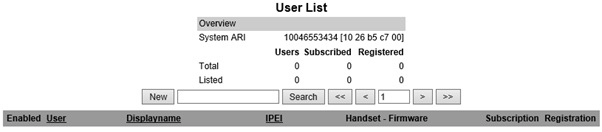
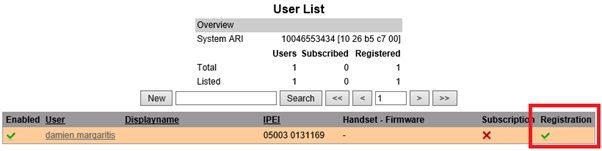
You should now have a successful registration against the Lync server
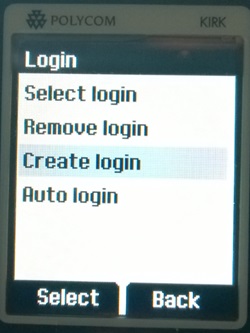
From the Spectralink DECT handset, go to Menu > Settings > Advanced > Login > Create Login
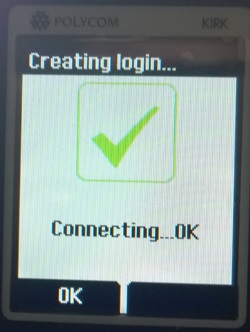
Select the Spectralink ARI number you want to register against (can be found on the base of the server or from the user list Web GUI). On the next page, click ok. You should now be connected:
From the Spectralink Web GUI, you should now have two ticks: one for Subscription from the DECT handset to the Spectralink server and one for the successful registration against the Lync server
Test Call
Now that we’ve completed the configuration, you should have no issue getting a call inbound/outbound from the DECT handset:
Known Limitations
For a list of known limitations when using the DECT handsets in a Lync environment, refer to Chapter 8 of theSpectralink IP-DECT Server 400 and 6500 and Microsoft Lync Server Configuration Guide. The limitation I found to be the most annoying when testing various call flows is the lack of Response Group call information for incoming Response Group calls (only the calling number is displayed).
I hope you have found this blog post useful. If you would like to know more about Lync and Spectralink, would like a demo or would like to talk more about a solution that’s right for you, feel free to get in touch: damien.margaritis@insynctechnology.com.au.
A little known fact about the Sonus SBC range of appliances (previously NET UX appliances) is that they have a VGA header hidden behind the front bezel. If your appliance has an Application Solution Module (ASM) as part of it’s configuration, this is used to get console access to the ASM. This is useful in situations where you have lost connectivity to the ASM from the Sonus Web GUI (a rare occurrence, but it happens from time to time).
What constitutes lost connectivity to the ASM?
When a Sonus SBC appliance is deployed with the ASM module, the appliance is usually connected to the network with a single Ethernet link (this does not always apply, particularly for SBC 2000 gateways, but for the sake of the point I’m making, it’s connected with a single Ethernet lead). The SBC or gateway component of the appliance and the ASM both share a common physical Ethernet connection, but they are two separate logical devices in one: they each have their own unique IP address. For those that aren’t familiar with the ASM, it’s basically a windows server that runs on hardware within the SBC 1000/2000 chassis, and is used in Lync deployments to support the Survivable Branch Appliance (SBA) role in branch office deployments. You can read more about what an SBA is here.
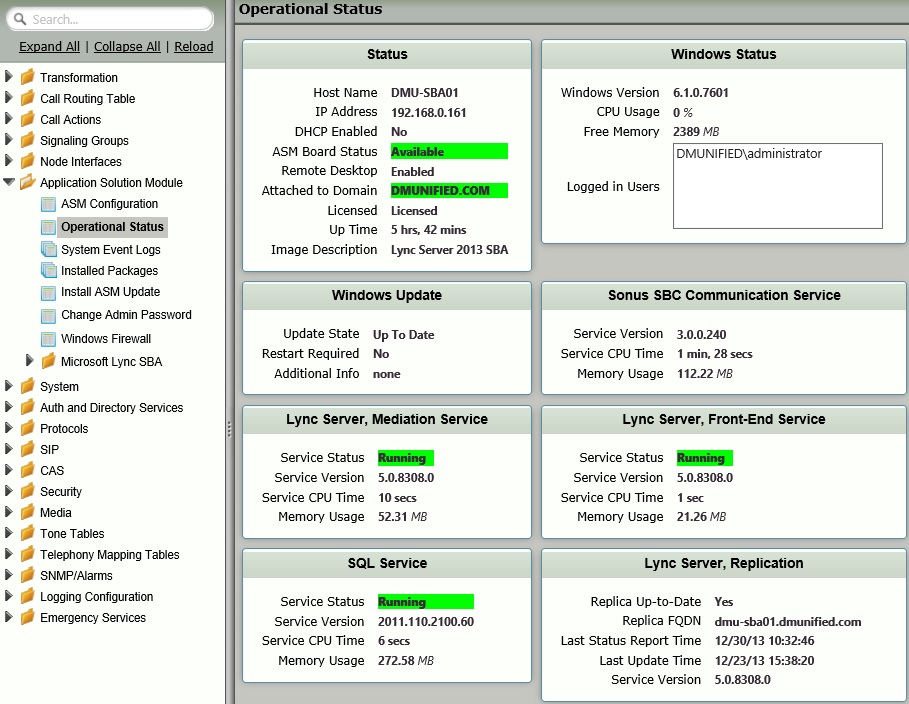
The ASM communicates with the Sonus SBC 1000/2000 system using the SBC Communication Service. It’s a windows service that runs on the ASM, shown below:
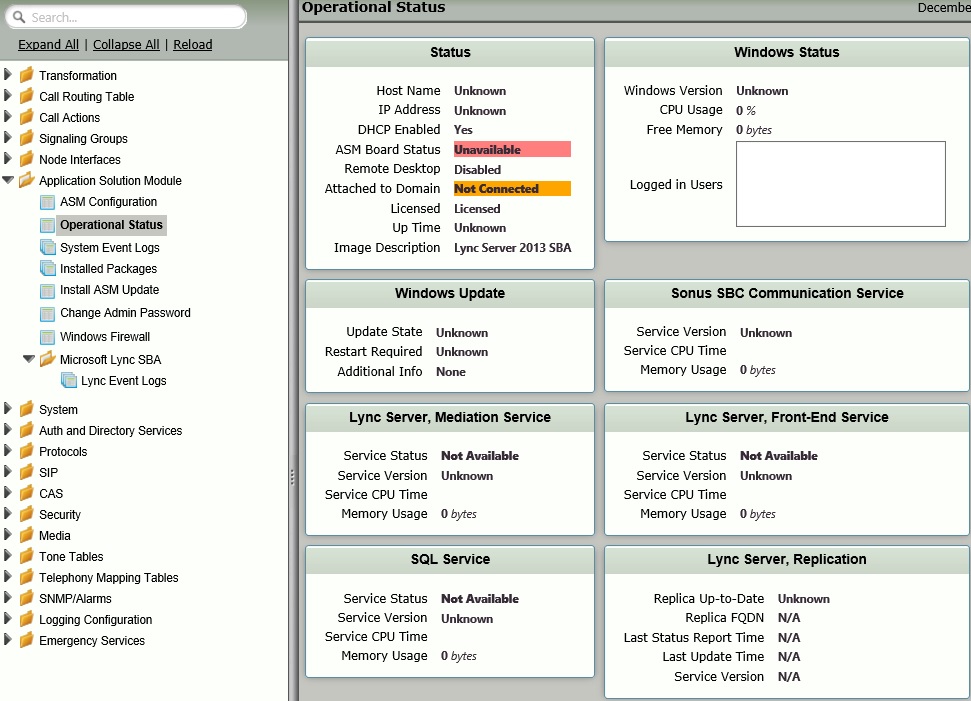
From the Sonus Web GUI, you can view the version of the SBC Communications service, and as long as the ASM Board Status is displaying as Available, all is well in the world:
If however, your ASM display a board status of Unavailable, and no amount of rebooting brings it back, That’s when you’re in trouble. Here’s what issues with connectivity to the ASM looks like:
Usually when this occurs, and assuming there isn’t a hardware failure, you are left with one option: rebuild the ASM image using a USB recovery drive. At a high level, this process involves the following:
Power down the appliance
Insert specially prepared USB recovery drive
Power up the appliance
Twiddle your thumbs for around 40 minutes, remove the USB recovery drive and reboot
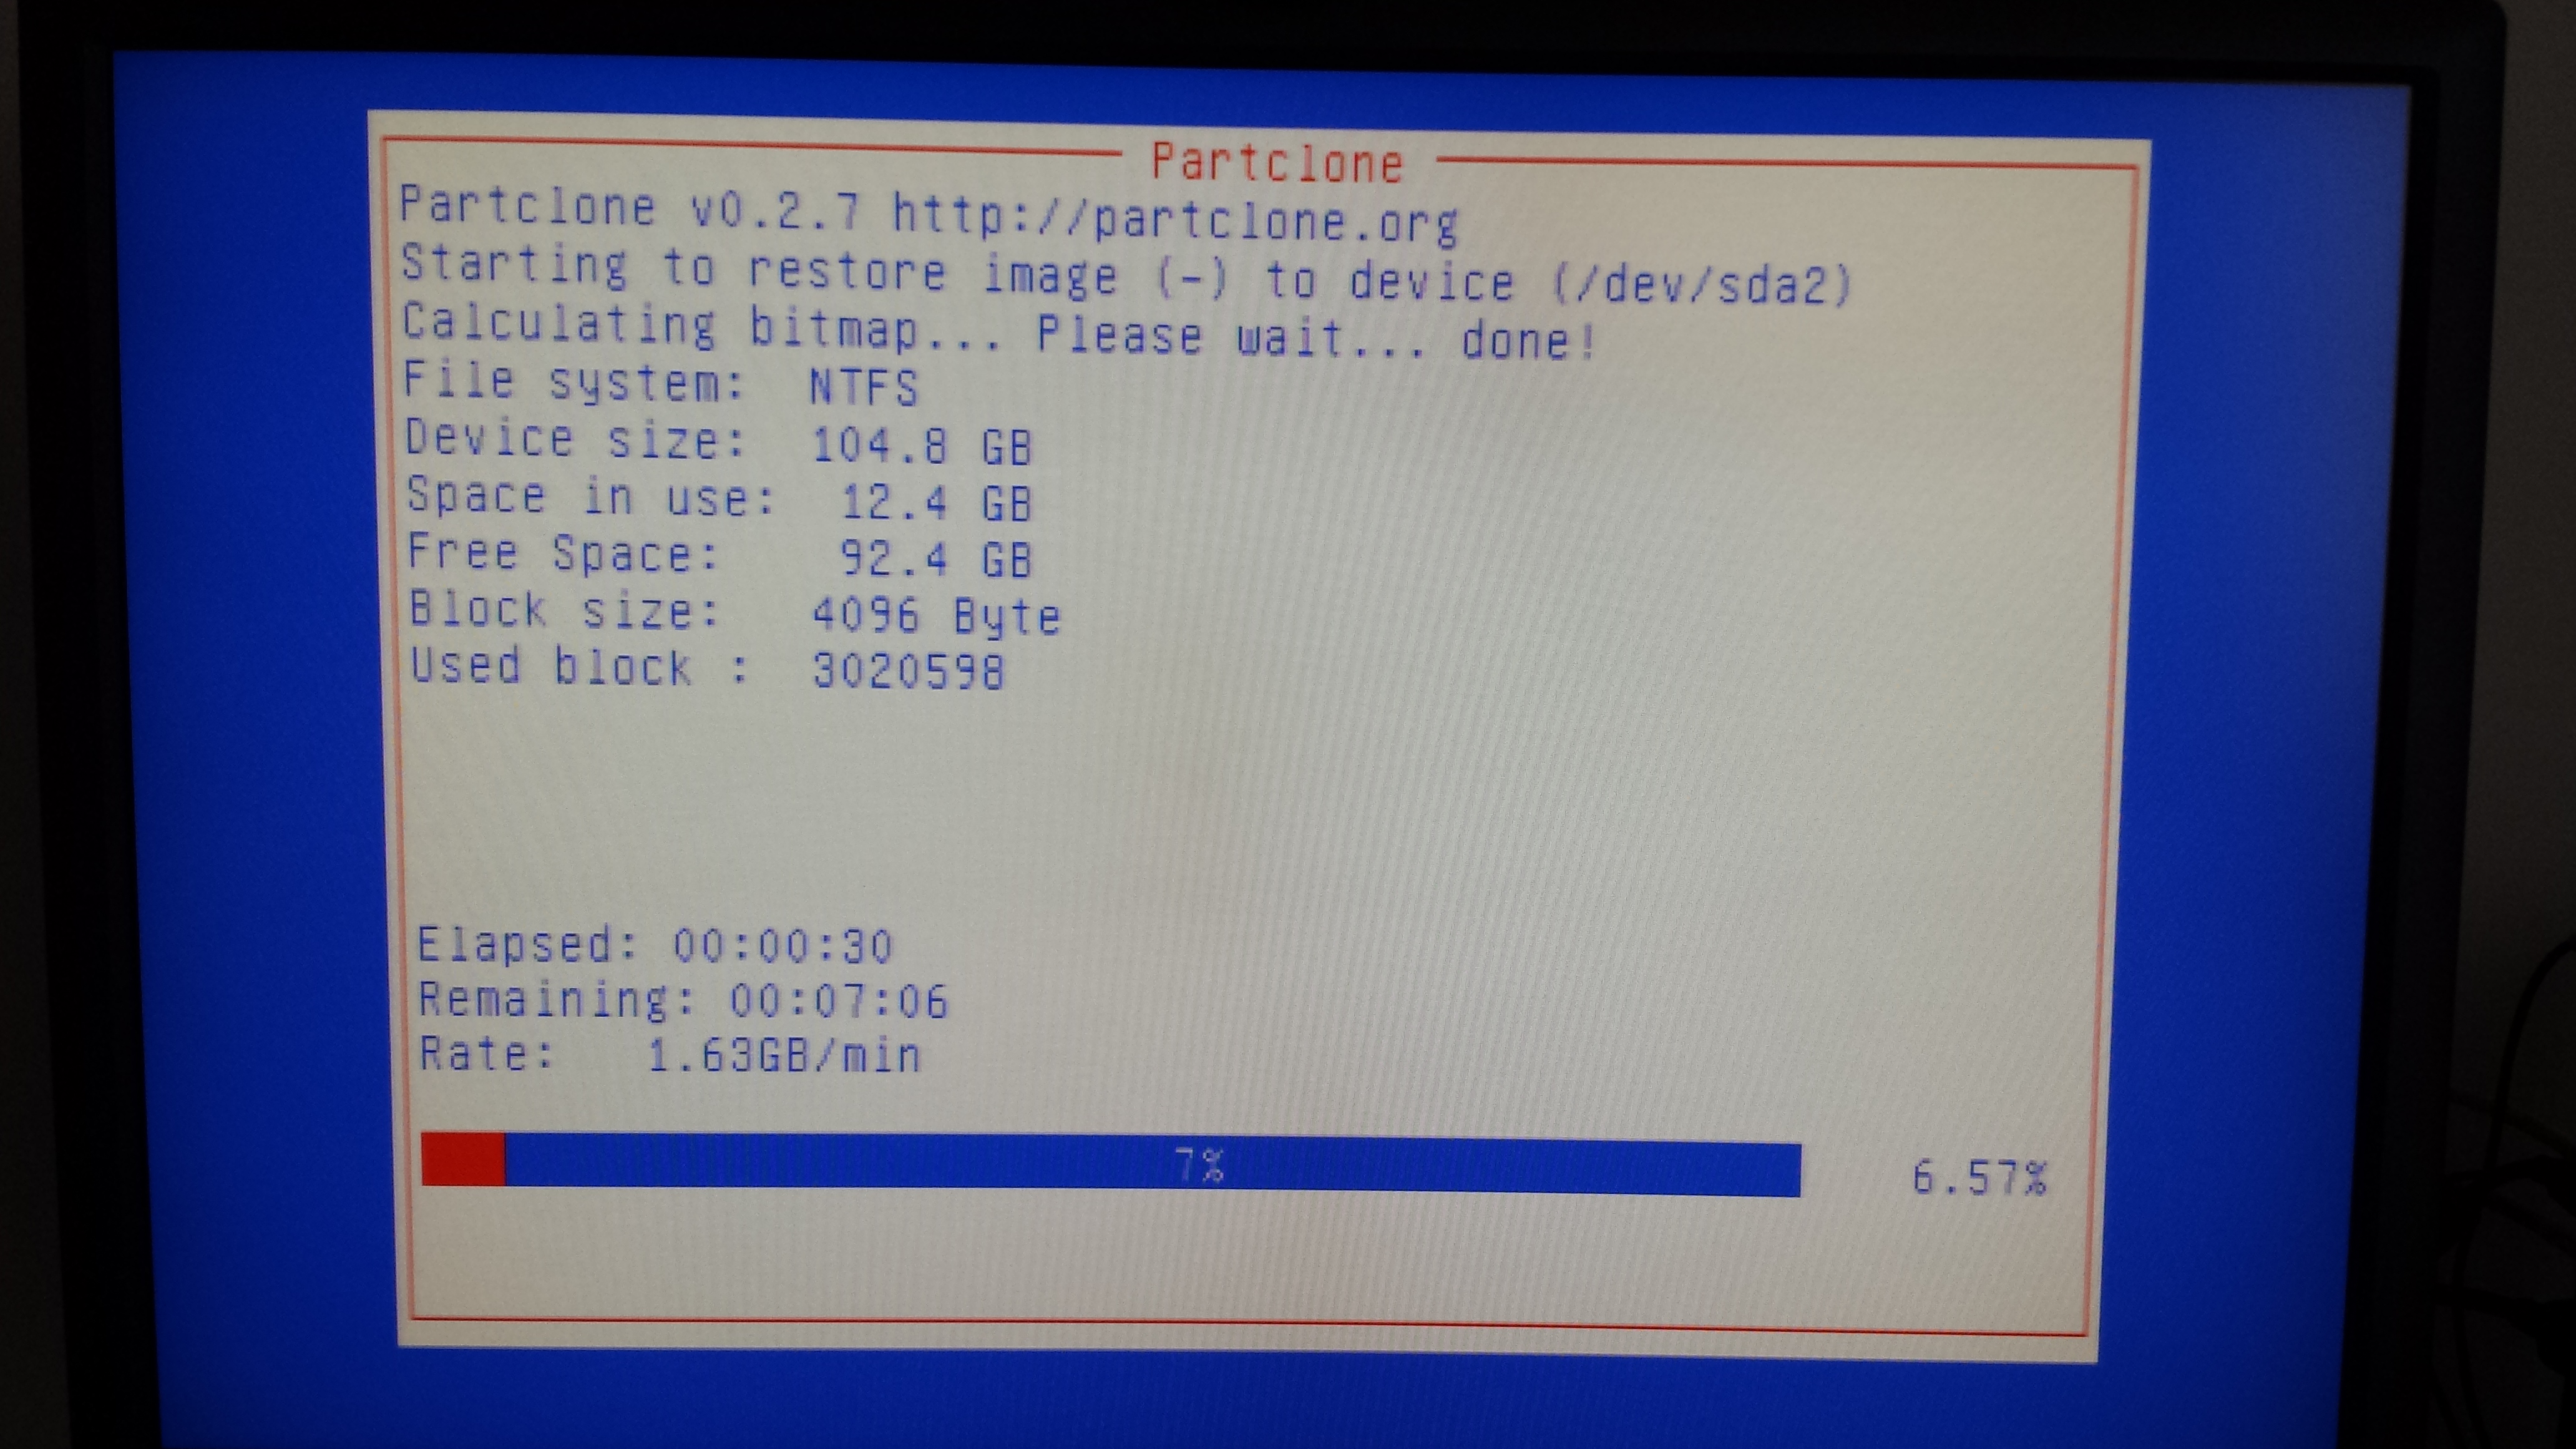
After this process is complete, the ASM board status should now display as available, and you can get on with rebuilding the ASM. The problem is, during that 40 minutes, you have no way of knowing what’s going on. Unless of course you have access to the console.
Accessing the console VGA port
UPDATE: The VGA adapter is only available to select Sonus partners. If this isn’t you, the recovery process is the same regardless of whether or not you have access to the console. Look out for a future blog from me in which I will go through the recovery process in more detail. The process is the same regardless of whether or not you have console access to the ASM.
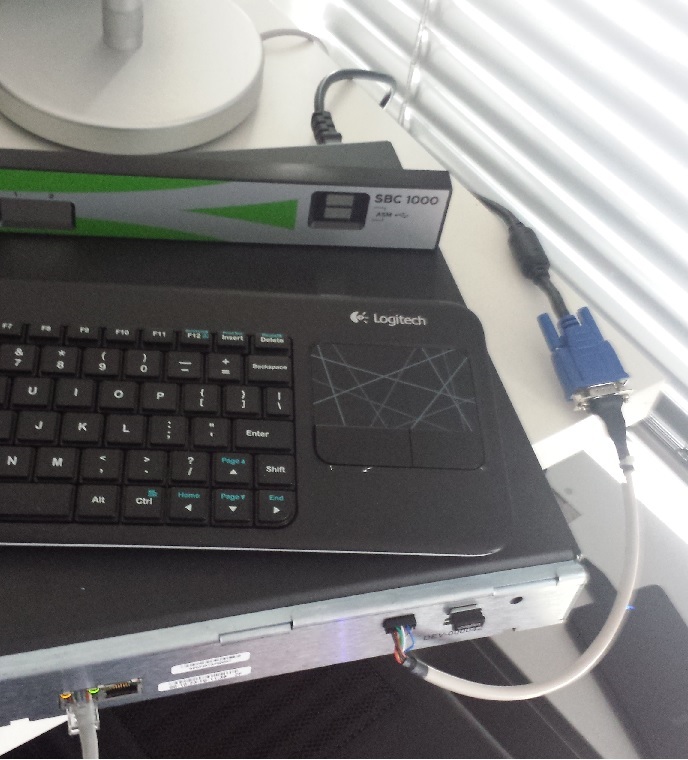
To access the console, remove the bezel from the front of the appliance. There you will see a header near the ASM USB ports. To connect to this, you’ll need a VGA adapter lead, available from your Sonus distributor. You can also plug a USB keyboard/mouse into one of the ASM USB ports:
Here’s a sample screenshot, showing the kind of information that can be seen when the ASM is rebuilding, letting you know you’re not wasting your time: